HAProxy安装

介绍HAProxy的基础安装以及基础配置

官方帮助手册:https://docs.haproxy.org/

2

内网IP地址划分

1
2
3
4
5
#外部网段
192.168.10.0/24

#内部网段
10.0.0.0/24

Ubuntu包安装

1
https://haproxy.debian.net/#distribution=Ubuntu&release=noble&version=3.0
1
2
3
4
# apt-get install --no-install-recommends software-properties-common
# add-apt-repository ppa:vbernat/haproxy-3.0

# apt-get install haproxy=3.0.\*

Rocky编译安装

CentOS 基础环境

1
https://www.lua.org/start.html

lua版本太低,不能编译安装

3

1
2
3
4
5
6
7
8
9
[root@rocky8 ~]# yum install gcc readline-devel -y
[root@rocky8 ~]# curl -L -R -O https://www.lua.org/ftp/lua-5.4.7.tar.gz
[root@rocky8 ~]# tar zxf lua-5.4.7.tar.gz
[root@rocky8 ~]# cd lua-5.4.7/
[root@rocky8 lua-5.4.7]# make all test

[root@rocky8 ~]# cd lua-5.4.7/src/
[root@rocky8 src]# ./lua -v
Lua 5.4.7 Copyright (C) 1994-2024 Lua.org, PUC-Rio

Ubuntu 基础环境

1
2
3
4
5
6
apt install gcc make libssl-dev libpcre3 libpcre3-dev zlib1g-dev libreadline-dev libsystemd-dev

wget https://www.lua.org/ftp/lua-5.4.7.tar.gz
tar zxf lua-5.4.7.tar.gz
cd lua-5.4.7/
make all test

编译安装 HAProxy

1
2
3
4
5
6
7
8
9
10
11
12
13
14
15
16
17
18
19
20
21
22
23
24
25
26
27
28
29
30
31
32
33
34
35
36
37
38
39
40
41
42
43
44
45
46
47
48
49
50
51
52
53
54
55
56
57
58
59
60
61
62
63
64
65
66
67
68
69
70
71
72
73
74
75
76
77
78
79
80
81
82
83
84
85
86
87
88
89
90
91
92
93
94
95
96
97
98
99
100
101
102
103
104
105
106
107
108
109
110
111
112
113
114
115
116
117
118
119
120
121
122
123
124
125
126
127
128
129
130
131
132
133
134
135
136
137
138
139
140
141
142
143
yum install -y wget gcc readline-devel libtermcap-devel ncurses-devel libevent-devel
yum install -y openssl-devel pcre-devel systemd-devel gcc gcc-c++ glibc glibc-devel
yum install -y pcre pcre-devel openssl openssl-devel systemd-devel make

cd /usr/local/src && wget https://www.haproxy.org/download/1.9/src/haproxy-1.9.16.tar.gz

useradd -s /sbin/nologin haproxy

tar xf haproxy-1.9.16.tar.gz && cd haproxy-1.9.16

make -j 4 ARCH=x86_64 TARGET=linux2628 USE_PCRE=1 USE_OPENSSL=1 USE_ZLIB=1 USE_SYSTEMD=1 USE_CPU_AFFINITY=1 PREFIX=/usr/local/haproxy -s

make install PREFIX=/usr/local/haproxy -s

ln -s /usr/local/haproxy/sbin/haproxy /usr/local/bin/haproxy

mkdir /etc/haproxy/conf.d/ -p
sysctl -w net.ipv4.ip_nonlocal_bind=1
echo "sysctl -w net.ipv4.ip_nonlocal_bind=1" > /etc/rc.d/rc.local
chmod +x /etc/rc.d/rc.local

cat > /usr/lib/systemd/system/haproxy.service <<-EOF
[Unit]
Description=HAProxy Load Balancer
After=syslog.target network.target

[Service]
ExecStartPre=/usr/local/bin/haproxy -f /etc/haproxy/haproxy.cfg -f /etc/haproxy/conf.d/ -c -q
ExecStart=/usr/local/bin/haproxy -Ws -f /etc/haproxy/haproxy.cfg -f /etc/haproxy/conf.d/ -p /var/lib/haproxy/haproxy.pid
ExecReload=/bin/kill -USR2 \$MAINPID
LimitNOFILE=100000

[Install]
WantedBy=multi-user.target
EOF

cat > /etc/haproxy/haproxy.cfg <<-EOF
global
maxconn 100000
chroot /usr/local/haproxy
stats socket /var/lib/haproxy/haproxy.sock mode 600 level admin
#uid 99
#gid 99
user haproxy
group haproxy
daemon

#nbproc 4
#cpu-map 1 0
#cpu-map 2 1
#cpu-map 3 2
#cpu-map 4 3
pidfile /var/lib/haproxy/haproxy.pid
log 127.0.0.1 local2 info

defaults
option http-keep-alive
option forwardfor
maxconn 100000
mode http
timeout connect 300000ms
timeout client 300000ms
timeout server 300000ms


listen stats
mode http
bind 0.0.0.0:9999
stats enable
log global
#stats refresh 10
stats realm HAProxy\
stats uri /status
stats auth admin:000000

#listen web_port
#bind 10.0.0.10:80
#mode tcp
#log global
#server web1 127.0.0.1:8080 check inter 3000 fall 2 rise5
EOF

mkdir /var/lib/haproxy &> /dev/null
chown haproxy:haproxy /var/lib/haproxy/ -R &> /dev/null
systemctl start haproxy
systemctl enable haproxy

ss -ntlp|grep -wq 9999

# HAProxy状态页:http://localhost:9999/status
# 用户名/密码:admin:000000

[root@rocky8 ~]# haproxy -v
HA-Proxy version 1.9.16 2020/07/31 - https://haproxy.org/
No more fixes for branch 1.9 past this version, please upgrade to branch 2.0!

[root@rocky8 ~]# haproxy -vv
HA-Proxy version 1.9.16 2020/07/31 - https://haproxy.org/
No more fixes for branch 1.9 past this version, please upgrade to branch 2.0!
Build options :
TARGET = linux2628
CPU = generic
CC = gcc
CFLAGS = -m64 -march=x86-64 -O2 -g -fno-strict-aliasing -Wdeclaration-after-statement -fwrapv -Wno-unused-label -Wno-sign-compare -Wno-unused-parameter -Wno-old-style-declaration -Wno-ignored-qualifiers -Wno-clobbered -Wno-missing-field-initializers -Wno-implicit-fallthrough -Wno-stringop-overflow -Wno-cast-function-type -Wtype-limits -Wshift-negative-value -Wshift-overflow=2 -Wduplicated-cond -Wnull-dereference
OPTIONS = USE_ZLIB=1 USE_CPU_AFFINITY=1 USE_OPENSSL=1 USE_SYSTEMD=1 USE_PCRE=1

Default settings :
maxconn = 2000, bufsize = 16384, maxrewrite = 1024, maxpollevents = 200

Built with OpenSSL version : OpenSSL 1.1.1k FIPS 25 Mar 2021
Running on OpenSSL version : OpenSSL 1.1.1k FIPS 25 Mar 2021
OpenSSL library supports TLS extensions : yes
OpenSSL library supports SNI : yes
OpenSSL library supports : TLSv1.0 TLSv1.1 TLSv1.2 TLSv1.3
Built with transparent proxy support using: IP_TRANSPARENT IPV6_TRANSPARENT IP_FREEBIND
Built with zlib version : 1.2.11
Running on zlib version : 1.2.11
Compression algorithms supported : identity("identity"), deflate("deflate"), raw-deflate("deflate"), gzip("gzip")
Built with PCRE version : 8.42 2018-03-20
Running on PCRE version : 8.42 2018-03-20
PCRE library supports JIT : no (USE_PCRE_JIT not set)
Encrypted password support via crypt(3): yes
Built with multi-threading support.

Available polling systems :
epoll : pref=300, test result OK
poll : pref=200, test result OK
select : pref=150, test result OK
Total: 3 (3 usable), will use epoll.

Available multiplexer protocols :
(protocols marked as <default> cannot be specified using 'proto' keyword)
h2 : mode=HTX side=FE|BE
h2 : mode=HTTP side=FE
<default> : mode=HTX side=FE|BE
<default> : mode=TCP|HTTP side=FE|BE

Available filters :
[SPOE] spoe
[COMP] compression
[CACHE] cache
[TRACE] trace

Docker 安装

1
2
3
4
docker run -d --name my-running-haproxy \
-v /etc/haproxy/haproxy.cfg:/usr/local/etc/haproxy/haproxy.cfg:ro \
-p 9999:9999 --sysctl net.ipv4.ip_unprivileged_port_start=0 \
haproxy:2.6.0-alpine3.16

HAProxy 基础配置

HAProxy 的配置文件 haproxy.cfg 由两大部分组成,分别是 global 和 proxies 部分

  • global:全局配置段
1
2
3
进程及安全配置相关的参数
性能调整相关参数
Debug参数
  • proxies:代理配置段
1
2
3
4
defaults: 为frontend, backend, listen提供默认配置
frontend: 前端,相当于nginx中的server {}
backend: 后端,相当于ngingx中的upstream {}
listen: 同时拥有前端和后端配置,配置简单,生产推荐使用

Global配置

1
2
3
4
5
6
7
8
9
10
11
12
13
14
15
16
17
18
19
20
21
22
global
chroot /apps/haproxy # 指定根运行目录
stats socket /var/lib/haproxy/haproxy.sock mode 600 level admin process 1 # Socket文件(管理权限)
user haproxy # 运行用户
group haproxy # 运行用户组
#uid 99 # 用户ID(可选)
#gid 99 # 用户组ID(可选)
daemon # 以守护进程模式运行

#nbproc 4 # Worker进程数(默认1,多进程需谨慎)2.5版本不再支持
nbthread 4 # 线程数 默认1
#cpu-map 1 0 # 绑定第1个Worker进程到0号CPU
#cpu-map 2 1 # 绑定第2个Worker进程到1号CPU
cpu-map auto:1/1-8 0-7 # 线程与CPU绑定(每个进程1-8线程绑定0-7号CPU)

maxconn 100000 # 单进程最大并发连接数
maxconnrate 100 # 每秒最大新建连接数(证书场景适用)
maxsessrate 100 # 每秒最大会话数
maxsslconn 100 # 最大SSL连接数
spread-checks 2 # 状态检查延迟分散(0-50%,建议2-5)
pidfile /var/lib/haproxy/haproxy.pid # PID文件路径
log 127.0.0.1 local2 info #日志发送到本地syslog(local2设备,info级别)

多线程绑定CPU

1
2
3
4
5
6
7
8
9
10
11
12
13
14
15
16
17
18
19
[root@rocky8 ~]# vim /etc/haproxy/haproxy.cfg 
vim /etc/haproxy/haproxy.cfg
nbthread 4
cpu-map auto:1/1-4 0-3


[root@rocky8 ~]# pstree -p
├─haproxy(4830)───haproxy(4831)─┬─{haproxy}(4832)
│ ├─{haproxy}(4833)
│ └─{haproxy}(4834)


[root@rocky8 ~]# ps axo pid,cmd,psr -L | grep haproxy
4845 /usr/local/bin/haproxy -Ws 3
4846 /usr/local/bin/haproxy -Ws 0
4846 /usr/local/bin/haproxy -Ws 1
4846 /usr/local/bin/haproxy -Ws 2
4846 /usr/local/bin/haproxy -Ws 3
4853 grep --color=auto haproxy 0

日志配置

  • 不建议开启HAProxy日志,会增加HAProxy压力

HAProxy配置

1
2
3
4
5
6
7
8
9
10
# global配置定义
log 127.0.0.1 local{1-7} info # 基于syslog记录日志到指定设备,级别包括err、warning、info、debug

listen web_port
bind 127.0.0.1:80
mode http
log global
server web1 127.0.0.1:8080 check inter 3000 fall 2 rise 5

# systemctl restart haproxy

Rsyslog配置

1
2
3
4
5
6
7
8
9
10
yum install rsyslog -y

vim /etc/rsyslog.conf
module(load="imudp")
input(type="imudp" port="514")
......
local3.* /var/log/haproxy.log
......

# systemctl restart rsyslog

Proxies 配置

default

1
2
3
4
5
6
7
8
9
10
11
option redispatch        #当server Id对应的服务器挂掉后,强制定向到其他健康的服务器,重新派发
option abortonclose #当服务器负载很高时,自动结束掉当前队列处理比较久的连接,针对业务情况选择开启
option http-keep-alive #开启与客户端的会话保持
option forwardfor #传递客户端真实IP至后端web服务器
mode http|tcp #设置默认工作类型,使用TCP服务器性能更好,减少压力
timeout http-keep-alive 120s #session 会话保持超时时间,此时间段内会转发到相同的后端服务器
timeout connect 120s #客户端请求从haproxy到后端server最长连接等待时间(TCP连接之前),默认单位ms
timeout server 600s #客户端请求从haproxy到后端服务端的请求处理超时时间长(TCP连接之后),默认单位ms,如果超时,会出现502错误,此值建议设置较大些,防止出现502错误
timeout client 600s #设置haproxy与客户端的最长非活动时间,默认单位ms,建议和timeout server相同
timeout check 5s #对后端服务器的健康检测超时时间
default-server inter 1000 weight 3 #指定后端服务器的默认设置

listen

使用listen替换frontend和backend的配置方式,可以简化设置,常用于TCP协议的应用

1
2
3
4
5
6
7
8
9
10
11
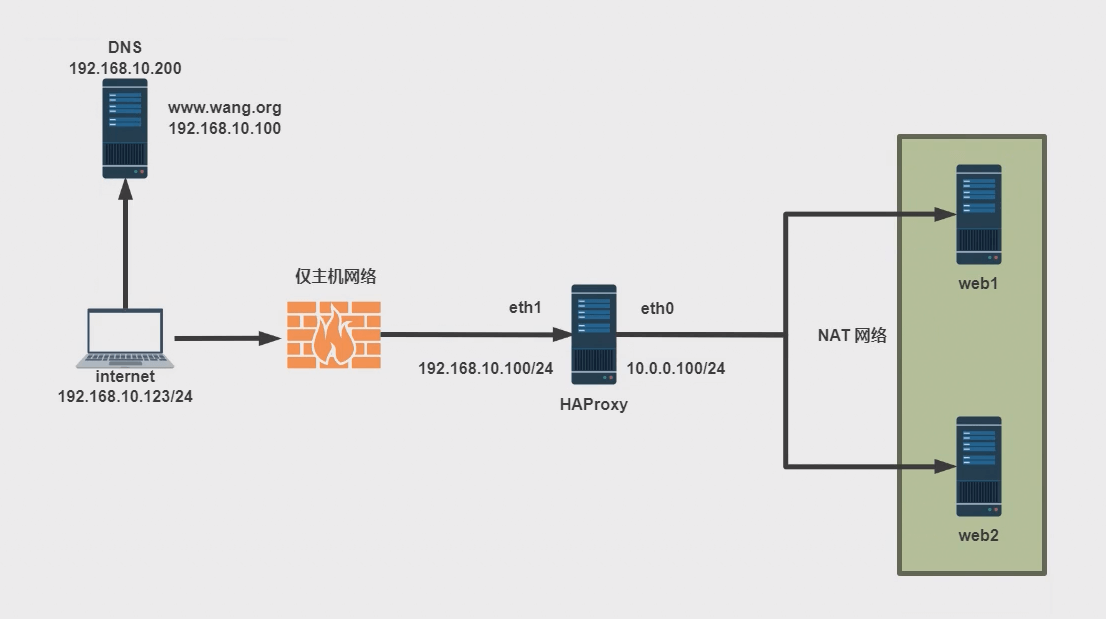
#官网业务访问入口
listen WEB_PORT_80
bind 192.168.10.100:80
mode http
option forwardfor
server web1 10.0.0.17:8080 check inter 3000 fall 3 rise 5
server web2 10.0.0.27:8080 check inter 3000 fall 3 rise 5

#检查语法
[root@ubuntu2004 ~]# haproxy -c -f /etc/haproxy/haproxy.cfg
Configuration file is valid

frontend

1
2
3
4
5
6
7
8
bind: # 指定HAProxy的监听地址,可以是IPV4或者IPV6,可以同时监听多个IP或端口,可同时用于listen字段中

# 格式:
bind [<address>]:<port_range> [, ...] [param*]

# 注意:如果需要绑定在非本机的IP,需要开启内核参数:net.ipv4.ip_nonlocal_bind=1

backlog <backlog> # 针对多有server配置,当前端服务器的连接数达到上限后的后援队列长度,注意,不支持backend

范例:

1
2
3
4
5
6
7
8
9
10
11
12
13
14
15
16
frontend http_proxy
bind :80,:443,:8801-8810 #监听http的多个IP的多个端口和sock文件
bind 10.0.0.1:10080,10.0.0.1:10443
bind /var/run/ssl-frontend.sock user root mode 600 accept-proxy

frontend http_https_proxy
bind :80 #https监听
bind :443 ssl crt /etc/haproxy/site.pem #公钥和私钥公共文件

frontend http_https_proxy_explicit
bind ipv6@:80 #监听ipv6、ipv4和unix sock文件
bind ipv4@public_ssl:443 ssl crt /etc/haproxy/site.pem
bind unix@ssl-frontend.sock user root mode 600 accept-proxy

listen external_bind_app1
bind "fd@$${FD_APP1}" #监听file descriptor

生产示例:

1
2
3
4
5
frontend wang_web_port
bind :80,:8080 #建议采用后面形式命名:业务+服务+端口号
bind 10.0.0.7:10080,:8501-8810,10.0.0.17:9001-9010
mode http/tcp #指定负载协议类型
use_backend <backend_name> #调用的后端服务器组名称

backend

定义一组后端服务器,backend服务器将被frontend进行调用。

注意: backend 的名称必须唯一,并且必须在listen或frontend中事先定义才可以使用,否则服务无法启动

1
2
3
mode http|tcp  #指定负载协议类型,和对应的frontend必须一致
option #配置选项
server #定义后端real server,必须指定IP和端口

注意:option后面加httpchk, smtpchk, mysql-check, pgsql-check, ssl-hello-chk方法,可用于实现更多应用层检测功能。

server 配置

1
2
3
4
5
6
7
8
9
10
11
12
13
#针对一个server配置
check #对指定real进行健康状态检查,如果不加此设置,默认不开启检查,只有check后面没有其它配置也可以启用检查功能
#默认对相应的后端服务器IP和端口,利用TCP连接进行周期性健康性检查,注意必须指定端口才能实现健康性检查
addr <IP> #可指定的健康状态监测IP,可以是专门的数据网段,减少业务网络的流量
port <num> #指定的健康状态监测端口
inter <num> #健康状态检查间隔时间,默认2000 ms
fall <num> #后端服务器从线上转为线下的检查的连续失效次数,默认为3
rise <num> #后端服务器从线下恢复上线的检查的连续有效次数,默认为2
weight <weight> #默认为1,最大值为256,0(状态为蓝色)表示不参与负载均衡,但仍接受持久连接
backup #将后端服务器标记为备份状态,只在所有非备份主机down机时提供服务,类似Sorry Server
disabled #将后端服务器标记为不可用状态,即维护状态,除了持久模式,将不再接受连接,状态为深黄色,优雅下线,不再接受新用户的请求
maxconn <maxconn> #当前后端server的最大并发连接数,放在,在server 指令后面
redir http://www.baidu.com #将请求临时(302)重定向至其它URL,只适用于http模式,放在server 指令后面

redirect 配置

1
2
# 注意: 此指令和redir功能相似,但不属于server指令后面,是独立存放在listen, frontend, backend语句块
redirect prefix http://www.baidu.com/ # 将请求临时(302)重定向至其它URL,只适用于http模式

frontend+backend案例

1
2
3
4
5
6
7
8
9
10
11
12
# 官网业务访问入口

frontend web_http_80
bind 10.0.0.7:80
mode http
use_backend web_http_nodes

backend web_http_nodes
mode http
option forwardfor
server 10.0.0.17 10.0.0.17:8080 check inter 3000 fall 3 rise 5
server 10.0.0.27 10.0.0.27:8080 check inter 3000 fall 3 rise 5

使用 HAProxy 子配置文件

当业务众多时,将所有配置都放在一个配置文件中,会造成维护困难。
可以考虑按业务分类,将配置信息拆分,放在不同的子配置文件中,从而达到方便维护的目的。

注意: 子配置文件的文件后缀必须为.cfg

1
2
3
4
5
6
7
8
9
10
11
12
13
14
15
16
17
18
19
20
21
22
23
24
25
26
27
28
29
# 创建子配置目录
[root@centos7 ~]# mkdir /etc/haproxy/conf.d/

# 添加子配置目录到unit文件中
[root@centos7 ~]# vim /lib/systemd/system/haproxy.service
[Unit]
Description=HAProxy Load Balancer
After=syslog.target network.target

[Service]
# 修改下面两行
ExecStartPre=/usr/sbin/haproxy -f /etc/haproxy/haproxy.cfg -f /etc/haproxy/conf.d/*.cfg -c -q
ExecStart=/usr/sbin/haproxy -Ws -f /etc/haproxy/haproxy.cfg -f /etc/haproxy/conf.d/*.cfg -p /var/lib/haproxy/haproxy.pid
ExecReload=/bin/kill -USR2 $MAINPID

[Install]
WantedBy=multi-user.target

# 创建子配置文件,注意:必须为cfg后缀非.开头的配置文件
[root@centos7 ~]# vim /etc/haproxy/conf.d/test.cfg
listen WEB_PORT_80
bind 10.0.0.7:80
mode http
balance roundrobin
server web1 10.0.0.17:80 check inter 3000 fall 2 rise 5
server web2 10.0.0.27:80 check inter 3000 fall 2 rise 5

[root@centos7 ~]# systemctl daemon-reload
[root@centos7 ~]# systemctl restart haproxy

HAProxy 调度算法

HAProxy通过固定参数 balance 指明对后端服务器的调度算法,该参数可以配置在listen或backend选项中。

HAProxy的调度算法分为静态和动态调度算法,但是有些算法可以根据参数在静态和动态算法中相互转换。

官方文档: http://cbonte.github.io/haproxy-dconv/2.4/configuration.html#4-balance

静态算法

静态算法:按照事先定义好的规则轮询进行调度,不关心后端服务器的当前负载、连接数和响应速度等,且无法实时动态修改权重(只能为0和1,不支持其它值)或者修改后不生效,如果需要修改只能靠重启HAProxy生效。

Socat 工具

对服务器动态权重和其它状态可以利用socat工具进行调整。Socat是Linux下的一个多能的网络工具,名字来由是Socket CAT,相当于netCAT的增强版。Socat的主要特点就是在两个数据流之间建立双向通道,且支持众多协议和链接方式。如IP、TCP、UDP、IPv6、Socket文件等。

范例:利用工具socat 对服务器动态权重调整

1
2
3
4
5
6
7
8
9
10
11
12
13
14
15
16
17
18
19
20
21
22
23
24
25
26
27
28
29
30
31
32
33
34
35
36
37
38
39
40
41
42
43
44
45
46
47
48
49
50
51
52
53
54
55
56
57
58
59
60
61
62
63
64
65
66
67
68
69
70
71
72
73
74
75
76
77
78
79
80
81
82
83
84
85
86
87
88
89
90
91
92
93
94
95
96
97
98
99
100
101
102
103
104
105
106
107
108
109
110
111
112
113
114
115
116
117
118
#安装socat
[root@rocky8 ~]# yum install socat -y
[root@ubuntu1804 ~]# apt install socat -y

#查看帮助
[root@rocky8 ~]# socat -h
[root@rocky8 ~]# echo "help" | socat stdio /var/lib/haproxy/haproxy.sock
Unknown command. Please enter one of the following commands only :
help : this message
prompt : toggle interactive mode with prompt
quit : disconnect
show tls-keys [id|*]: show tls keys references or dump tls ticket keys when id specified
set ssl tls-key [id|keyfile] <tlskey>: set the next TLS key for the <id> or <keyfile> listener to <tlskey>
show sess [id] : report the list of current sessions or dump this session
shutdown session : kill a specific session
shutdown sessions server : kill sessions on a server
clear counters : clear max statistics counters (add 'all' for all counters)
show info : report information about the running process [json|typed]
show stat : report counters for each proxy and server [json|typed]
show schema json : report schema used for stats
disable agent : disable agent checks (use 'set server' instead)
disable health : disable health checks (use 'set server' instead)
disable server : disable a server for maintenance (use 'set server' instead)
enable agent : enable agent checks (use 'set server' instead)
enable health : enable health checks (use 'set server' instead)
enable server : enable a disabled server (use 'set server' instead)
set maxconn server : change a server's maxconn setting
set server : change a server's state, weight or address
get weight : report a server's current weight
set weight : change a server's weight (deprecated)
show resolvers [id]: dumps counters from all resolvers section and
associated name servers
clear table : remove an entry from a table
set table [id] : update or create a table entry's data
show table [id]: report table usage stats or dump this table's contents
show peers [peers section]: dump some information about all the peers or this peers section
disable frontend : temporarily disable specific frontend
enable frontend : re-enable specific frontend
set maxconn frontend : change a frontend's maxconn setting
show servers state [id]: dump volatile server information (for backend <id>)
show backend : list backends in the current running config
shutdown frontend : stop a specific frontend
set dynamic-cookie-key backend : change a backend secret key for dynamic cookies
enable dynamic-cookie backend : enable dynamic cookies on a specific backend
disable dynamic-cookie backend : disable dynamic cookies on a specific backend
show errors : report last request and response errors for each proxy
set maxconn global : change the per-process maxconn setting
set rate-limit : change a rate limiting value
set severity-output [none|number|string] : set presence of severity level in feedback information
set timeout : change a timeout setting
show env [var] : dump environment variables known to the process
show cli sockets : dump list of cli sockets
show cli level : display the level of the current CLI session
show fd [num] : dump list of file descriptors in use
show activity : show per-thread activity stats (for support/developers)
operator : lower the level of the current CLI session to operator
user : lower the level of the current CLI session to user
show startup-logs : report logs emitted during HAProxy startup
show cache : show cache status
add acl : add acl entry
clear acl <id> : clear the content of this acl
del acl : delete acl entry
get acl : report the patterns matching a sample for an ACL
show acl [id] : report available acls or dump an acl's contents
add map : add map entry
clear map <id> : clear the content of this map
del map : delete map entry
get map : report the keys and values matching a sample for a map
set map : modify map entry
show map [id] : report available maps or dump a map's contents
show pools : report information about the memory pools usage
show profiling : show CPU profiling options
set profiling : enable/disable CPU profiling


[root@centos7 ~]# echo "get weight wang-test-80/web2" | socat stdio /var/lib/haproxy/haproxy.sock
3 (initial 3)

# 修改weight,注意只针对单进程有效
[root@centos7 ~]# echo "set weight wang-test-80/web2 2" | socat stdio /var/lib/haproxy/haproxy.sock
[root@centos7 ~]# echo "get weight wang-test-80/web2" | socat stdio /var/lib/haproxy/haproxy.sock
2 (initial 3)

# 将后端服务器禁用,注意只针对单进程有效
[root@centos7 ~]# echo "disable server wang-test-80/web2" | socat stdio /var/lib/haproxy/haproxy.sock

# 启用后端服务器
[root@centos7 ~]# echo "enable server wang-test-80/web2" | socat stdio /var/lib/haproxy/haproxy.sock

# 将后端服务器软下线,即weight设为0
[root@centos7 ~]# echo "set weight wang-test-80/web1 0" | socat stdio /var/lib/haproxy/haproxy.sock

# 针对haproxy的多进程,将后端服务器禁用
[root@centos7 ~]# vim /etc/haproxy/haproxy.cfg
stats socket /var/lib/haproxy/haproxy1.sock mode 600 level admin process 1 #绑定第1个进程和socket文件
stats socket /var/lib/haproxy/haproxy2.sock mode 600 level admin process 2 #绑定第2个进程和socket文件
nbproc 2

[root@centos7 ~]# echo "disable server wang-test-80/web2" | socat stdio /var/lib/haproxy/haproxy1.sock
[root@centos7 ~]# echo "disable server wang-test-80/web2" | socat stdio /var/lib/haproxy/haproxy2.sock

[root@haproxy ~]# for i in {1..2}; do echo "set weight wang-test-80/web$i 10" | socat stdio /var/lib/haproxy/haproxy$i.sock; done
3311987957

# 如果静态算法,如:static-rr,可以更改weight为0或1,但不支持动态更改weight为其它值,否则会提示下面信息
[root@centos7 ~]# echo "set weight wang-test-80/web1 0" | socat stdio /var/lib/haproxy/haproxy.sock
[root@centos7 ~]# echo "set weight wang-test-80/web1 1" | socat stdio /var/lib/haproxy/haproxy.sock
[root@centos7 ~]# echo "set weight wang-test-80/web1 2" | socat stdio /var/lib/haproxy/haproxy.sock
Backend is using a static LB algorithm and only accepts weights '0%' and '100%'.

# 新的写法
# 相当于disable server
[root@ubuntu2004 ~]# echo "set server www.wang.org_nginx/web1 state maint" | socat stdio /var/lib/haproxy/haproxy.sock

# 相当于enable server
[root@ubuntu2004 ~]# echo "set server www.wang.org_nginx/web1 state ready" | socat stdio /var/lib/haproxy/haproxy.sock

[root@ubuntu2004 ~]# echo "set server www.wang.org_nginx/web1 state drain" | socat stdio /var/lib/haproxy/haproxy.sock

范例:上线和下线后段服务器脚本

1
2
3
4
5
6
7
8
9
10
11
12
13
14
15
#!/etc/init.d/functions

case $1 in
up)
echo "enable server wang-web-80/$2" | socat stdio /var/lib/haproxy/haproxy.sock
[ $? -eq 0 ] && action "$2 is up"
;;
down)
echo "disable server wang-web-80/$2" | socat stdio /var/lib/haproxy/haproxy.sock
[ $? -eq 0 ] && action "$2 is down"
;;
*)
echo "Usage: `basename $0` up|down IP"
;;
esac

范例:实现容器服务的上线和下线

1
2
3
4
5
6
7
8
9
10
11
12
13
14
15
#!/bin/bash

WEB_SERVERS="
10.0.0.101
10.0.0.102
"

for i in $WEB_SERVERS; do
echo "set server www.wang.org_nginx/$i state maint" | socat stdio /var/lib/haproxy/haproxy.sock
ssh $i docker rm -f nginx
ssh $i "echo DOCKER $i WEBSITE $1 > /data/www/index.html"
ssh $i docker run -d -p 80:80 -v /data/www:/usr/share/nginx/html --name nginx nginx
sleep 10
echo "set server www.wang.org_nginx/$i state ready" | socat stdio /var/lib/haproxy/haproxy.sock
done

static-rr 算法

static-rr: 基于权重的轮询调度,不支持运行时利用 socat 进行权重的动态调整(只支持0和1,不支持其它值)及后端服务器慢启动。其后端主机数量没有限制,相当于 LVS 中的 wrr。

1
2
3
4
5
6
7
listen web_host
bind 10.0.0.7:80,:8801-8810,10.0.0.7:9001-9010
mode http
log global
balance static-rr
server web1 10.0.0.17:80 weight 1 check inter 3000 fall 2 rise 5
server web2 10.0.0.27:80 weight 2 check inter 3000 fall 2 rise 5

范例:调整权重

1
2
3
4
5
6
7
8
[root@haproxy ~]# echo "set weight www.wang.org_nginx/10.0.0.101 0" | socat stdio /var/lib/haproxy/haproxy.sock
[root@haproxy ~]# echo "get weight www.wang.org_nginx/10.0.0.101" | socat stdio /var/lib/haproxy/haproxy.sock
0 (initial 3)

[root@haproxy ~]# echo "set weight www.wang.org_nginx/10.0.0.101 1" | socat stdio /var/lib/haproxy/haproxy.sock
Backend is using a static LB algorithm and only accepts weights '0%' and '100%'.

[root@haproxy ~]# echo "set weight www.wang.org_nginx/10.0.0.101 100%" | socat stdio /var/lib/haproxy/haproxy.sock

first 算法

first: 根据服务器在列表中的位置,自上而下进行调度,但是其只会当第一台服务器的连接数达到上限,新请求才会分配给下一台服务,因此会忽略服务器的权重设置,此方式使用较少。

不支持用 socat 进行动态修改权重,可以设置0和1,可以设置其它值但无效

1
2
3
4
5
6
7
listen web_host
bind 10.0.0.7:80,:8801-8810,10.0.0.7:9001-9010
mode http
log global
balance first
server web1 10.0.0.17:80 maxconn 2 weight 1 check inter 3000 fall 2 rise 5
server web2 10.0.0.27:80 weight 1 check inter 3000 fall 2 rise 5

测试访问效果

1
2
3
4
5
6
7
8
9
10
11
12
13
14
15
16
# 同时运行下面命令,观察结果
# 在后端服务器上限速
server {
listen 80 default_server;
listen [::]:80 default_server;
limit_rate 10;
}

# 用 wget 下载文件测试才能看到效果
wget --limit-rate 1k http://192.168.10.100/test.img

# curl 测试不成功
# while true; do curl http://10.0.0.7/index.html ; sleep 0.1; done

# 动态修改权重,不报错,但不生效
[root@haproxy ~]# echo "set weight www.wang.org_nginx/10.0.0.102 10" | socat stdio /var/lib/haproxy/haproxy.sock

动态算法

动态算法: 基于后端服务器状态进行调度适当调整,新请求将优先调度至当前负载较低的服务器,且权重可以在 HAProxy 运行时动态调整无需重启。

roundrobin 算法

roundrobin: 基于权重的轮询动态调度算法,支持权重的运行时调整,不同于 LVS 中的 rr 轮询模式,HAProxy 中的 roundrobin 支持慢启动(新加的服务器会逐渐增加转发数),其每个后端 backend 中最多支持 4095 个 real server,支持对 real server 权重动态调整,roundrobin 为默认调度算法,此算法使用广泛。

1
2
3
4
5
6
7
listen web_host
bind 10.0.0.7:80,:8801-8810,10.0.0.7:9001-9010
mode http
log global
balance roundrobin
server web1 10.0.0.17:80 weight 1 check inter 3000 fall 2 rise 5
server web2 10.0.0.27:80 weight 2 check inter 3000 fall 2 rise 5

支持动态调整权重:

1
2
3
4
5
6
7
# echo "get weight web_host/web1" | socat stdio /var/lib/haproxy/haproxy.sock
1 (initial 1)

# echo "set weight web_host/web1 3" | socat stdio /var/lib/haproxy/haproxy.sock

# echo "get weight web_host/web1" | socat stdio /var/lib/haproxy/haproxy.sock
3 (initial 1)

leastconn 算法

leastconn: 加权的最少连接的动态,支持权重的运行时调整和慢启动,即根据当前连接最少的后端服务器而非权重进行优先调度(新客户端连接),比较适合长连接的场景使用,比如 MySQL 等场景。

相当于LVS中的WLC算法

1
2
3
4
5
6
7
listen web_host
bind 10.0.0.7:80,:8801-8810,10.0.0.7:9001-9010
mode http
log global
balance leastconn
server web1 10.0.0.17:80 weight 1 check inter 3000 fall 2 rise 5
server web2 10.0.0.27:80 weight 1 check inter 3000 fall 2 rise 5

random 算法

在1.9版本开始增加 random 的负载平衡算法,其基于随机数作为一致性 hash 的 key。随机负载平衡对于大型服务器场或经常添加或删除服务器非常有用,支持 weight 的动态调整,weight 较大的主机有更大概率获取新请求。

random配置实例

1
2
3
4
5
6
7
listen web_host
bind 10.0.0.7:80,:8801-8810,10.0.0.7:9001-9010
mode http
log global
balance random
server web1 10.0.0.17:80 weight 1 check inter 3000 fall 2 rise 5
server web2 10.0.0.27:80 weight 1 check inter 3000 fall 2 rise 5

其他算法

其它算法即可作为静态算法,又可以通过选项成为动态算法。

source 算法

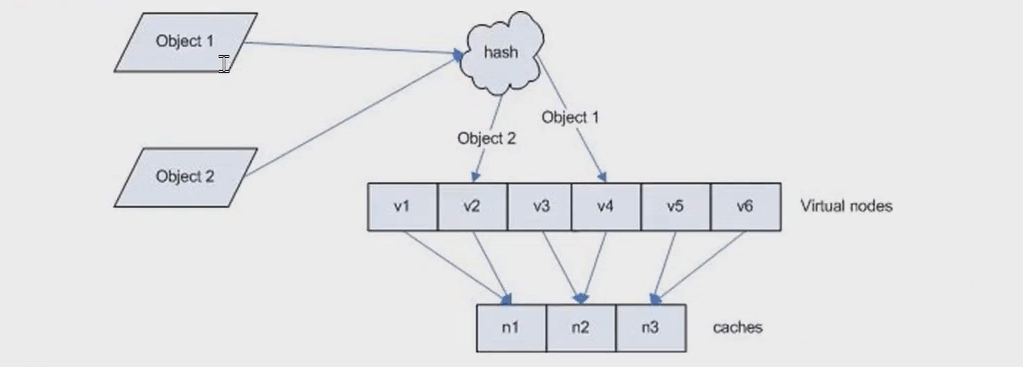
源地址 hash,基于用户源地址 hash 并将请求转发到后端服务器,后续同一个源地址请求将被转发至同一个后端 web 服务器。此方式当后端服务器数据量发生变化时,会导致很多用户的请求转发至新的后端服务器,默认为静态方式,但是可以通过 hash-type 选项进行更改。

这个算法一般是在不插入 Cookie 的 TCP 模式下使用,也可给不支持会话 cookie 的客户提供会话粘性,适用于需要 session 会话保持但不支持 cookie 和缓存的场景。

源地址有两种转发客户端请求到后端服务器的服务器选取计算方式,分别是取模法和一致性 hash。

map-based 取模法

map-based:取模法,对 source 地址进行 hash 计算,再基于服务器总权重的取模,最终结果决定将此请求转发至对应的后端服务器。此方法是静态的,即不支持在线调整权重,不支持慢启动,可实现对后端服务器均衡调度。缺点是当服务器的总权重发生变化时,即有服务器上线或下线,都会因总权重发生变化而导致调度结果整体改变,hash-type 指定的默认值为此算法。

1
2
所谓取模运算,就是计算两个数相除之后的余数,10%7=3,7%4=3。
map-based 算法:基于权重取模,hash(source_ip)%所有后端服务器相加的总权重

取模法配置示例:

1
2
3
4
5
6
7
8
9
10
11
12
13
14
15
16
17
18
listen web_host
bind 10.0.0.7:80,:8801-8810,10.0.0.7:9001-9010
mode tcp
log global
balance source
hash-type map-based
server web1 10.0.0.17:80 weight 1 check inter 3000 fall 2 rise 3
server web2 10.0.0.27:80 weight 1 check inter 3000 fall 2 rise 3


#不支持动态调整权重值
[root@haproxy ~]# echo "set weight web_host/10.0.0.27 10" | socat stdio /var/lib/haproxy/haproxy.sock
Backend is using a static LB algorithm and only accepts weights '0%' and '100%'.

#只能动态上线和下线
[root@haproxy ~]# echo "set weight web_host/10.0.0.27 0" | socat stdio /var/lib/haproxy/haproxy.sock
[root@haproxy conf.d]# echo "get weight web_host/10.0.0.27" | socat stdio /var/lib/haproxy/haproxy.sock
0 (initial 1)

一致性 hash

一致性哈希,当服务器的总权重发生变化时,对调度结果影响是局部的,不会引起大的变动。hash (o) mod n,该 hash 算法是动态的,支持使用 socat 等工具进行在线权重调整,支持慢启动。

算法:

  1. key1 = hash(source_ip) % (2^32) [0—4294967295]
  2. keyA = hash(后端服务器虚拟 ip) % (2^32)
  3. 将 key1 和 keyA 都放在 hash 环上,将用户请求调度到离 key1 最近的 keyA 对应的后端服务器

hash 环偏斜问题

增加虚拟服务器 IP 数量,比如:一个后端服务器根据权重为 1 生成 1000 个虚拟 IP,再 hash。而后端服务器权重为 2 则生成 2000 个虚拟 IP,再进行 hash 运算,最终在 hash 环上生成 3000 个节点,从而解决 hash 环偏斜问题。

hash 对象

Hash 对象到后端服务器的映射关系:

这些配置展示了如何使用 HAProxy 的不同调度算法,并通过 socat 工具动态调整权重。

4

一致性hash示意图

后端服务器在线与离线的调度方式

5

一致性hash配置示例
1
2
3
4
5
6
7
8
listen web_host
bind 10.0.0.7:80,:8801-8810,10.0.0.7:9001-9010
mode tcp
log global
balance source
hash-type consistent # 决定source是静态还是动态
server web1 10.0.0.17:80 weight 1 check inter 3000 fall 2 rise 5
server web2 10.0.0.27:80 weight 1 check inter 3000 fall 2 rise 5

uri 算法

基于对用户请求的 URI 的左半部分或整个 URI 做 hash,再将 hash 结果对总权重进行取模后,根据最终结果将请求转发到后端指定服务器。适用于后端是缓存服务器场景,默认为静态算法,也可以通过 hash-type 指定 map-basedconsistent,来定义使用取模法还是一致性 hash。

注意:此算法基于应用层,所以只支持 mode http,不支持 mode tcp

1
2
3
<scheme>://<username>:<password>@<host>:<port>/<path>;params?query#frag
左半部分: /path;params
整个 URI: /path;params?query#frag

6

uri 取模法配置示例

1
2
3
4
5
6
7
listen web_host
bind 10.0.0.7:80,:8801-8810,10.0.0.7:9001-9010
mode http
log global
balance uri
server web1 10.0.0.17:80 weight 1 check inter 3000 fall 2 rise 5
server web2 10.0.0.27:80 weight 1 check inter 3000 fall 2 rise 5

uri 一致性 hash 配置示例

1
2
3
4
5
6
7
8
listen web_host
bind 10.0.0.7:80,:8801-8810,10.0.0.7:9001-9010
mode http
log global
balance uri
hash-type consistent
server web1 10.0.0.17:80 weight 1 check inter 3000 fall 2 rise 5
server web2 10.0.0.27:80 weight 1 check inter 3000 fall 2 rise 5

访问测试

访问不同的url,确认可以将用户同样的请求转发至相同的服务器

url_param 算法

url_param对用户请求的url中的params部分中的一个参数key对应的value值作hash计算,并由服务器总权重相除以后派发至某挑出的服务器;通常用于追踪用户,以确保来自同一个用户的请求始终发往同一个real server。如果无该key,将按roundrobin算法。

1
2
3
4
5
6
#假设
url = http://www.wang.com/foo/bar/index.php?key=value

#则:
host = "www.wang.com"
url_param = "key=value"

url_param取模法配置示例

1
2
3
4
5
6
7
listen web_host
bind 10.0.0.7:80,:8801-8810,10.0.0.7:9001-9010
mode http
log global
balance url_param userid #url_param hash
server web1 10.0.0.17:80 weight 1 check inter 3000 fall 2 rise 5
server web2 10.0.0.27:80 weight 1 check inter 3000 fall 2 rise 5

url_param一致性hash配置示例

1
2
3
4
5
6
7
8
listen web_host
bind 10.0.0.7:80,:8801-8810,10.0.0.7:9001-9010
mode http
log global
balance url_param userid #对url_param的值取hash
hash-type consistent
server web1 10.0.0.17:80 weight 1 check inter 3000 fall 2 rise 5
server web2 10.0.0.27:80 weight 1 check inter 3000 fall 2 rise 5

测试访问

1
2
# curl http://10.0.0.7/index.html?userid=<NAME_ID>
# curl "http://10.0.0.7/index.html?userid=<NAME_ID>&typeid=<TYPE_ID>"

hdr 算法

针对用户每个HTTP头部(header)请求中的指定信息做hash,此处由name指定的HTTP首部将会被取出并做hash计算,然后由服务器总权重取模以后派发至某挑出的服务器。如果无有效值,则会使用默认的轮询调度。

hdr取模法配置示例

针对不同的浏览器进行调度:

1
2
3
4
5
6
7
8
9
listen web_host
bind 10.0.0.7:80,:8801-8810,10.0.0.7:9001-9010
mode http
log global
balance hdr(User-Agent)
#balance hdr(host)

server web1 10.0.0.17:80 weight 1 check inter 3000 fall 2 rise 5
server web2 10.0.0.27:80 weight 1 check inter 3000 fall 2 rise 5

一致性hash配置示例

1
2
3
4
5
6
7
8
9
listen web_host
bind 10.0.0.7:80,:8801-8810,10.0.0.7:9001-9010
mode http
log global
balance hdr(User-Agent)
hash-type consistent

server web1 10.0.0.17:80 weight 1 check inter 3000 fall 2 rise 5
server web2 10.0.0.27:80 weight 1 check inter 3000 fall 2 rise 5

测试访问

1
2
3
[root@centos6 ~]# curl -v http://10.0.0.7/index.html
[root@centos6 ~]# curl -VA 'firefox' http://10.0.0.7/index.html
[root@centos6 ~]# curl -VA 'chrome' http://10.0.0.7/index.html

rdp-cookie对远windows远程桌面的负载,使用cookie保持会话,默认是静态,也可以通过hash-type指定map-based和consistent,来定义使用取模法还是一致性hash。

1
2
3
4
5
listen RDP
bind 10.0.0.7:3389
balance rdp-cookie
mode tcp
server rdp0 10.0.0.17:3389 check fall 3 rise 5 inter 2000 weight 1
1
2
3
4
5
6
7
[root@haproxy ~]# cat /etc/haproxy/conf.d/windows_rdp.cfg
listen wang_RDP_3389
mode tcp
bind 172.16.0.100:3389
balance rdp-cookie
hash-type consistent
server rdp0 10.0.0.200:3389 check fall 3 rise 5 inter 2000 weight 1

测试命令

1
2
[root@haproxy ~]# hostname -I
10.0.0.7 172.16.0.100

算法总结

1
2
3
4
5
6
7
8
9
10
11
12
13
14
15
16
17
18
19
20
21
22
23
24
25
26
27
#静态
static-rr---------->tcp/http
first-------------->tcp/http

#动态
roundrobin--------->tcp/http
leastconn---------->tcp/http
random------------->tcp/http

#以下静态和动态取决于hash_type是否consistent
source-------------tcp/http
Uri----------------http
url_param----------http
hdr---------------http
rdp-cookie--------->tcp

#各种算法使用场景
first #使用较少
static-rr #做了session共享的 web 集群
roundrobin
random
leastconn #数据库
source #基于客户端公网 IP 的会话保持
Uri--------------http #缓存服务器,CDN服务商,蓝汛、百度、阿里云、腾讯
url_param--------http #可以实现session保持
hdr #基于客户端请求报文头部做下一步处理
rdp-cookie #基于windows主机,很少使用

HAProxy 高级功能

介绍 HAProxy 高级配置及实用案例

cookie value: 为当前 server 指定 cookie 值,实现基于 cookie 的会话黏性。相对于基于 source 地址 hash 调度算法对客户端的粒度更精准,但同时也加重了 haproxy 负载。目前此模式使用较少,已经被 session 共享服务器代替。

注意:不支持 tcp mode,使用 http mode

配置选项

1
2
3
4
5
6
cookie name [ rewrite | insert | prefix ] [ indirect ] [ nocache ] [ postonly ] [ preserve ] [ httponly ] [ secure ] [ domain ]* [ maxidle <idle> ] [ maxlife ]

name: #cookie 的 key 名称,用于实现持久连接
insert: #插入新的 cookie,默认不插入 cookie
indirect: #如果客户端已经有 cookie,则不会再发送 cookie 信息
nocache: #当 client 和 hapoxy 之间有缓存服务器(如:CDN)时,不允许中间缓存器缓存 cookie,因为这会导致很多经过同一个 CDN 的请求都发送到同一台后端服务器

配置示例

1
2
3
4
5
6
7
8
listen web_port
bind 10.0.0.7:80
balance roundrobin
mode http
log global
cookie WEBSRV insert nocache indirect
server web1 10.0.0.17:80 check inter 3000 fall 2 rise 5 cookie web1
server web2 10.0.0.27:80 check inter 3000 fall 2 rise 5 cookie web2
1
2
3
4
5
6
7
8
9
curl -c cookie.txt http://www.wang.org/
10.0.0.17

curl -b cookie.txt http://www.wang.org/
10.0.0.17
curl -b cookie.txt http://www.wang.org/
10.0.0.17
curl -b cookie.txt http://www.wang.org/
10.0.0.17

HAProxy 状态页

通过Web界面,显示当前HAProxy的运行状态。

官方帮助:

1
2
http://cbonte.github.io/haproxy-dconv/2.4/configuration.html#4-stats%20admin
http://cbonte.github.io/haproxy-dconv/2.0/configuration.html#4-stats%20admin

状态页配置项

1
2
3
4
5
6
7
stats enable	         #基于默认的参数启用stats page
stats hide-version #将状态页中haproxy版本隐藏
stats refresh <delay> #设定自动刷新时间间隔,默认不自动刷新,以秒为单位
stats uri <prefix> #自定义stats page uri,默认值:/haproxy/stats
stats realm <realm> #账户认证时的提示信息,示例:stats realm HAProxy Statistics
stats auth <user>:<passwd> #认证时的账号和密码,可定义多个用户,每行指定一个用户,默认:no authentication
stats admin { if | unless } <cond> #启用 stats page中的管理功能

启用状态页示例

1
2
3
4
5
6
7
8
9
10
listen haproxy-status
bind :9999
stats enable
#stats hide-version
stats uri /haproxy-status #自定义stats page uri
stats realm HAProxy\ Stats\ Page #账户认证时的提示信息
stats auth haadmin:123456 #支持多个用户
stats auth admin:123456
#stats refresh 30
stats admin if TRUE #开启管理功能,基于安全原因,不建议开启

登录状态页说明

1
2
3
4
5
6
7
8
9
10
11
12
13
14
15
16
17
18
19
20
21
22
23
24
25
26
27
28
29
30
31
32
33
34
35
36
pid = 27134 (process #1, nbproc = 1, nbthread = 1)  # pid为当前pid号,process为当前进程号,nbproc和nbthread为一共多少进程和每个进程多少个线程
uptime = 0d 0h00m04s #启动了多长时间
system limits: memmax = unlimited; ulimit-n = 200029 #系统资源限制:内存/最大打开文件数/
maxsock = 200029; maxconn = 100000; maxpipes = 0 #最大socket连接数/单进程最大连接数/最大管道数maxpipes
current conns = 2; current pipes = 0/0; conn rate = 2/sec; bit rate = 0.000 kbps #当前连接数/当前管道数/当前连接速率
Running tasks: 1/14; idle = 100 % #运行的任务/当前空闲率

active UP:
#在线服务器

backup UP:
#标记为backup的服务器

active UP, going down:
#监测未通过正在进入down过程

backup UP, going down:
#备份服务器正在进入down过程

active DOWN, going up:
#down的服务器正在进入up过程

backup DOWN, going up:
#备份服务器正在进入up过程

active or backup DOWN:
#在线的服务器或者是backup的服务器已经转换成了down状态

not checked:
#标记为不监测的服务器

active or backup DOWN for maintenance (MAINT)
#active或者backup服务器人为下线的

active or backup SOFT STOPPED for maintenance
#active或者backup被人为软下线(人为将weight改成0)

IP 透传

web服务器中需要记录客户端的真实IP地址,用于做访问统计、安全防护、行为分析、区域排行等场景。

Layer 4 与 Layer 7

  • 四层:IP+PORT转发
  • 七层:协议+内容交换

image-20250415150506786

四层负载

在LVS传统的四层负载设备中,把client发送的报文目标地址(原来是负载均衡设备的IP地址),根据均衡设备设置的选择web服务器的规则选择对应的web服务器IP地址,这样client就可以直接跟此服务器建立TCP连接并发送数据,而四层负载自身不参与建立连接。

而和LVS不同,haproxy是伪四层负载均衡,因为haproxy需要分别和前端客户端及后端服务器建立连接。

七层代理

七层负载均衡服务器起了一个反向代理服务器的作用,服务器建立一次TCP连接要三次握手,而client要访问Web Server要先与七层负载设备进行三次握手后建立TCP连接,把要访问的报文信息发送给七层负载均衡;然后七层负载均衡再根据设置的均衡规则选择特定的Web Server,然后通过三次握手与此台Web Server建立TCP连接,然后Web Server把需要的数据发送给七层负载均衡设备,负载均衡设备再把数据发送给client;所以,七层负载均衡设备起到了代理服务器的作用,七层代理需要和Client和后端服务器分别建立连接。

1
2
[root@haproxy ~]# tcpdump tcp -i eth0 -nn port ! 22 -w dump-tcp.pcap -v
[root@haproxy ~]# tcpdump tcp -i eth1 -nn port ! 22 -w dump-tcp2.pcap -v

四层IP透传

1
2
3
4
5
6
7
8
9
10
11
12
13
14
15
16
#haproxy 配置:
listen web_http_nodes
bind 172.16.0.100:80 #因下面wangxiaochun.com的站点建立在阿里云有防火墙,此处必须用80端口,如无防火墙可以使用其它端口
mode tcp #不支持http协议
balance roundrobin
server web1 www.wangxiaochun.com:80 send-proxy check inter 3000 fall 3 rise 5 #添加send-proxy

#nginx 配置: 在访问日志中通过变量$proxy_protocol_addr 记录透传过来的客户端IP
http {
log_format main '$remote_addr - $remote_user [$time_local] "$request" "$proxy_protocol_addr"';
server {
listen 80 proxy_protocol; #启用此项,将无法直接访问此网站,只能通过四层代理访问
server_name www.wangxiaochun.com;
......
}
}

抓包可以看到 continuation 信息中带有客户端的源IP

image-20250415150814497

七层IP透传

当haproxy工作在七层的时候,也可以透传客户端真实IP至后端服务器。

HAProxy配置

在由haproxy发往后端主机的请求报文中添加“X-Forwarded-For”首部,其值为前端客户端的地址;用于向后端主发送真实的客户端IP。

1
2
3
4
5
option forwardfor [ except <network> ] [ header <name> ] [ if-none ]

[ except <network> ]: # 请求报请来自此处指定的网络时不予添加此首部,如haproxy自身所在网络
[ header <name> ]: # 使用自定义的首部名称,而非“X-Forwarded-For”,示例:X-client
[ if-none ] # 如果没有首部才添加首部,如果有使用默认值

范例:

1
2
3
4
5
6
7
8
9
10
11
12
13
14
15
16
17
#haproxy 配置
defaults

#此为默认值,首部字段默认为: X-Forwarded-For
option forwardfor

#或者自定义首部,如:X-client
option forwardfor except 127.0.0.0/8 header X-client

#listen配置
listen web_host
bind 10.0.0.7:80
mode http #一定是http模式,tcp 模式不会传递客户端IP
log global
balance random
server web1 10.0.0.17:80 weight 1 check inter 3000 fall 2 rise 5
server web2 10.0.0.27:80 weight 1 check inter 3000 fall 2 rise 5

后端web服务器日志格式配置

配置web服务器,记录负载均衡透传的客户端IP地址

1
2
3
4
5
6
7
8
9
10
11
12
13
14
15
16
17
18
19
#apache 配置:需要修改才支持
LogFormat "%{X-Forwarded-For}i %a %l %u %t \"%r\" %>s %b \"%{Referer}i\" \"%{User-Agent}i\"" combined


#nginx 日志格式:默认就支持
$proxy_add_x_forwarded_for: 包括客户端IP和中间经过的所有代理的IP
$http_x_forwarded_for: 只有客户端IP

log_format main '$proxy_add_x_forwarded_for - $remote_user [$time_local] "$request" '
'$status $body_bytes_sent "$http_referer" '
'"$http_user_agent" $http_x_forwarded_for';

[root@centos8 ~]# tail /var/log/nginx/access.log
"172.16.0.200, 10.0.0.7 10.0.0.7 - - [09/Apr/2020:10:10:16 +0800] "GET / HTTP/1.1" 200 4057 "-" "curl/7.19.7 (x86_64-redhat-linux-gnu) libcurl/7.19.7 NSS/3.27.1 zlib/1.2.3 libidn/1.18 libssh2/1.4.2" "172.16.0.200"

#tomcat 配置:conf目录下的server.xml
<Valve className="org.apache.catalina.valves.AccessLogValve" directory="logs"
prefix="localhost_access_log" suffix=".txt"
pattern="%{X-Forwarded-For}i %h %l %u %t &quot;%r&quot; %s %b" />

验证客户端IP地址

1
2
3
4
5
6
7
8
9
10
11
12
13
14
15
#apache日志
[root@centos7 ~]# vim /etc/httpd/conf/httpd.conf
LogFormat "%{X-Forwarded-For}i %h %l %u %t \"%r\" %>s %b \"%{Referer}i\" \"%{User-Agent}i\"" combined

[root@centos7 ~]# systemctl restart httpd

[root@centos6 ~]# hostname -I
10.0.0.6

[root@centos6 ~]# curl http://10.0.0.7
10.0.0.17

[root@centos7 ~]# tail -f /var/log/httpd/access_log
10.0.0.6 10.0.0.7 - - [01/Apr/2020:01:08:31 +0800] "GET / HTTP/1.1" 200 10 "-" "curl/7.19.7 (x86_64-redhat-linux-gnu) libcurl/7.19.7 NSS/3.27.1 zlib/1.2.3 libidn/1.18 libssh2/1.4.2"
10.0.0.6 10.0.0.7 - - [01/Apr/2020:01:08:33 +0800] "GET / HTTP/1.1" 200 10 "-" "curl/7.19.7 (x86_64-redhat-linux-gnu) libcurl/7.19.7 NSS/3.27.1 zlib/1.2.3 libidn/1.18 libssh2/1.4.2"

报文修改

在http模式下,基于实际需求修改客户端的请求报文与响应报文,通过reqadd和reqdel在请求报文添加删除字段,通过rspadd与rspdel在响应报文中添加与删除字段。

注意:此功能的以下相关指令在2.1以上版本中已经取消

官方文档:参看2.0的帮助文档

1
http://cbonte.github.io/haproxy-dconv/2.0/configuration.html#4-rspadd
1
2
3
4
5
6
7
8
9
10
11
12
13
14
15
16
17
18
19
20
21
22
23
24
25
26
#在向后端服务器转发的请求报文尾部添加指定首部
reqadd <string> [[if | unless] <cond>]
示例: reqadd X-Via:\ HAproxy #注意只能有一个空格,并需要转义

#在向后端服务器转发的请求报文中删除匹配正则表达式的首部
reqdel <search> [[if | unless] <cond>]
reqidel <search> [[if | unless] <cond>] #忽略大小写

示例:
reqdel user-agent
reqdel X-Forwarded-For #无法删除

#在向前端客户端转发的响应报文尾部添加指定首部
rspadd <string> [[if | unless] <cond>]

示例:
rspadd X-Via:\ HAproxy
rspadd Server:\ wanginx


#从向前端客户端转发的响应报文中删除匹配正则表达式的首部
rspdel <search> [[if | unless] <cond>]
rspidel <search> [[if | unless] <cond>] #忽略大小写
示例:
rspdel ^server:.* #从响应报文删除server信息
rspdel X-Powered-By:.* #从响应报文删除X-Powered-By信息,一般此首部字段报错php版本信息

2.1 版本以上用下面指令http-request和http-response代替

官方文档:参看2.4的帮助文档

1
2
http://cbonte.github.io/haproxy-dconv/2.4/configuration.html#4-http-request
http://cbonte.github.io/haproxy-dconv/2.4/configuration.html#4-http-response

配置说明:

1
2
3
4
5
6
7
8
9
10
11
12
13
14
15
16
17
18
19
# 修改请求host首部,默认host首部会保留客户端原首部haproxy不会修改
http-request set-header host www.wangxiaochun.com

# 添加向后端服务器发送的请求报文首部
http-request add-header <name> <fmt> [ { if | unless } <condition> ]
# 示例: http-request add-header X-Haproxy-Current-Date %T

# 删除向后端服务器发送的请求报文首部
http-request del-header <name> [ { if | unless } <condition> ]

# 修改响应首部
http-response set-header server wangserver

# 添加向客户端发送的响应报文首部
http-response add-header <name> <fmt> [ { if | unless } <condition> ]

# 删除向客户端发送的响应报文首部
http-response del-header <name>
# 示例: http-response del-header Server

范例: 添加向后端服务器发送的请求报文首部

1
2
3
4
5
6
7
8
9
10
11
12
13
[root@haproxy ~]# vim /etc/haproxy/conf.d/test.cfg
frontend wang_web_80
bind 10.0.0.100:80
use_backend wang_webservers1
http-request add-header X-Haproxy-Current-Date %T

[root@haproxy ~]# systemctl restart haproxy.service

[root@rs1 ~]# vim /etc/httpd/conf/httpd.conf
LogFormat "%h %l %u %t \"%r\" %>s %b \"%{Referer}i\" \"%{User-Agent}i\" \"%{X-Forwarded-For}i\" \"%{X-Haproxy-Current-Date}i\"" combined

[root@rs1 ~]# tail /var/log/httpd/access_log
10.0.0.100 - - [21/Jun/2021:15:43:29 +0800] "GET / HTTP/1.1" 200 11 "-" "curl/7.29.0" "10.0.0.7" "21/Jun/2021:07:43:29 +0800"

自定义日志格式

log global 开启日志功能,默认只会在记录下面格式的日志

1
2
[root@haproxy ~]# tail /var/log/haproxy.log
Apr 9 19:38:46 localhost haproxy[60049]: Connect from 172.16.0.200:54628 to 172.16.0.100:80 (web_prot_http_nodes/HTTP)

option httplog 可以采用 http 格式记录下来,并且可以使用相关指令将特定信息记录在haproxy的日志中

但一般不建议开启,这会加重 HAProxy 负载

配置选项

1
2
3
4
5
6
7
8
9
10
11
12
13
log global:              #开启日志功能。
option httplog: #启用HTTP日志格式。
capture cookie <name> len <length>: #记录指定长度的cookie信息。
capture request header <name> len <length>: #捕获并记录指定长度的请求头信息。
capture response header <name> len <length>: #捕获并记录指定长度的响应头信息。

# 示例:
log global
option httplog
capture request header Host len 256
capture request header User-Agent len 512
capture request header Referer len 15
capture request header X-Forwarded-For len 15

配置示例

1
2
3
4
5
6
7
8
9
10
11
listen web_host
bind 10.0.0.7:80
mode http
balance roundrobin
log global #开启日志功能
option httplog #开启httplog日志格式选项
capture request header User-Agent len 512 #记录日志信息,记录User-Agent首部值的前512个字符
capture request header Host len 256 #记录日志信息,记录Host首部值
cookie SERVER-COOKIE insert indirect nocache
server web1 10.0.0.17:80 cookie web1 check inter 3000 fall 3 rise 5
server web2 10.0.0.27:80 cookie web2 check inter 3000 fall 3 rise 5

验证日志格式

1
2
3
4
[root@centos7 ~]# tail -n3 /var/log/haproxy.log
Apr 2 12:44:26 localhost haproxy[27637]: 10.0.0.6:50004 [02/Apr/2020:12:44:26.817] web_port web_port/web1 0/0/0/2/3 200 42484 - --NI 1/1/0/0 0/0 {curl/7.19.7 (x86_64-redhat-linux-gnu) libcurl/7.19.7 NSS/3.27.1 zlib/1.2.3 libidn/1.18 libssh2/1.4.2}[10.0.0.7] "GET /test.php HTTP/1.1"
Apr 2 12:44:27 localhost haproxy[27637]: 10.0.0.6:50006 [02/Apr/2020:12:44:27.294] web_port web_port/web2 0/0/0/1/1 404 370 - --NI 1/1/0/0 0/0 {curl/7.19.7 (x86_64-redhat-linux-gnu) libcurl/7.19.7 NSS/3.27.1 zlib/1.2.3 libidn/1.18 libssh2/1.4.2}[10.0.0.7] "GET /test.php HTTP/1.1"
Apr 2 12:44:27 localhost haproxy[27637]: 10.0.0.6:50008 [02/Apr/2020:12:44:27.840] web_port web_port/web1 0/0/0/3/4 200 42484 - --NI 1/1/0/0 0/0 {curl/7.19.7 (x86_64-redhat-linux-gnu) libcurl/7.19.7 NSS/3.27.1 zlib/1.2.3 libidn/1.18 libssh2/1.4.2}[10.0.0.7] "GET /test.php HTTP/1.1"

压缩功能

对响应给客户端的报文进行压缩,以节省网络带宽,但是会占用部分CPU性能。

建议在后端服务器开启压缩功能,而非在HAProxy上开启压缩。

配置选项

1
2
3
4
5
6
7
8
9
10
11
12
13
compression algo <algorithm> ...  #启用http协议中的压缩机制,常用算法有gzip, deflate

#压缩算法<algorithm>支持下面类型:
identity #debug调试使用的压缩方式
gzip #常用的压缩方式,与各浏览器兼容较好
deflate #有些浏览器不支持
raw-deflate #新式的压缩方式

compression type <mime type> ... #要压缩的文件类型MIME

#示例:
compression algo gzip deflate
compression type text/html text/css text/plain

配置示例

1
2
3
4
5
6
7
8
9
10
11
12
13
listen web_host
bind 10.0.0.7:80
mode http
balance roundrobin
log global
option httplog
compression algo gzip deflate #启用压缩和指定算法
compression type text/plain text/html text/css text/xml text/javascript application/javascript #指定压缩文件类型
server web1 10.0.0.17:80 cookie web1 check inter 3000 fall 3 rise 5
server web2 10.0.0.27:80 cookie web2 check inter 3000 fall 3 rise 5

#后端服务器准备一个文本文件
[root@centos7 ~]# ll /var/www/html/m.txt -h

验证压缩功能

1
2
3
4
5
6
7
8
9
10
11
12
13
14
15
16
17
18
19
[root@centos6 ~]# curl -is --compressed 10.0.0.7/m.txt | less
HTTP/1.1 200 OK
date: Thu, 02 Apr 2020 05:00:26 GMT
server: Apache/2.4.6 (CentOS) PHP/5.4.16
last-modified: Thu, 02 Apr 2020 04:56:25 GMT
etag: W/"c0ef6-5a2479f7aee68"
accept-ranges: bytes
content-type: text/plain; charset=UTF-8
set-cookie: WEBSRV=web1; path=/
cache-control: private
content-encoding: deflate
transfer-encoding: chunked
vary: Accept-Encoding

Feb 2 18:49:27 centos7 journal: Runtime journal is using 6.0M (max allowed 48.6M, trying to leave 72.9M free of 480.1M available -> current limit 48.6M).
Feb 2 18:49:27 centos7 kernel: Initializing cgroup subsys cpuset
Feb 2 18:49:27 centos7 kernel: Initializing cgroup subsys cpu
Feb 2 18:49:27 centos7 kernel: Initializing cgroup subsys cpuacct
......

后端服务器健康性监测

三种状态监测方式

1
2
3
基于四层的传输端口做状态监测,此为默认方式
基于指定 URI 做状态监测,需要访问整个页面资源,占用更多带宽
基于指定 URI 的 request 请求头部内容做状态监测,占用较少带宽,建议使用此方式

基于应用层http协议进行健康性检测

基于应用层HTTP协议,有不同的监测方式,对后端real server进行状态监测。

注意:此方式会导致在后端服务器生成很多的HAProxy发起的访问日志。

1
2
3
4
5
6
7
8
9
10
11
12
13
option httpchk               #启用七层健康性检测,对tcp 和 http 模式都支持,默认为: OPTIONS / HTTP/1.0
option httpchk <uri>
option httpchk <method> <uri>
option httpchk <method> <uri> <version>

#期望以上检查得到的响应码
http-check expect [!] <match> <pattern>
#示例:
http-check expect status 200
http-check expect ! rstatus ^5 #支持正则表达式

#关于HTTP/1.1的说明
<version> is the optional HTTP version string. It defaults to "HTTP/1.0" but some servers might behave incorrectly in HTTP 1.0, so turning it to HTTP/1.1 may sometimes help. Note that the Host field is mandatory in HTTP/1.1, and as a trick, it is possible to pass it after "\r\n" following the version string.

配置示例

1
2
3
4
5
6
7
8
9
10
11
12
13
14
15
16
17
18
19
20
listen web_host
bind 10.0.0.7:80
mode http
balance roundrobin
#option httpchk GET /monitor/check.html #默认HTTP/1.0
#option httpchk GET /monitor/check.html HTTP/1.0
#option httpchk GET /monitor/check.html HTTP/1.1 #注意:HTTP/1.1强制要求必须有Host字段
option httpchk HEAD /monitor/check.html HTTP/1.1\r\nHost:\ www.wang.org #使用HEAD减少网络流量
cookie SERVER-COOKIE insert indirect nocache
server web1 10.0.0.17:80 cookie web1 check inter 3000 fall 3 rise 5
server web2 10.0.0.27:80 cookie web2 check inter 3000 fall 3 rise 5

#创建检测页面
# 在所有后端服务建立检测页面
[root@backend ~]# mkdir /var/www/html/monitor/
[root@backend ~]# echo monitor > /var/www/html/monitor/check.html

#关闭一台 Backend 服务器
# 关闭一台Backend服务器
[root@backend1 ~]# systemctl stop httpd

ACL

访问控制列表(ACL, Access Control Lists)是一种基于包过滤的访问控制技术,它可以根据设定的条件对经过服务器传输的数据包进行过滤(条件匹配),即对接收到的报文进行匹配和过滤。基于请求报文头部中的源地址、源端口、目标地址、目标端口、请求方法、URL、文件后缀等信息内容进行匹配并执行进一步操作,比如允许其通过或丢弃。

官方帮助:

定义ACL配置选项

1
2
acl   <aclname> <criterion> [flags] [operator] [value]
acl 名称 匹配规范 匹配模式 具体操作符 操作对象类型

ACL-Name

1
2
3
acl image_service hdr_dom(host) -i img.wang.com

ACL名称,可以使用大字母A-Z、小写字母a-z、数字0-9、冒号:、点.、中横线和下划线,并且严格区分大小写,比如: my_acl 和 My_Acl 就是两个完全不同的 acl

ACL-criterion

定义ACL匹配规范,即:判断条件

1
2
3
4
5
6
7
8
9
10
11
12
13
14
15
16
17
18
19
20
21
22
23
24
25
26
27
28
29
30
31
32
33
34
35
36
37
38
39
40
41
42
43
44
45
46
47
48
49
50
51
52
53
54
55
56
57
58
59
60
61
62
63
64
65
66
67
68
69
70
71
72
73
74
75
76
hdr string, 提取在一个HTTP请求报文的首部
hdr ([<name> [, <occ>]]): 完全匹配字符串, header 的指定信息, <occ> 表示在多值中使用的值的出现次数
hdr_beg ([<name> [, <occ>]]): 前缀匹配, header 中指定匹配内容的 begin
hdr_end ([<name> [, <occ>]]): 后缀匹配, header 中指定匹配内容 end
hdr_dom ([<name> [, <occ>]]): 域匹配, header 中的 domain name
hdr_dir ([<name> [, <occ>]]): 路径匹配, header 的 uri 路径
hdr_len ([<name> [, <occ>]]): 长度匹配, header 的长度匹配
hdr_reg ([<name> [, <occ>]]): 正则表达式匹配, 自定义表达式 (regex) 模糊匹配
hdr_sub ([<name> [, <occ>]]): 子串匹配, header 中的 uri 模糊匹配

#示例:
hdr (<string>) 用于测试请求头部首部指定内容
hdr_dom(host) 请求的 host 名称,如 www.wang.com, m.wang.com
hdr_beg(host) 请求的 host 开头,如 www., img., video., download., ftp.
hdr_end(host) 请求的 host 结尾,如 .com, .net, .cn

#示例:
hdr (<string>) 用于测试请求头部首部指定内容
hdr_dom(host) 请求的host名称,如 www.wang.com,m.wang.com
hdr_beg(host) 请求的host开头,如 www., img., video., download., ftp.
hdr_end(host) 请求的host结尾,如 .com, .net, .cn

#示例:
acl bad_agent hdr_sub(User-Agent) -i curl wget
http-request deny if bad_agent
#block if bad_agent 2.1版本后不再支持,用上面替代

hdr(host) ==www.wang.org:8080
hdr_domain(host) ==> www.wang.org

#有些功能是类似的,比如以下几个都是匹配用户请求报文中host的开头是不是www
acl short_form hdr_beg(host) www.
acl alternate1 hdr_beg(host) -m beg www.
acl alternate2 hdr_dom(host) -m beg www.
acl alternate3 hdr(host) -m beg www.

base : string
#返回第一个主机头和请求的路径部分的连接,该请求从主机名开始,并在问号之前结束,对虚拟主机有用,下面的例子中是两个#中间的内容,实际#是没有的
<scheme>://<user>:<password>@<host>:<port>/<path>; <params>#?<query>#<frag>
base : exact string match
base_beg : prefix match
base_dir : subdir match
base_dom : domain match
base_end : suffix match
base_len : length match
base_reg : regex match
base_sub : substring match

path : string
#提取请求的URL路径,该路径从第一个斜杠开始,并在问号之前结束(无主机部分)
<scheme>://<user>:<password>@<host>:<port>/<path>; <params>#?<query>#<frag>
path : exact string match
path_beg : prefix match #请求的URL开头,如/static/, /images/, /img/, /css
path_end : suffix match #请求的URL中资源的结尾,如 .gif, .png, .css, .js, .jpg, .jpeg
path_dom : domain match
path_dir : subdir match
path_len : length match


src #源IP
src_port #源PORT

dst #目标IP
dst_port #目标PORT

#示例:
acl invalid_src src 10.0.0.7 192.168.1.0/24
acl invalid_src src 172.16.0.0/24

acl invalid_port src_port 0:1023

status : integer #返回在响应报文中的状态码

#七层协议
acl valid_method method GET HEAD
http-request deny if ! valid_method

ACL-flags

ACL匹配模式

1
2
3
4
-i 不区分大小写
-m 使用指定的pattern匹配方法
-n 不做DNS解析
-u 禁止acl重名,否则多个同名ACL匹配或关联

ACL-operator

ACL操作符

1
2
3
4
5
6
7
8
整数比较: eq, ge, gt, le, lt
字符串比较:
exact match (-m str): 字符串必须完全匹配模式
substring match (-m sub): 在提取的字符串中查找模式,如果其中任何一个被发现,ACL将匹配
prefix match (-m beg): 在提取的字符串首部中查找模式,如果其中任何一个被发现,ACL将匹配
suffix match (-m end): 将模式与提取字符串的尾部进行比较,如果其中任何一个匹配,则ACL进行匹配
subdir match (-m dir): 查看提取出来的用斜线分隔(“/”)的字符串,如其中任一个匹配,则ACL进行匹配
domain match (-m dom): 查找提取的用点(“.”)分隔字符串,如果其中任何一个匹配,则ACL进行匹配

ACL-value

value的类型

1
2
3
4
5
6
7
8
9
10
11
12
13
14
The ACL engine can match these types against patterns of the following types:

Boolean #布尔值
integer or integer range #整数或整数范围,比如用于匹配端口范围
IP address / network #IP地址或IP范围,192.168.0.1, 192.168.0.1/24
string-> www.wang.com
exact #精确比较
substring #子串
suffix #后缀比较
prefix #前缀比较
subdir #路径,/wp-includes/js/jquery/jquery.js
domain #域名,www.wang.com
regular expression #正则表达式
hex block #16进制

ACL示例:域名匹配

1
2
3
4
5
6
7
8
9
10
11
12
13
14
15
16
17
18
19
20
21
22
23
24
25
[root@centos7 ~]# cat /etc/haproxy/conf.d/test.cfg
frontend wang_http_port
bind 10.0.0.7:80
mode http
balance roundrobin
log global
option httplog

###################### acl setting ########################
acl pc_domain hdr_dom(host) -i www.wang.org
acl mobile_domain hdr_dom(host) -i mobile.wang.org

###################### acl hosts ##########################
use_backend pc_hosts if pc_domain
use_backend mobile_hosts if mobile_domain
default_backend pc_hosts #所有都不匹配,使用默认

###################### backend hosts #######################
backend mobile_hosts
mode http
server web1 10.0.0.17 check inter 2000 fall 3 rise 5

backend pc_hosts
mode http
server web2 10.0.0.27:80 check inter 2000 fall 3 rise 5

测试结果

1
2
3
4
5
6
7
8
9
10
11
12
13
[root@centos6 ~]# cat /etc/hosts
127.0.0.1 localhost localhost.localdomain localhost4 localhost4.localdomain4 centos6.localdomain
::1 localhost localhost.localdomain localhost6 localhost6.localdomain6
10.0.0.7 mobile.wang.org www.wang.org wang.org

[root@centos6 ~]# curl www.wang.org
10.0.0.27

[root@centos6 ~]# curl mobile.wang.org
10.0.0.17

[root@centos6 ~]# curl wang.org
10.0.0.27

ACL示例:基于源IP或子网调度访问

1
2
3
4
5
6
7
8
9
10
11
12
13
14
15
16
17
18
19
20
21
22
23
24
25
26
27
28
[root@centos7 ~]# cat /etc/haproxy/conf.d/test.cfg
frontend wang_http_port
bind 10.0.0.7:80
mode http
balance roundrobin
log global
option httplog

########################## acl setting #####################
acl pc_domain hdr_dom(host) -i www.wang.org
acl mobile_domain hdr_dom(host) -i mobile.wang.org
acl ip_range_test src 172.18.0.0/16 10.0.0.6 #基于源地址的ACL,定义多个ACL的顺序无关
acl ip_range_test2 src 172.18.0.200

########################## acl hosts #######################
use_backend pc_hosts if ip_range_test #放在前面的ACL规则优先生效,引用ACL时,严格的ACL应放在前面
use_backend pc_hosts if pc_domain
use_backend mobile_hosts if mobile_domain
default_backend pc_hosts

###################### backend hosts #######################
backend mobile_hosts
mode http
server web1 10.0.0.17 check inter 2000 fall 3 rise 5

backend pc_hosts
mode http
server web2 10.0.0.27:80 check inter 2000 fall 3 rise 5

测试结果

1
2
3
4
5
6
7
8
9
10
11
[root@centos6 ~]# hostname -I
10.0.0.6

[root@centos6 ~]# curl www.wang.org
10.0.0.27

[root@internet ~]# curl -H "HOST: www.wang.org" 10.0.0.7
10.0.0.27

[root@centos6 ~]# curl mobile.wang.org
10.0.0.27

ACL示例:基于源地址的访问控制

拒绝指定IP或者IP范围访问

1
2
3
4
5
6
7
8
9
10
11
12
13
14
15
16
17
18
19
20
21
22
23
24
25
listen web_host
bind 10.0.0.7:80
mode http
balance roundrobin
log global
option httplog

########################## acl setting #####################
acl acl_deny_src src 10.0.0.6 192.168.0.0/24

########################## acl hosts #######################
http-request deny if acl_deny_src #2.1版本后,不再支持block
#block if acl_deny_src

#http-request allow
default_backend default_web

###################### backend hosts #######################
backend wang_host
mode http
server web1 10.0.0.17 check inter 2000 fall 3 rise 5

backend default_web
mode http
server web1 10.0.0.27:80 check inter 2000 fall 3 rise 5

ACL示例:匹配浏览器类型

匹配客户端浏览器,将不同类型的浏览器调度至不同的服务器组

范例: 163 网易拒绝curl和wget的访问

1
2
3
4
5
6
7
8
9
10
11
12
13
14
15
16
17
18
19
20
21
22
23
24
25
26
27
28
29
30
31
32
33
34
35
36
37
38
39
40
41
[root@ubuntu2004 ~]# curl -I www.163.com
HTTP/1.1 403 Forbidden
Date: Fri, 01 Jan 2021 06:57:22 GMT
Content-Type: text/html
Content-Length: 237
Connection: keep-alive
Server: web cache
Expires: Fri, 01 Jan 2021 06:57:22 GMT
X-Ser: BC17_lt-shandong-zaozhuang-6-cache-1
Cache-Control: no-cache,no-store,private
cdn-user-ip: 111.199.184.218
cdn-ip: 124.132.138.17
X-Cache-Remote: HIT
cdn-source: baishan

[root@ubuntu2004 ~]# curl -I -A "wget" www.163.com
HTTP/1.1 403 Forbidden
Date: Fri, 01 Jan 2021 06:58:13 GMT
Content-Type: text/html
Content-Length: 237
Connection: keep-alive
Server: web cache
Expires: Fri, 01 Jan 2021 06:58:13 GMT
X-Ser: BC17_lt-shandong-zaozhuang-6-cache-1
Cache-Control: no-cache,no-store,private
cdn-user-ip: 111.199.184.218
cdn-ip: 124.132.138.17
X-Cache-Remote: HIT
cdn-source: baishan

#不拒绝其它浏览器的访问
[root@ubuntu2004 ~]# curl -I -A "ApacheBench" www.163.com
HTTP/1.1 301 Moved Permanently
Date: Fri, 01 Jan 2021 06:58:41 GMT
Content-Length: 0
Location: https://www.163.com/
Cache-Control: no-cache,no-store,private
cdn-user-ip: 111.199.184.218
cdn-ip: 124.132.138.17
X-Cache-Remote: HIT
cdn-source: baishan

范例:

1
2
3
4
5
6
7
8
9
10
11
12
13
14
15
16
17
18
19
20
21
22
23
24
25
26
[root@centos7 ~]# cat /etc/haproxy/conf.d/test.cfg
frontend wang_http_port
bind 10.0.0.7:80
mode http
balance roundrobin
log global
option httplog

########################## acl setting #####################
acl acl_user_agent hdr_sub(User-Agent) -i curl wget #基于浏览器的ACL
acl acl_user_agent_ab hdr_sub(User-Agent) -i ApacheBench

########################## acl hosts #######################
redirect prefix http://www.baidu.com if acl_user_agent #302 临时重定向至新URL
http-request deny if acl_user_agent_ab #拒绝ab

default_backend pc_hosts

###################### backend hosts #######################
backend mobile_hosts
mode http
server web1 10.0.0.17 check inter 2000 fall 3 rise 5

backend pc_hosts
mode http
server web2 10.0.0.27:80 check inter 2000 fall 3 rise 5

ACL示例:基于文件后缀名实现动静分离

配置文件内容

1
2
3
4
5
6
7
8
9
10
11
12
13
14
15
16
17
18
19
20
21
22
23
24
25
26
27
28
29
30
31
32
33
34
35
36
37
38
39
[root@centos7 ~]# cat /etc/haproxy/conf.d/test.cfg
frontend wang_http_port
bind 10.0.0.7:80
mode http
balance roundrobin
log global
option httplog

########################## acl setting #####################
acl acl_static path_end -i .jpg .jpeg .png .gif .css .js .html #基于文件后缀名的ACL
acl acl_php path_end -i .php

########################## acl hosts #######################
use_backend mobile_hosts if acl_static
use_backend app_hosts if acl_php
default_backend pc_hosts

###################### backend hosts #######################
backend mobile_hosts
mode http
server web1 10.0.0.17 check inter 2000 fall 3 rise 5

backend pc_hosts
mode http
server web2 10.0.0.27:80 check inter 2000 fall 3 rise 5

backend app_hosts
mode http
server web2 10.0.0.27:80 check inter 2000 fall 3 rise 5


# 分别在后端两台主机准备相关文件
[root@centos17 ~]# ls /var/www/html
index.html wang.jpg

[root@centos27 ~]# cat /var/www/html/test.php
<?php
echo "<h1>http://10.0.0.27/test.php</h1>\n";
?>

ACL示例:匹配访问路径实现动静分离

1
2
3
4
5
6
7
8
9
10
11
12
13
14
15
16
17
18
19
20
21
22
23
24
25
26
27
28
29
30
31
[root@centos7 ~]# cat /etc/haproxy/conf.d/test.cfg
frontend wang_http_port
bind 10.0.0.7:80
mode http
balance roundrobin
log global
option httplog

acl acl_static path_beg -i /static /images /javascript #基于路径的ACL
acl acl_static path_end -i .jpg .jpeg .png .gif .css .js .html .htm #ACL同名为或关系
acl acl_app path_beg -i /api

use_backend static_hosts if acl_static
use_backend app_hosts if acl_app
default_backend app_hosts

backend static_hosts
mode http
server web1 10.0.0.17 check inter 2000 fall 3 rise 5

backend app_hosts
mode http
server web2 10.0.0.27:80 check inter 2000 fall 3 rise 5

#创建相关文件
[root@centos17 ~]# mkdir /var/www/html/static
[root@centos17 ~]# echo 10.0.0.17 > /var/www/html/static/test.html

#测试访问
[root@centos6 ~]# curl 10.0.0.7/static/test.html
10.0.0.17

ACL示例:预定义ACL使用

官方帮助文档:http://cbonte.github.io/haproxy-dconv/2.1/configuration.html#7.4

预定义ACL

ACL name Equivalent to Usage
FALSE always_false never match
HTTP req_proto_http match if protocol is valid HTTP
HTTP_1.0 req_ver 1.0 match HTTP version 1.0
HTTP_1.1 req_ver 1.1 match HTTP version 1.1
HTTP_CONTENT hdr_val(content-length) gt 0 match an existing content-length
HTTP_URL_ABS url_reg ^[^/:]*:// match absolute URL with scheme
HTTP_URL_SLASH url_beg / match URL beginning with “/“
HTTP_URL_STAR url * match URL equal to “*”
LOCALHOST src 127.0.0.1/8 match connection from local host
METH_CONNECT method CONNECT match HTTP CONNECT method
METH_DELETE method DELETE match HTTP DELETE method
METH_GET method GET HEAD match HTTP GET or HEAD method
METH_HEAD method HEAD match HTTP HEAD method
METH_OPTIONS method OPTIONS match HTTP OPTIONS method
METH_POST method POST match HTTP POST method
METH_PUT method PUT match HTTP PUT method
METH_TRACE method TRACE match HTTP TRACE method
RDP_COOKIE req_rdp_cookie_cnt gt 0 match presence of an RDP cookie
REQ_CONTENT req_len gt 0 match data in the request buffer
TRUE always_true always match
WAIT_END wait_end wait for end of content analysis

预定义ACL使用

范例:禁止TRACE方法和HTTP/1.1协议

1
2
3
4
5
6
7
8
9
10
11
12
13
14
15
16
17
18
19
20
21
22
23
24
25
26
27
28
29
30
31
32
33
34
35
36
37
38
39
40
41
42
43
44
45
46
47
48
49
50
51
52
53
54
55
56
57
58
59
60
61
62
63
64
65
[root@centos6 ~]# curl -I -XTRACE 10.0.0.7/static/test.html
HTTP/1.1 200 OK
date: Sat, 04 Apr 2020 02:04:01 GMT
server: Apache/2.4.6 (CentOS) PHP/5.4.16
transfer-encoding: chunked
content-type: message/http

[root@centos7 ~]# cat /etc/haproxy/conf.d/test.cfg
frontend wang_http_port
bind 10.0.0.7:80
mode http
balance roundrobin
log global
option httplog

acl acl_static_path path_beg -i /static /images /javascript #基于路径的ACL

use_backend static_path_hosts if acl_static_path
http-request deny if METH_TRACE HTTP_1.1 #引用预定义的ACL,多个ACL默认为与关系
default_backend pc_hosts

backend static_path_hosts
mode http
server web1 10.0.0.17 check inter 2000 fall 3 rise 5

backend mobile_hosts
mode http
server web1 10.0.0.17 check inter 2000 fall 3 rise 5

backend pc_hosts
mode http
server web2 10.0.0.27:80 check inter 2000 fall 3 rise


[root@centos6 ~]# curl -I -XTRACE 10.0.0.7/static/test.html
HTTP/1.1 403 Forbidden
content-length: 93
cache-control: no-cache
content-type: text/html
connection: close

[root@centos6 ~]# curl -I -O -XTRACE 10.0.0.7/static/test.html
HTTP/1.1 200 OK
date: Sat, 04 Apr 2020 02:10:13 GMT
server: Apache/2.4.6 (CentOS) PHP/5.4.16
content-type: message/http
connection: close

#查看日志,观察协议版本
[root@centos17 ~]# tail /var/log/httpd/access_log
10.0.0.7 - - [04/Apr/2020:10:11:41 +0800] "TRACE /static/test.html HTTP/1.0" 200 230 "-" "curl/7.19.7 (x86_64-redhat-linux-gnu) libcurl/7.19.7 NSS/3.27.1 zlib/1.2.3 libidn/1.18 libssh2/1.4.2"


[root@centos6 ~]# curl -i 10.0.0.7/static/test.html
HTTP/1.1 200 OK
date: Sat, 04 Apr 2020 02:07:58 GMT
server: Apache/2.4.6 (CentOS) PHP/5.4.16
last-modified: Sat, 04 Apr 2020 01:27:45 GMT
etag: "a-5a26cf0ed4913"
accept-ranges: bytes
content-length: 10
content-type: text/html; charset=UTF-8
10.0.0.17

自定义HAProxy错误界面

对指定错误进行重定向,进行优雅的显示错误页面

使用errofile和errorloc指令的两种方法,可以实现自定义各种错误页面

基于自定义的错误页面文件

自定义错误页

1
2
3
4
5
6
7
8
errorfile <code> <file>
<code> #HTTP status code. 支持200, 400, 403, 405, 408, 425, 429, 500, 502, 503, 504
<file> #包含完整HTTP响应头的错误页文件的绝对路径。建议后缀为".http",以和一般的html文件相区分

#示例
errorfile 400 /etc/haproxy/errorfiles/400badreq.http
errorfile 403 /etc/haproxy/errorfiles/403forbid.http
errorfile 503 /etc/haproxy/errorfiles/503sorry.http

范例

1
2
3
4
5
6
7
8
9
defaults
#option forwardfor
#no option http-use-htx 支持html文件,此设置和版本有关,2.1不支持
#......
#加下面行

errorfile 500 /usr/local/haproxy/html/500.http
errorfile 502 /usr/local/haproxy/html/502.http
errorfile 503 /usr/local/haproxy/html/503.http

范例

1
2
3
4
5
6
7
8
9
10
11
12
13
14
15
16
17
18
19
20
21
22
23
24
25
26
27
28
29
30
31
[root@centos7 ~]# vim /etc/haproxy/haproxy.cfg
defaults
option http-keep-alive
option forwardfor
maxconn 100000
mode http
timeout connect 300000ms
timeout client 300000ms
timeout server 300000ms
errorfile 503 /apps/haproxy/html/503.http
listen
......

[root@centos7 ~]# vim /apps/haproxy/html/503.http
HTTP/1.1 503 Service Unavailable
Content-Type:text/html;charset=utf-8

<!DOCTYPE html>
<html lang="en">
<head>
<meta charset="UTF-8">
<title>报错页面</title>
</head>
<body>
<center><h1>网站维护中……请稍候再试</h1></center>
<center><h2>联系电话:400-123-4567</h2></center>
<center><h3>503 Service Unavailable</h3></center>
</body>
</html>

[root@centos7 ~]# systemctl restart haproxy

启用 no option http-use-htx 示例

1
2
3
4
5
6
7
8
9
10
11
12
13
14
15
16
17
18
19
20
21
22
23
24
25
26
27
28
29
30
31
32
33
34
35
36
37
38
39
[root@haproxy ~]# vi /etc/haproxy/haproxy.cfg
defaults
option http-keep-alive
no option http-use-htx # 在 defaults 块中添加
errorfile 503 /apps/haproxy/errorfiles/503.html


[root@haproxy ~]# cat /apps/haproxy/errorfiles/503.html
<!DOCTYPE html>
<html lang="en">
<head>
<meta charset="UTF-8">
<title>报错页面</title>
</head>
<body>
<center><h1>网站维护中……请稍候再试</h1></center>
<center><h2>联系电话:400-123-8888</h2></center>
<center><h3>503 Service Unavailable</h3></center>
</body>
</html>

#注意没有响应头信息
[root@internet ~]# curl -I 172.16.0.100
<!DOCTYPE html>
<html lang="en">
<head>
<meta charset="UTF-8">
<title>报错页面</title>
</head>
<body>
<center><h1>网站维护中……请稍候再试</h1></center>
<center><h2>联系电话:400-123-8888</h2></center>
<center><h3>503 Service Unavailable</h3></center>
</body>
</html>

#Ubuntu 客户端提示错误
root@ubuntu2004:~# curl 172.16.0.100
curl: (1) Received HTTP/0.9 when not allowed

基于 HTTP 重定向错误页面

1
2
3
4
5
6
7
#错误页面重定向
errorloc <code> <url>
#相当于 errorloc302 <code> <url>, 利用302重定向至指URL

#示例
errorloc 503 http://www.wang.com/error_pages/503.html
errorloc 503 http://www.wang.com/

范例

1
2
3
4
5
6
7
8
9
10
11
12
13
14
15
16
17
18
19
20
21
22
23
24
[root@centos7 ~]# vim /etc/haproxy/haproxy.cfg
defaults
option http-keep-alive
option forwardfor
#no option http-use-htx
#...... 加以下一行
#errorfile 503 /apps/haproxy/html/503.http
errorloc 503 http://10.0.0.8/error_page/503.html

[root@haproxy ~]# cat /apps/haproxy/errorfiles/503.html
<!DOCTYPE html>
<html lang="en">
<head>
<meta charset="UTF-8">
<title>报错页面</title>
</head>
<body>
<center><h1>网站维护中……请稍候再试</h1></center>
<center><h2>联系电话:400-123-8888</h2></center>
<center><h3>503 Service Unavailable</h3></center>
</body>
</html>

#浏览器访问http://haproxy/ 302子自动跳转

HAProxy 四层负载

针对除 HTTP 以外的 TCP 协议应用服务访问的应用场景

1
2
3
4
MySQL
Redis
Memcached
RabbitMQ

问题: 后端服务器到底是与 haproxy 还是和客户端建立三次握手呢?

四层负载示例

注意: 如果使用 frontend 和 backend,一定在 frontend 和 backend 段中都指定 mode tcp。

1
2
3
4
5
6
listen redis-port
bind 10.0.0.7:6379
mode tcp
balance leastconn
server server1 10.0.0.17:6379 check
server server2 10.0.0.27:6379 check backup

范例:对 MySQL 服务实现四层负载

1
2
3
4
5
6
7
8
9
10
11
12
13
14
15
16
17
18
19
20
21
22
23
24
25
26
27
28
29
30
31
32
33
34
35
36
37
38
39
40
41
42
43
44
45
46
47
48
49
50
[root@centos7 ~]# vim /etc/haproxy/haproxy.cfg
listen wang_mysql
bind 10.0.0.7:3306
mode tcp
balance leastconn
server mysql1 10.0.0.17:3306 check
server mysql2 10.0.0.27:3306 check # 如果不写端口号,可以转发,但无法check状态

#或者使用 frontend 和 backend 实现
frontend mysql
bind :3306
mode tcp # 必须指定tcp
default_backend mysqlsrvs

backend mysqlsrvs
mode tcp # 必须指定tcp
balance leastconn
server mysql1 10.0.0.17:3306 check
server mysql2 10.0.0.27:3306 check

[root@centos7 ~]# systemctl restart haproxy

#在后端服务器安装和配置 MariaDB 服务
[root@centos7 ~]# yum -y install mariadb-server
[root@centos7 ~]# mysql -e "grant all on *.* to test@'10.0.0.%' identified by '123456'"
[root@centos7 ~]# vim /etc/my.cnf
[mysqld]
server-id=17 # 在另一台主机为27

[root@centos7 ~]# systemctl start mariadb

#测试
[root@centos6 ~]# mysql -utest -p123456 -e "show variables like 'hostname'"
+-----------------+--------------------------------------+
| Variable_name | Value |
+-----------------+--------------------------------------+
| hostname | centos17.wangxiaochu.com |
+-----------------+--------------------------------------+

[root@centos6 ~]# mysql -utest -p123456 -e "show variables like 'hostname'"
+-----------------+--------------------------------------+
| Variable_name | Value |
+-----------------+--------------------------------------+
| hostname | centos27.wangxiaochu.com |
+-----------------+--------------------------------------+

[root@centos6 ~]# mysql -utest -p123456 -h10.0.0.7 -e 'select @@server_id'
+-------------+
| @@server_id |
+-------------+

HAProxy HTTPS 实现

HAProxy 支持 HTTPS。基于性能考虑,证书通常在后端服务器(如 Nginx)上实现,即用户到 HAProxy 使用 TCP 模式再到后端服务器。

范例: 基于 TCP 模式实现

1
2
3
4
5
6
7
8
9
10
11
12
13
14
listen web_http
bind 192.168.10.100:80
redirect scheme https if !{ ssl_fc }
mode http
log global
server web1 10.0.0.8:80 check
server web2 10.0.0.18:80 check

listen web_https
bind 192.168.10.100:443
mode tcp
log global
server web1 10.0.0.8:443 check
server web2 10.0.0.18:443 check

HAProxy 可以实现 HTTPS 的证书安全。即从用户到 HAProxy 为 HTTPS,从 HAProxy 到后端服务器用 HTTP 通信。

1
2
3
4
5
6
7
8
9
10
11
12
13
# 配置 HAProxy 支持 HTTPS 协议,支持 SSL 会话
bind *:443 ssl crt /PATH/TO/SOME_PEM_FILE

# 指令 `crt` 后证书文件为 PEM 格式,需要同时包含证书和所有私钥
cat demo.key demo.crt > demo.pem

# 把 80 端口的请求利用 302 重定向到 443
bind *:80
redirect scheme https if !{ ssl_fc }

# 向后端传递用户请求的协议和端口 (frontend 或 backend)
http_request set-header X-Forwarded-Port %[dst_port]
http_request add-header X-Forwarded-Proto https if { ssl_fc }

证书制作

1
2
3
4
5
6
7
8
9
10
11
12
13
14
15
16
17
18
19
20
21
22
23
24
25
#方法1
[root@centos7 ~]# mkdir /etc/haproxy/certs/
[root@centos7 ~]# cd /etc/haproxy/certs/
[root@centos7 certs]# openssl genrsa -out haproxy.key 2048
[root@centos7 certs]# openssl req -new -x509 -key haproxy.key -out haproxy.crt -subj "/CN=www.wang.org" -days 365

#或者用下一条命令实现:
[root@centos7 certs]# openssl req -x509 -newkey rsa:2048 -nodes -days 365 -out haproxy.pem -subj "/CN=www.wang.org"


#方法2
[root@centos7 ~]# mkdir /etc/haproxy/certs/
[root@centos7 ~]# cd /etc/pki/tls/certs
[root@centos7 certs]# make /etc/haproxy/certs/haproxy.pem
umask 77 ; \
PEM1='/bin/mktemp /tmp/openssl.XXXXXX' ; \
PEM2='/bin/mktemp /tmp/openssl.XXXXXX' ; \
/usr/bin/openssl req -utf8 -newkey rsa:2048 -keyout $PEM1 -nodes -x509 -days 365 -out $PEM2 ; \
cat $PEM1 > /etc/haproxy/certs/haproxy.pem ; \
echo "" >> /etc/haproxy/certs/haproxy.pem ; \
cat $PEM2 >> /etc/haproxy/certs/haproxy.pem ; \
rm -f $PEM1 $PEM2

[root@centos7 certs]# ls /etc/haproxy/certs/
haproxy.pem

HTTPS 配置示例

1
2
3
4
5
6
7
8
9
10
11
12
13
14
15
16
17
18
19
20
21
22
23
24
25
26
27
28
29
30
[root@centos7 ~]# cat /etc/haproxy/conf.d/test.cfg
frontend wang_http_port
bind 10.0.0.7:80

############## https setting #################
bind 10.0.0.7:443 ssl crt /etc/haproxy/certs/haproxy.pem
redirect scheme https if !{ ssl_fc } # 注意 { } 内的空格
http-request set-header X-forwarded-Port %[dst_port]
http-request add-header X-forwarded-Proto https if { ssl_fc }

mode http
balance roundrobin
log global
option httplog

############## acl setting ###################
acl mobile_domain hdr_dom(host) -i mobile.wang.org

############## acl hosts #####################
default_backend pc_hosts

backend mobile_hosts
mode http
server web1 10.0.0.17:80 check inter 2000 fall 3 rise 5

backend pc_hosts
mode http
#http-request set-header X-forwarded-Port %[dst_port] 也可加在此处
#http-request add-header X-forwarded-Proto https if { ssl_fc }
server web2 10.0.0.27:80 check inter 2000 fall 3 rise 5

修改后端服务器的日志格式

1
2
[root@centos27 ~]# vim /etc/httpd/conf/httpd.conf
LogFormat "%h %l %u %t \"%r\" %>s %b \"%{Referer}i\" \"%{User-Agent}i\" \"%{X-Forwarded-Port}i\" \"%{X-Forwarded-Proto}i\"" combined

验证 HTTPS

1
2
3
4
5
6
7
8
9
10
11
12
13
14
15
16
17
18
19
20
21
22
23
24
25
26
27
28
29
[root@centos6 ~]# curl -IkL http://www.wang.org
HTTP/1.1 302 Found
content-length: 0
location: https://www.wang.org/
cache-control: no-cache

HTTP/1.1 200 OK
date: Sat, 04 Apr 2020 02:31:31 GMT
server: Apache/2.4.6 (CentOS) PHP/5.4.16
last-modified: Thu, 02 Apr 2020 01:44:13 GMT
etag: "a-5a244f01f8adc"
accept-ranges: bytes
content-length: 10
content-type: text/html; charset=UTF-8


[root@centos6 ~]# curl -Ik https://www.wang.org
HTTP/1.1 200 OK
date: Sat, 04 Apr 2020 02:31:50 GMT
server: Apache/2.4.6 (CentOS) PHP/5.4.16
last-modified: Thu, 02 Apr 2020 01:44:28 GMT
etag: "a-5a244f0fd5175"
accept-ranges: bytes
content-length: 10
content-type: text/html; charset=UTF-8

#查看后端服务器的访问日志
[root@centos27 ~]# tail /var/log/httpd/access_log
10.0.0.7 - - [04/Apr/2020:10:40:17 +0800] "HEAD / HTTP/1.1" 200 - "-" "curl/7.19.7 (x86_64-redhat-linux-gnu) libcurl/7.19.7 NSS/3.27.1 zlib/1.2.3 libidn/1.18 libssh2/1.4.2" "443" "https"