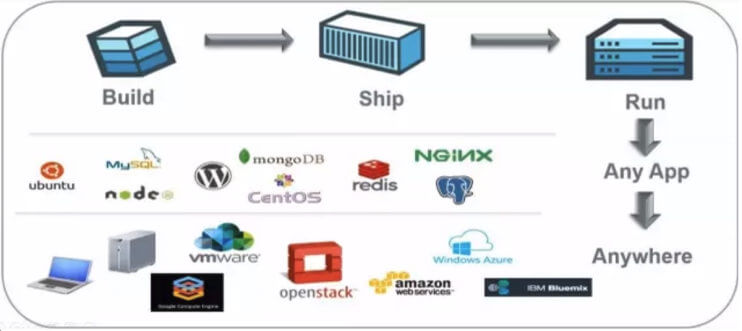
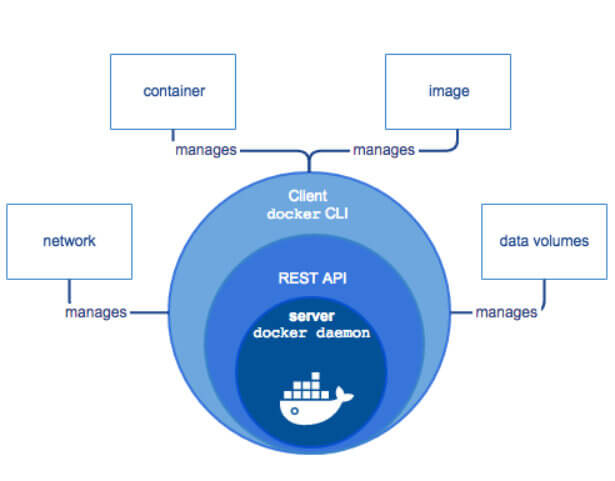
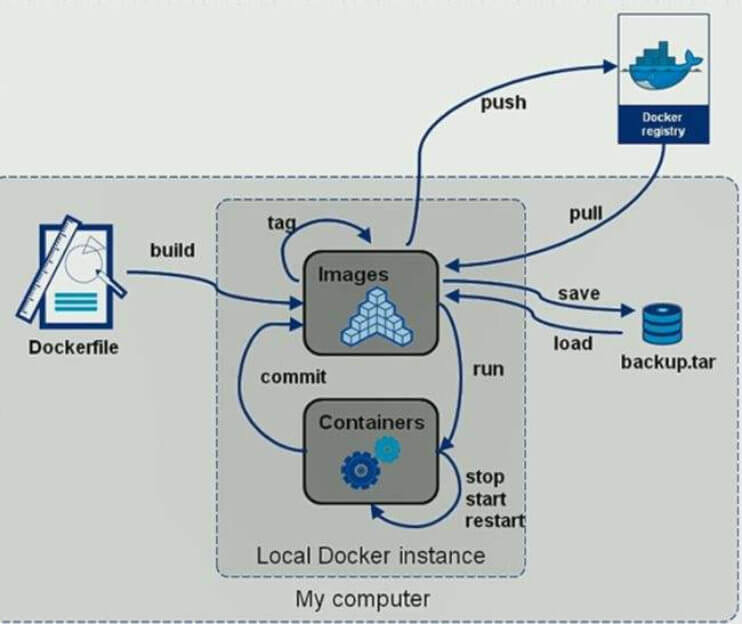
Build, Ship and Run Any App, Anywhere,即通过对应用组件的封装(Packaging)、分发(Distribution)、部署(Deployment)、运行(Runtime)等生命周期的管理,达到应用组件级别的“一次封装,到处运行”。这里的应用组件,既可以是一个Web应用,也可以是一套数据库服务,甚至是一个操作系统。将应用运行在Docker 容器上,可以实现跨平台,跨服务器,只需一次配置准备好相关的应用环境,即可实现到处运行,保证研发和生产环境的一致性,解决了应用和运行环境的兼容性问题,从而极大提升了部署效率,减少故障的可能性
[root@centos8 ~]# cat /etc/redhat-release CentOS Linux release 8.1.1911 (Core)
[root@centos8 ~]# grep CGROUP /boot/config-4.18.0-147.el8.x86_64 CONFIG_CGROUPS=y CONFIG_BLK_CGROUP=y # CONFIG_DEBUG_BLK_CGROUP is not set CONFIG_CGROUP_WRITEBACK=y CONFIG_CGROUP_SCHED=y CONFIG_CGROUP_PIDS=y CONFIG_CGROUP_RDMA=y CONFIG_CGROUP_FREEZER=y CONFIG_CGROUP_HUGETLB=y CONFIG_CGROUP_DEVICE=y CONFIG_CGROUP_CPUACCT=y CONFIG_CGROUP_PERF=y CONFIG_CGROUP_BPF=y # CONFIG_CGROUP_DEBUG is not set CONFIG_SOCK_CGROUP_DATA=y # CONFIG_BLK_CGROUP_IOLATENCY is not set CONFIG_NETFILTER_XT_MATCH_CGROUP=m CONFIG_NET_CLS_CGROUP=y CONFIG_CGROUP_NET_PRIO=y CONFIG_CGROUP_NET_CLASSID=y
Centos 7.6 cgroups:
1 2 3 4 5 6 7 8 9 10 11 12 13 14 15 16 17 18
[root@centos7 ~]# cat /etc/redhat-release CentOS Linux release 7.6.1810 (Core)
[root@centos7 ~]# grep CGROUP /boot/config-3.10.0-957.el7.x86_64 CONFIG_CGROUPS=y # CONFIG_CGROUP_DEBUG is not set CONFIG_CGROUP_FREEZER=y CONFIG_CGROUP_PIDS=y CONFIG_CGROUP_DEVICE=y CONFIG_CGROUP_CPUACCT=y CONFIG_CGROUP_HUGETLB=y CONFIG_CGROUP_PERF=y CONFIG_CGROUP_SCHED=y CONFIG_BLK_CGROUP=y # CONFIG_DEBUG_BLK_CGROUP is not set CONFIG_NETFILTER_XT_MATCH_CGROUP=m CONFIG_NET_CLS_CGROUP=y CONFIG_NETPRIO_CGROUP=y
[root@ubuntu1804 ~]# grep CGROUP /boot/config-4.15.0-29-generic CONFIG_CGROUPS=y CONFIG_BLK_CGROUP=y # CONFIG_DEBUG_BLK_CGROUP is not set CONFIG_CGROUP_WRITEBACK=y CONFIG_CGROUP_SCHED=y CONFIG_CGROUP_PIDS=y CONFIG_CGROUP_RDMA=y CONFIG_CGROUP_FREEZER=y CONFIG_CGROUP_HUGETLB=y CONFIG_CGROUP_DEVICE=y CONFIG_CGROUP_CPUACCT=y CONFIG_CGROUP_PERF=y CONFIG_CGROUP_BPF=y # CONFIG_CGROUP_DEBUG is not set CONFIG_SOCK_CGROUP_DATA=y CONFIG_NETFILTER_XT_MATCH_CGROUP=m CONFIG_NET_CLS_CGROUP=m CONFIG_CGROUP_NET_PRIO=y CONFIG_CGROUP_NET_CLASSID=y
cgroups 中内存模块:
1 2 3 4 5
[root@ubuntu1804 ~]#grep MEMCG /boot/config-4.15.0-29-generic CONFIG_MEMCG=y CONFIG_MEMCG_SWAP=y # CONFIG_MEMCG_SWAP_ENABLED is not set CONFIG_SLUB_MEMCG_SYSFS_ON=y
[root@ubuntu1804 ~]# apt install lxc lxd Reading package lists... Done Building dependency tree Reading state information... Done lxd is already the newest version (3.0.3-0ubuntu1~18.04.1). lxc is already the newest version (3.0.3-0ubuntu1~18.04.1). ......
[root@ubuntu1804 ~]# lxc-checkconfig #检查内核对lcx的支持状况,必须全部为lcx Kernel configuration not found at /proc/config.gz; searching... Kernel configuration found at /boot/config-4.15.0-29-generic --- Namespaces --- Namespaces: enabled Utsname namespace: enabled Ipc namespace: enabled Pid namespace: enabled User namespace: enabled Network namespace: enabled ......
[root@ubuntu1804 ~]# lxc-create -t download --name alpine1 -- --dist alpine --release 3.9 --arch amd Setting up the GPG keyring Downloading the image index Downloading the rootfs Downloading the metadata The image cache is now ready Unpacking the rootfs
Docker CE and EE are released quarterly, and CE also has a monthly “Edge” option. Each Docker EE release is supported and maintained for one year and receives security and critical bugfixes during that period. We are also improving Docker CE maintainability by maintaining each quarterly CE release for 4 months. That gets Docker CE users a new 1-month window to update from one version to the next.
#extras 源中包名为docker [root@centos7 ~]# yum list docker Loaded plugins: fastestmirror Repository base is listed more than once in the configuration Repository extras is listed more than once in the configuration Loading mirror speeds from cached hostfile * base: mirrors.tuna.tsinghua.edu.cn * extras: mirrors.tuna.tsinghua.edu.cn * updates: mirrors.tuna.tsinghua.edu.cn Available Packages docker.x86_64 2:1.13.1-103.git7f2769b.el7.centos extras
[root@rocky8 ~]# docker version Client: Docker Engine - Community Version: 26.1.3 API version: 1.45 Go version: go1.21.10 Git commit: b72abbb Built: Thu May 16 08:34:39 2024 OS/Arch: linux/amd64 Context: default Cannot connect to the Docker daemon at unix:///var/run/docker.sock. Is the docker daemon running?
[root@centos7 ~]# docker version Client: Version: 18.09.9 API version: 1.39 Go version: go1.11.13 Git commit: 039a7df9ba Built: Wed Sep 4 16:51:21 2019 OS/Arch: linux/amd64 Experimental: false Cannot connect to the Docker daemon at unix:///var/run/docker.sock. Is the docker daemon running?
[root@centos8 ~]# docker version Client: Docker Engine - Community Version: 19.03.5 API version: 1.40 Go version: go1.12.12 Git commit: 633a0ea838 Built: Wed Nov 13 07:22:05 2019 OS/Arch: linux/amd64 Experimental: false
Server: Docker Engine - Community Engine: Version: 19.03.5 API version: 1.40 (minimum version 1.12) Go version: go1.12.12 Git commit: 633a0ea838 Built: Wed Nov 13 07:28:45 2019 OS/Arch: linux/amd64 Experimental: false containerd: Version: v1.2.10 GitCommit: b34a5c8af56e510852c35414db4c1f4fa6172339 runc: Version: 1.0.0-rc8+dev GitCommit: 3e425f80a8c931f88e6d94a8c831b9d5aa481657 docker-init: Version: 0.18.0 GitCommit: fec3683
[root@centos8 ~]# docker run hello-world Unable to find image 'hello-world:latest' locally latest: Pulling from library/hello-world 1b930d010525: Pull complete Digest: sha256:9572f7cdcee8591948c2963463447a53466950b3fc15a247fcad1917ca215a2f Status: Downloaded newer image for hello-world:latest
Hello from Docker! This message shows that your installation appears to be working correctly.
To generate this message, Docker took the following steps:
1. The Docker client contacted the Docker daemon. 2. The Docker daemon pulled the "hello-world" image from the Docker Hub. (amd64) 3. The Docker daemon created a new container from that image which runs the executable that produces the output you are currently reading. 4. The Docker daemon streamed that output to the Docker client, which sent it to your terminal.
To try something more ambitious, you can run an Ubuntu container with: $ docker run -it ubuntu bash
Share images, automate workflows, and more with a free Docker ID: https://hub.docker.com/
For more examples and ideas, visit: https://docs.docker.com/get-started/
[Service] Type=notify # the default is not to use systemd for cgroups because the delegate issues still # exists and systemd currently does not support the cgroup feature set required # for containers run by docker ExecStart=/usr/bin/dockerd -H unix://var/run/docker.sock ExecReload=/bin/kill -s HUP \$MAINPID # Having non-zero Limit*s causes performance problems due to accounting overhead # in the kernel. We recommend using cgroups to do container-local accounting. LimitNOFILE=infinity LimitNPROC=infinity LimitCORE=infinity # Uncomment TasksMax if your systemd version supports it. # Only systemd 226 and above support this version. #TasksMax=infinity TimeoutStartSec=0 # set delegate yes so that systemd does not reset the cgroups of docker containers Delegate=yes # kill only the docker process, not all processes in the cgroup KillMode=process # restart the docker process if it exits prematurely Restart=on-failure StartLimitBurst=3 StartLimitInterval=60s
[Service] Type=notify # the default is not to use systemd for cgroups because the delegate issues still # exists and systemd currently does not support the cgroup feature set required #for containers run by docker
# Note that StartLimit* options were moved from "Service" to "Unit" in systemd 229. # Both the old, and new location are accepted by systemd 229 and up, so using the old location # to make them work for either version of systemd. StartLimitBurst=3
# Note that StartLimitInterval was renamed to StartLimitIntervalSec in systemd 230. # Both the old, and new name are accepted by systemd 230 and up, so using the old name to make # this option work for either version of systemd. StartLimitInterval=60s
# Having non-zero Limit*s causes performance problems due to accounting overhead # in the kernel. We recommend using cgroups to do container-local accounting. LimitNOFILE=infinity LimitNPROC=infinity LimitCORE=infinity
# Comment TasksMax if your systemd version does not support it. # Only systemd 226 and above support this option. TasksMax=infinity
# set delegate yes so that systemd does not reset the cgroups of docker containers Delegate=yes
# kill only the docker process, not all processes in the cgroup KillMode=process
# Copyright 2018-2020 Docker Inc. # Licensed under the Apache License, Version 2.0 (the "License"); # you may not use this file except in compliance with the License. # You may obtain a copy of the License at # http://www.apache.org/licenses/LICENSE-2.0 # Unless required by applicable law or agreed to in writing, software # distributed under the License is distributed on an "AS IS" BASIS, # WITHOUT WARRANTIES OR CONDITIONS OF ANY KIND, either express or implied. # See the License for the specific language governing permissions and # limitations under the License.
[Service] ExecStartPre=-/sbin/modprobe overlay ExecStart=/usr/bin/containerd KillMode=process Delegate=yes LimitNOFILE=1048576 # Having non-zero Limit*s causes performance problems due to accounting overhead # in the kernel. We recommend using cgroups to do container-local accounting. LimitNPROC=infinity LimitCORE=infinity TasksMax=infinity
install_docker () { tar xf docker-${DOCKER_VERSION}.tgz -C /usr/local/ cp /usr/local/docker/* /usr/bin/ cat > /lib/systemd/system/docker.service <<-EOF [Unit] Description=Docker Application Container Engine Documentation=https://docs.docker.com After=network-online.target firewalld.service Wants=network-online.target [Service] Type=notify # the default is not to use systemd for cgroups because the delegate issues still # exists and systemd currently does not support the cgroup feature set required # for containers run by docker ExecStart=/usr/bin/dockerd -H unix://var/run/docker.sock ExecReload=/bin/kill -s HUP \$MAINPID # Having non-zero Limit*s causes performance problems due to accounting overhead # in the kernel. We recommend using cgroups to do container-local accounting. LimitNOFILE=infinity LimitNPROC=infinity LimitCORE=infinity # Uncomment TasksMax if your systemd version supports it. # Only systemd 226 and above support this version. #TasksMax=infinity TimeoutStartSec=0 # set delegate yes so that systemd does not reset the cgroups of docker containers Delegate=yes # kill only the docker process, not all processes in the cgroup KillMode=process # restart the docker process if it exits prematurely Restart=on-failure StartLimitBurst=3 StartLimitInterval=60s [Install] WantedBy=multi-user.target EOF systemctl daemon-reload } start_docker (){ systemctl enable --now docker docker version }
[root@ubuntu1804 ~]# grep -i aufs /boot/config-4.15.0-29-generic CONFIG_AUFS_FS=m CONFIG_AUFS_BRANCH_MAX_127=y # CONFIG_AUFS_BRANCH_MAX_511 is not set # CONFIG_AUFS_BRANCH_MAX_1023 is not set # CONFIG_AUFS_BRANCH_MAX_32767 is not set CONFIG_AUFS_SBILIST=y # CONFIG_AUFS_HNOTIFY is not set CONFIG_AUFS_EXPORT=y CONFIG_AUFS_INO_T_64=y CONFIG_AUFS_XATTR=y # CONFIG_AUFS_FHSM is not set # CONFIG_AUFS_RDU is not set CONFIG_AUFS_DIRREN=y # CONFIG_AUFS_SHWH is not set # CONFIG_AUFS_BR_RAMFS is not set # CONFIG_AUFS_BR_FUSE is not set CONFIG_AUFS_BR_HFSPLUS=y CONFIG_AUFS_BDEV_LOOP=y # CONFIG_AUFS_DEBUG is not set
[root@ubuntu1804 ~]# mkdir dir{1,2} [root@ubuntu1804 ~]# echo here is dir1 > dir1/file1 [root@ubuntu1804 ~]# echo here is dir2 > dir2/file2 [root@ubuntu1804 ~]# mkdir /data/aufs [root@ubuntu1804 ~]# mount -t aufs -o br=/root/dir1=ro:/root/dir2=rw none /data/aufs [root@ubuntu1804 ~]# ll /data/aufs/ total 16 drwxr-xr-x 4 root root 4096 Jan 25 16:22 ./ drwxr-xr-x 4 root root 4096 Jan 25 16:22 ../ -rw-r--r-- 1 root root 13 Jan 25 16:22 file1 -rw-r--r-- 1 root root 13 Jan 25 16:22 file2
[root@ubuntu1804 ~]# cat /data/aufs/file1 here is dir1
[root@ubuntu1804 ~]# cat /data/aufs/file2 here is dir2
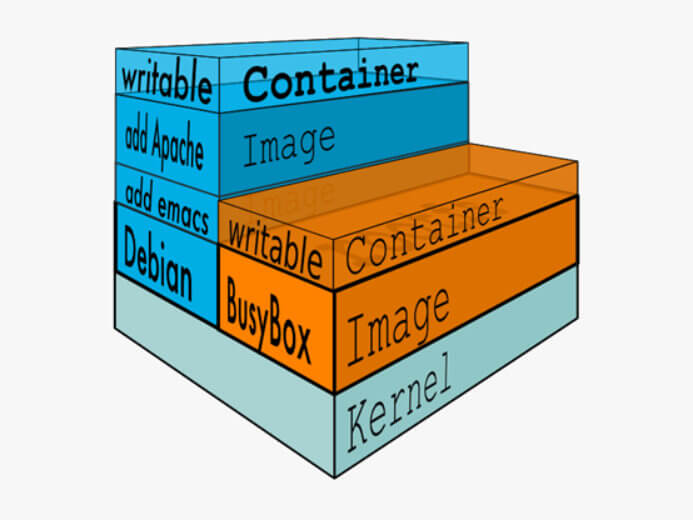
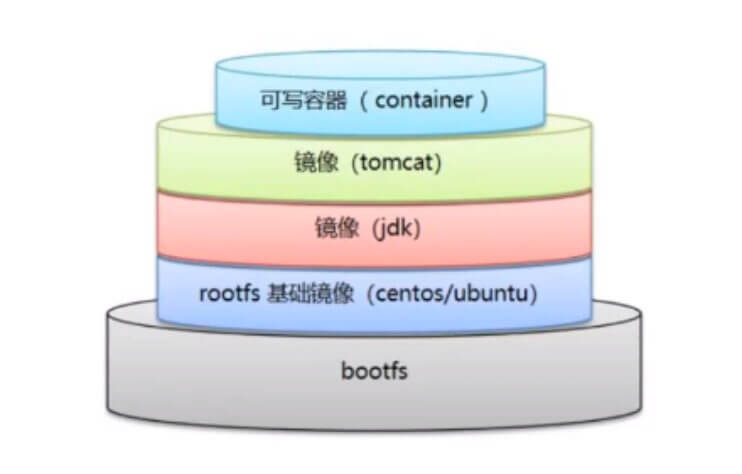
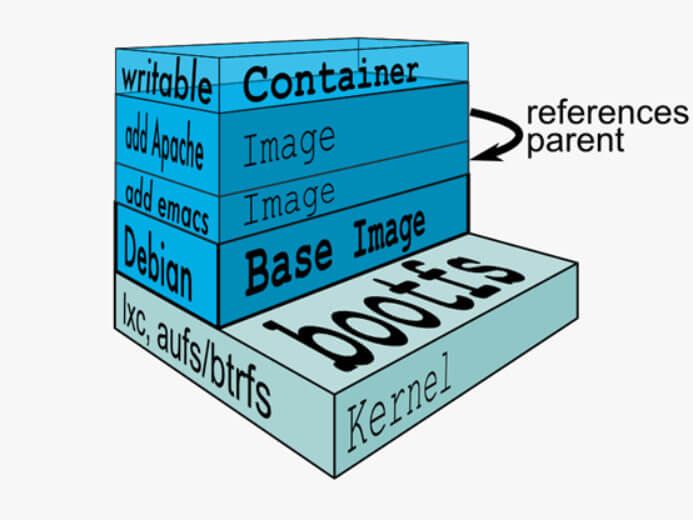
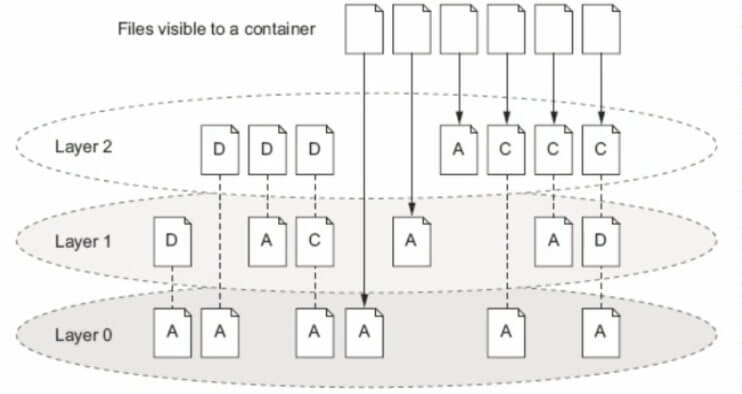
镜像含里面是一层层的文件系统,叫做 Union FS(联合文件系统),联合文件系统,可以将几层目录挂载到一起(就像千层饼,洋葱头,俄罗斯套娃一样),形成一个虚拟文件系统,虚拟文件系统的目录结构就像普通 linux 的目录结构一样,镜像通过这些文件再加上宿主机的内核共同提供了一个 linux 的虚拟环境,每一层文件系统叫做一层 layer,联合文件系统可以对每一层文件系统设置三种权限,只读(readonly)、读写(readwrite)和写出(whiteout-able),但是镜像中每一层文件系统都是只读的,构建镜像的时候,从一个最基本的操作系统开始,每个构建提交的操作都相当于做一层的修改,增加了一层文件系统,一层层往上叠加,上层的修改会覆盖底层该位置的可见性,这也很容易理解,就像上层把底层遮住了一样,当使用镜像的时候,我们只会看到一个完全的整体,不知道里面有几层,实际上也不需要知道里面有几层,结构如下:
[root@ubuntu1804 ~]# cd /data/d2cf0fc540bb3be33ee7340498c41fd4fc82c6bb02b9955fca2109e599301dbd/ [root@ubuntu1804 d2cf0fc540bb3be33ee7340498c41fd4fc82c6bb02b9955fca2109e599301dbd]# ls json layer.tar VERSION
[root@ubuntu1804 d2cf0fc540bb3be33ee7340498c41fd4fc82c6bb02b9955fca2109e599301dbd]# tar xf layer.tar [root@ubuntu1804 d2cf0fc540bb3be33ee7340498c41fd4fc82c6bb02b9955fca2109e599301dbd]# ls bin dev home layer.tar lib64 mnt proc run srv tmp var boot etc json lib media opt root sbin sys usr VERSION
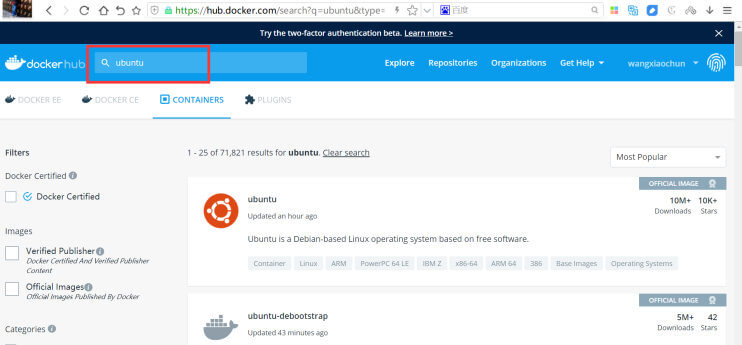
Usage: docker search [OPTIONS] TERM Options: -f, --filter filter Filter output based on conditions provided --format string Pretty-print search using a Go template --limit int Max number of search results (default 25) --no-trunc Don't truncate output 说明: OFFICIAL: 官方 AUTOMATED: 使用第三方docker服务来帮助编译镜像,可以在互联网上面直接拉取到镜像,减少了繁琐的编译过程
范例:
1 2
[root@ubuntu1804 ~]# docker search centos ......
范例: 选择性的查找镜像
1 2 3 4 5 6 7 8 9 10
#搜索点赞 100 个以上的镜像
#旧语法
[root@ubuntu1804 ~]# docker search -s 100 centos Flag --stars has been deprecated, use --filter=stars=3 instead ......
docker pull [OPTIONS] NAME[:TAG|@DIGEST] Options: -a, --all-tags Download all tagged images in the repository --disable-content-trust Skip image verification (default true) --platform string Set platform if server is multi-platform capable -q, --quiet Suppress verbose output
[root@ubuntu1804 ~]# docker images REPOSITORY TAG IMAGE ID CREATED SIZE alpine 3.11.3 e7d92cdc71fe 7 days ago 5.59MB centos centos8.1.1911 470671670cac 7 days ago 237MB busybox latest 6d5fcfe5ff17 4 weeks ago 1.22MB hello-world latest fce289e99eb9 12 months ago 1.84kB
[root@ubuntu1804 ~]# ls -l /var/lib/docker/overlay2/l total 16 lrwxrwxrwx 1 root root 72 Jan 25 19:51 C5ZTDYHYDTO7BQG6HX36MU6X5K -> ../de31641b8d2207de7f08eabb5240474a1aaccfef08b6034dcee02b9623f8d9dc/diff lrwxrwxrwx 1 root root 72 Jan 25 19:57 DEXHVNUGFLFJCSJAKISOHQG7JY -> ../f41df336075611f9e358e5eaf2ebd5089920a90ba68760cdec8da03edff362f7/diff lrwxrwxrwx 1 root root 72 Jan 25 19:51 KJ5IA5AUHFUEQXFKJA7UDUIA7A -> ../1802616f4c8e0a0b52c839431b6faa8ac21f4bd831548dcbd46943d3f60061fa/diff lrwxrwxrwx 1 root root 72 Jan 25 19:51 ZM3U4WDNHGJJX5DXHA5M4ZWAIW -> ../5773b92e1351da5e589d0573d9f22d1ec3be1e0e98edbfcddba4b830f12c7be2/diff
[root@ubuntu1804 ~]# docker info |tail WARNING: the overlay storage-driver is deprecated, and will be removed in a future release. ID: IZHJ:WPIN:BRMC:XQUI:VVVR:UVGK:NZBM:YQXT:JDWB:33RS:45V7:SQWJ Docker Root Dir: /var/lib/docker Debug Mode: false Registry: https://index.docker.io/v1/ Labels: Experimental: false Insecure Registries: 127.0.0.0/8 Live Restore Enabled: false
docker images [OPTIONS] [REPOSITORY[:TAG]] docker image ls [OPTIONS] [REPOSITORY[:TAG]]
#常用选项: -q, --quiet Only show numeric IDs -a, --all Show all images (default hides intermediate images) --digests Show digests --no-trunc Don't truncate output -f, --filter filter Filter output based on conditions provided --format string Pretty-print images using a Go template
执行结果的显示信息说明:
1 2 3 4 5
REPOSITORY #镜像所属的仓库名称 TAG #镜像版本号(标识符),默认为latest IMAGE ID #镜像唯一ID标识,如果ID相同,说明是同一个镜像有多个名称 CREATED #镜像在仓库中被创建时间 VIRTUAL SIZE #镜像的大小
#只查看指定REPOSITORY的镜像 [root@ubuntu1804 ~]# docker images tomcat REPOSITORY TAG IMAGE ID CREATED SIZE tomcat 9.0.37-v1 b8d669ebf99e 47 hours ago 652MB tomcat latest df72227b40e1 5 days ago 647MB
[root@rocky8 ~]# docker images REPOSITORY TAG IMAGE ID CREATED SIZE alpine 3.21.3 60733ce3f702 30 minutes ago 7.83MB nginx latest 53a18edff809 2 months ago 192MB
[root@rocky8 ~]# docker images REPOSITORY TAG IMAGE ID CREATED SIZE alpine 3.21.3 60733ce3f702 34 minutes ago 7.83MB nginx latest 53a18edff809 2 months ago 192MB
[root@rocky8 ~]# docker images REPOSITORY TAG IMAGE ID CREATED SIZE alpine 3.21.3 60733ce3f702 35 minutes ago 7.83MB nginx latest 53a18edff809 2 months ago 192MB
[root@rocky8 ~]# docker images REPOSITORY TAG IMAGE ID CREATED SIZE <none> <none> aded1e1a5b37 7 weeks ago 7.83MB <none> <none> ff7a7936e930 6 months ago 4.28MB
[root@rocky8 ~]# docker images REPOSITORY TAG IMAGE ID CREATED SIZE alpine latest aded1e1a5b37 7 weeks ago 7.83MB busybox latest ff7a7936e930 6 months ago 4.28MB
[root@rocky8 ~]# docker images REPOSITORY TAG IMAGE ID CREATED SIZE alpine latest aded1e1a5b37 7 weeks ago 7.83MB busybox latest ff7a7936e930 6 months ago 4.28MB
#选项: -f, --force Force removal of the image --no-prune Do not delete untagged parents
范例:
1 2 3 4 5 6 7 8 9 10 11 12 13 14 15 16 17
[root@rocky8 ~]# docker images REPOSITORY TAG IMAGE ID CREATED SIZE alpine latest aded1e1a5b37 7 weeks ago 7.83MB busybox latest ff7a7936e930 6 months ago 4.28MB
[root@rocky8 ~]# docker images REPOSITORY TAG IMAGE ID CREATED SIZE
范例: 删除多个镜像
1 2 3 4 5 6 7 8 9 10 11 12 13 14 15
[root@rocky8 ~]# docker images REPOSITORY TAG IMAGE ID CREATED SIZE alpine latest aded1e1a5b37 7 weeks ago 7.83MB busybox latest ff7a7936e930 6 months ago 4.28MB
[root@rocky8 ~]# docker ps -a CONTAINER ID IMAGE COMMAND CREATED STATUS PORTS NAMES ed697ade69d6 centos:centos7.7.1908 "ping 8.8.8.8" 25 seconds ago Up 24 seconds centos7
[root@rocky8 ~]# docker rmi centos:centos7.7.1908 Error response from daemon: conflict: unable to remove repository reference "centos:centos7.7.1908" (must force) - container ed697ade69d6 is using its referenced image 08d05d1d5859
[root@rocky8 ~]# docker ps -a CONTAINER ID IMAGE COMMAND CREATED STATUS PORTS NAMES ed697ade69d6 08d05d1d5859 "ping 8.8.8.8" 50 seconds ago Up 49 seconds centos7
[root@rocky8 ~]# docker images REPOSITORY TAG IMAGE ID CREATED SIZE <none> <none> 08d05d1d5859 5 years ago 204MB
[root@rocky8 ~]# docker rmi -f 08d0 Error response from daemon: conflict: unable to delete 08d05d1d5859 (cannot be forced) - image is being used by running container ed697ade69d6
范例: 删除所有镜像
1 2 3 4 5 6 7 8 9 10 11 12 13 14 15
[root@rocky8 ~]# docker images REPOSITORY TAG IMAGE ID CREATED SIZE alpine latest aded1e1a5b37 7 weeks ago 7.83MB busybox latest ff7a7936e930 6 months ago 4.28MB
[root@rocky8 ~]# docker images REPOSITORY TAG IMAGE ID CREATED SIZE alpine latest aded1e1a5b37 7 weeks ago 7.83MB busybox latest ff7a7936e930 6 months ago 4.28MB
[root@rocky8 ~]# docker tag alpine alpine:3.11 [root@rocky8 ~]# docker images REPOSITORY TAG IMAGE ID CREATED SIZE alpine 3.11 aded1e1a5b37 7 weeks ago 7.83MB alpine latest aded1e1a5b37 7 weeks ago 7.83MB busybox latest ff7a7936e930 6 months ago 4.28MB
Commands: attach Attach local standard input, output, and error streams to a running container commit Create a new image from a container's changes cp Copy files/folders between a container and the local filesystem create Create a new container diff Inspect changes to files or directories on a container's filesystem exec Execute a commandin a running container export Export a container's filesystem as a tar archive inspect Display detailed information on one or more containers kill Kill one or more running containers logs Fetch the logs of a container ls List containers pause Pause all processes within one or more containers port List port mappings or a specific mapping for the container prune Remove all stopped containers rename Rename a container restart Restart one or more containers rm Remove one or more containers run Create and run a new container from an image start Start one or more stopped containers stats Display a live stream of container(s) resource usage statistics stop Stop one or more running containers top Display the running processes of a container unpause Unpause all processes within one or more containers update Update configuration of one or more containers wait Block until one or more containers stop, then print their exit codes Run 'docker container COMMAND --help' for more information on a command.
Hello from Docker! This message shows that your installation appears to be working correctly.
To generate this message, Docker took the following steps: 1. The Docker client contacted the Docker daemon. 2. The Docker daemon pulled the "hello-world" image from the Docker Hub. (amd64) 3. The Docker daemon created a new container from that image which runs the executable that produces the output you are currently reading. 4. The Docker daemon streamed that output to the Docker client, which sent it to your terminal.
To try something more ambitious, you can run an Ubuntu container with: $ docker run -it ubuntu bash
Share images, automate workflows, and more with a free Docker ID: https://hub.docker.com/
For more examples and ideas, visit: https://docs.docker.com/get-started/
[root@rocky8 ~]# docker images REPOSITORY TAG IMAGE ID CREATED SIZE hello-world latest 74cc54e27dc4 2 months ago 10.1kB
[root@rocky8 ~]# docker ps -a CONTAINER ID IMAGE COMMAND CREATED STATUS PORTS NAMES baeee841d085 hello-world "/hello" 24 seconds ago Exited (0) 24 seconds ago quizzical_curran
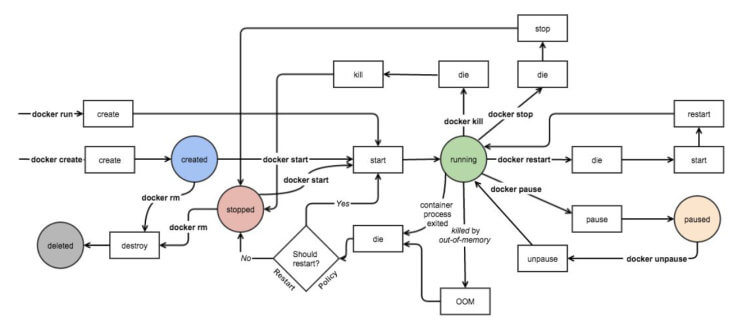
启动容器的流程
启动容器用法
帮助: man docker-run
命令格式:
1 2 3 4 5 6 7 8 9 10 11 12 13 14 15 16 17
docker run [选项] [镜像名] [shell命令] [参数]
#选项: -i, --interactive Keep STDIN open even if not attached,通常和-t一起使用 -t, --tty 分配pseudo-TTY,通常和-i一起使用,注意对应的容器必须运行shell才支持进入 -d, --detach Run container in background and print container ID,台后运行,默认前台 --name string Assign a name to the container --h, --hostname string Container host name --rm Automatically remove the container when it exits -p, --publish list Publish a container's port(s) to the host -P, --publish-all Publish all exposed ports to random ports --dns list Set custom DNS servers --entrypoint string Overwrite the default ENTRYPOINT of the image --restart policy --privileged Give extended privileges to container -e, --env=[] Set environment variables --env-file=[] Read in a line delimited file of environment variables
–restart 可以指定四种不同的policy
policy
说明
no
Default is no,Do not automatically restart the container when it exits.
on-failure[:max-retries]
on-failure[:max-retries] Restart only if the container exits with a non-zero exit status. Optionally, limit the number of restart retries the Docker daemon attempts.
always
Always restart the container regardless of the exit status. When you specify always, the Docker daemon will try to restart the container indefinitely. The container will also always start on daemon startup, regardless of the current state of the container.利用此项可以实现开机自动启动容器
unless-stopped
Always restart the container regardless of the exit status, but do not start it on daemon startup if the container has been put to a stopped state before.
注意: 容器启动后,如果容器内没有前台运行的进程,将自动退出停止
从容器内退出,并停止容器
1
exit
从容器内退出,且容器不停止
1
同时按三个键,ctrl+p+q
范例: 运行容器
1 2 3 4 5
#启动容器时会自动随机字符作为容器名 [root@rocky8 ~]# docker run alpine [root@rocky8 ~]# docker ps -a CONTAINER ID IMAGE COMMAND CREATED STATUS PORTS NAMES 1510db110e72 alpine "/bin/sh" 5 seconds ago Exited (0) 4 seconds ago quizzical_blackwell
范例: 一次性运行容器中命令
1 2 3 4 5 6 7 8 9 10 11
#启动的容器在执行完shell命令就退出,用于测试 [root@rocky8 ~]# docker run busybox echo "Hello WANG" Hello WANG
[root@rocky8 ~]# docker ps CONTAINER ID IMAGE COMMAND CREATED STATUS PORTS NAMES
[root@rocky8 ~]# docker ps -a CONTAINER ID IMAGE COMMAND CREATED STATUS PORTS NAMES 4bcd7fa5126a busybox "echo 'Hello WANG'" 12 seconds ago Exited (0) 10 seconds ago frosty_matsumoto 1510db110e72 alpine "/bin/sh" About a minute ago Exited (0) About a minute ago quizzical_blackwell
范例: 指定容器名称
1 2 3 4 5 6 7
#注意每个容器的名称要唯一 [root@rocky8 ~]# docker run --name a1 alpine [root@rocky8 ~]# docker ps -a CONTAINER ID IMAGE COMMAND CREATED STATUS PORTS NAMES fabb2001c932 alpine "/bin/sh" 5 seconds ago Exited (0) 4 seconds ago a1 4bcd7fa5126a busybox "echo 'Hello WANG'" About a minute ago Exited (0) About a minute ago frosty_matsumoto 1510db110e72 alpine "/bin/sh" 2 minutes ago Exited (0) 2 minutes ago quizzical_blackwell
范例: 运行交互式容器并退出
1 2 3 4 5 6 7 8 9 10 11 12 13 14 15
[root@rocky8 ~]# docker run -it busybox sh / # exit
#用exit退出后容器也停止 [root@rocky8 ~]# docker ps -l CONTAINER ID IMAGE COMMAND CREATED STATUS PORTS NAMES 901cc5325c3d busybox "sh" 32 seconds ago Exited (0) 26 seconds ago
[root@rocky8 ~]# docker run -it busybox sh / # 同时按三个键:ctrl+p+q
#用同时按三个键ctrl+p+q退出后容器不会停止 [root@rocky8 ~]# docker ps -l CONTAINER ID IMAGE COMMAND CREATED STATUS PORTS NAMES 13bdfadb18b5 busybox "sh" 42 seconds ago Up 41 seconds friendly_wozniak
/ # cat /etc/resolv.conf # Generated by Docker Engine. # This file can be edited; Docker Engine will not make further changes once it # has been modified.
nameserver 223.5.5.5 nameserver 223.6.6.6
# Based on host file: '/etc/resolv.conf' (legacy) # Overrides: []
范例: 一次性运行容器,退出后立即删除,用于测试
1 2 3 4 5 6
[root@rocky8 ~]# docker run --rm alpine cat /etc/issue Welcome to Alpine Linux 3.21 Kernel \r on an \m (\l)
[root@rocky8 ~]# docker ps -a CONTAINER ID IMAGE COMMAND CREATED STATUS PORTS NAMES
范例: 创建容器后直接进入并退出
退出两种方式:
exit 容器也停止
按ctrl+p+q 容器不停止
1 2 3 4 5 6 7 8 9 10 11 12 13 14 15 16 17 18 19
#执行exit退出后容器关闭 [root@rocky8 ~]# docker run -it --name alpine2 alpine / # cat /etc/issue Welcome to Alpine Linux 3.21 Kernel \r on an \m (\l)
/ # exit #退出容器,容器也停止运行
[root@rocky8 ~]# docker ps -a CONTAINER ID IMAGE COMMAND CREATED STATUS PORTS NAMES 46c789f613b3 alpine "/bin/sh" 37 seconds ago Exited (0) 5 seconds ago alpine2
[root@rocky8 ~]# docker ps -a CONTAINER ID IMAGE COMMAND CREATED STATUS PORTS NAMES e2d2b939be82 alpine "/bin/sh" 17 seconds ago Up 16 seconds alpine3 46c789f613b3 alpine "/bin/sh" About a minute ago Exited (0) 33 seconds ago alpine2
[root@rocky8 ~]# docker run --rm --name b1 busybox wget -qO - 172.17.0.3 <!DOCTYPE html> <html> <head> <title>Welcome to nginx!</title> <style> html { color-scheme: light dark; } body { width: 35em; margin: 0 auto; font-family: Tahoma, Verdana, Arial, sans-serif; } </style> </head> <body> <h1>Welcome to nginx!</h1> <p>If you see this page, the nginx web server is successfully installed and working. Further configuration is required.</p>
<p>For online documentation and support please refer to <a href="http://nginx.org/">nginx.org</a>.<br/> Commercial support is available at <a href="http://nginx.com/">nginx.com</a>.</p>
<p><em>Thank you for using nginx.</em></p> </body> </html>
[root@rocky8 ~]# docker run -d nginx 10047369f7c26ba8b0d0a32705bbd77a96fc4ac729db979f33c50570e4c1648e
[root@rocky8 ~]# docker ps -l CONTAINER ID IMAGE COMMAND CREATED STATUS PORTS NAMES 10047369f7c2 nginx "/docker-entrypoint.…" 4 seconds ago Up 3 seconds 80/tcp competent_visvesvaraya
#有些容器后台启动不会持续运行 [root@rocky8 ~]# docker run -d --name alpine4 alpine d3762c34560b5e1855e8b492ba0d0972769ea38aefce0d495b27850d51e0f175
[root@rocky8 ~]# docker ps -a CONTAINER ID IMAGE COMMAND CREATED STATUS PORTS NAMES d3762c34560b alpine "/bin/sh" 9 seconds ago Exited (0) 8 seconds ago alpine4 10047369f7c2 nginx "/docker-entrypoint.…" 53 seconds ago Up 51 seconds 80/tcp competent_visvesvaraya f35ebf8bb84f nginx "/docker-entrypoint.…" 5 minutes ago Up 5 minutes 80/tcp musing_cray e2d2b939be82 alpine "/bin/sh" 7 minutes ago Up 7 minutes alpine3 46c789f613b3 alpine "/bin/sh" 7 minutes ago Exited (0) 7 minutes ago alpine2
[root@rocky8 ~]# docker run -td --name alpine5 alpine 185a22f886147340c5207585ae578b13ab32b843ee3616e03fd67602d690f44b
[root@rocky8 ~]# docker ps -a CONTAINER ID IMAGE COMMAND CREATED STATUS PORTS NAMES 185a22f88614 alpine "/bin/sh" 3 seconds ago Up 2 seconds alpine5 d3762c34560b alpine "/bin/sh" 58 seconds ago Exited (0) 57 seconds ago alpine4 10047369f7c2 nginx "/docker-entrypoint.…" About a minute ago Up About a minute 80/tcp competent_visvesvaraya f35ebf8bb84f nginx "/docker-entrypoint.…" 5 minutes ago Up 5 minutes 80/tcp musing_cray e2d2b939be82 alpine "/bin/sh" 7 minutes ago Up 7 minutes alpine3 46c789f613b3 alpine "/bin/sh" 8 minutes ago Exited (0) 8 minutes ago alpine2
[root@rocky8 ~]# docker ps CONTAINER ID IMAGE COMMAND CREATED STATUS PORTS NAMES f3816fb172d3 nginx "/docker-entrypoint.…" 2 seconds ago Up 1 second 0.0.0.0:80->80/tcp, :::80->80/tcp nginx
[root@rocky8 ~]# reboot [root@rocky8 ~]# docker ps CONTAINER ID IMAGE COMMAND CREATED STATUS PORTS NAMES
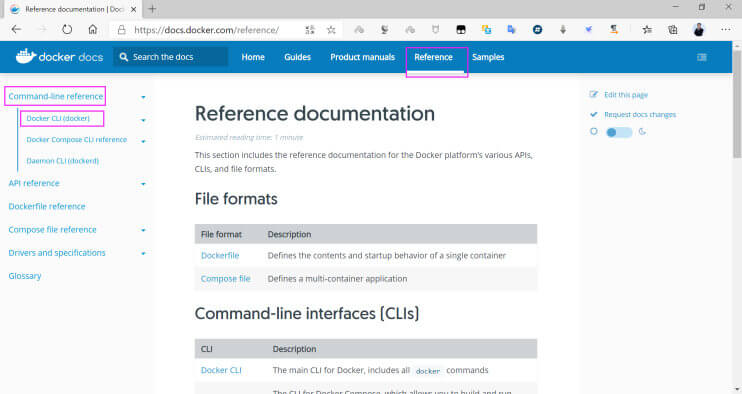
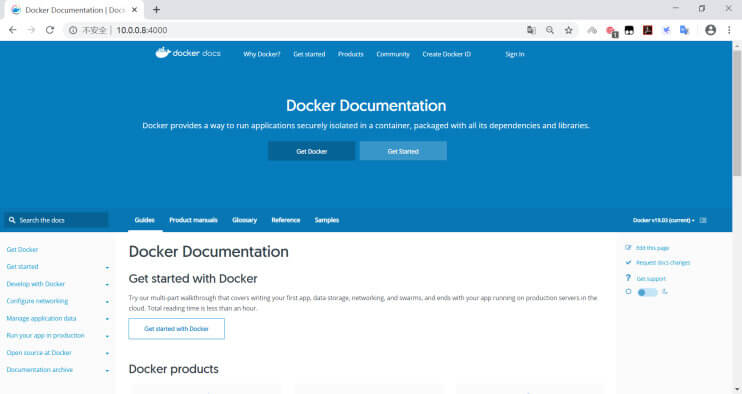
[root@centos8 ~]# docker run -it -d -p 4000:4000 docs/docker.github.io:latest [root@centos8 ~]# docker images docs/docker.github.io REPOSITORY TAG IMAGE ID CREATED SIZE docker.io/docs/docker.github.io latest ffd9131eeee7 2 days ago 1.99 GB #用浏览器访问http://localhost:4000/可以看到下面docker文档资料
查看容器信息
显示当前存在容器
格式
1 2 3 4 5 6 7 8 9 10
docker ps [OPTIONS] docker container ls [OPTIONS]
选项: -a, --all Show all containers (default shows just running) -q, --quiet Only display numeric IDs -s, --size Display total file sizes -f, --filter filter Filter output based on conditions provided -l, --latest Show the latest created container (includes all states) -n, --last int Show n last created containers (includes all states) (default -1)
#显示全部容器,包括退出状态的容器 [root@rocky8 ~]# docker ps -a CONTAINER ID IMAGE COMMAND CREATED STATUS PORTS NAMES 76818e032218 centos:centos7.7.1908 "/bin/bash" 29 minutes ago Exited (0) 23 minutes ago magical_kapitsa 1458fb8f2e1c centos:centos7.7.1908 "/bin/bash" 29 minutes ago Exited (0) 29 minutes ago admiring_diffie 939a9ec34aef centos:centos7.7.1908 "/bin/bash" 32 minutes ago Exited (127) 29 minutes ago priceless_jepsen
#显示容器大小 [root@rocky8 ~]# docker ps -as CONTAINER ID IMAGE COMMAND CREATED STATUS PORTS NAMES SIZE 76818e032218 centos:centos7.7.1908 "/bin/bash" 29 minutes ago Exited (0) 24 minutes ago magical_kapitsa 23B (virtual 204MB) 1458fb8f2e1c centos:centos7.7.1908 "/bin/bash" 30 minutes ago Exited (0) 29 minutes ago admiring_diffie 14B (virtual 204MB) 939a9ec34aef centos:centos7.7.1908 "/bin/bash" 32 minutes ago Exited (127) 30 minutes ago priceless_jepsen 44B (virtual 204MB)
#显示最新创建的容器(停止的容器也能显示) [root@rocky8 ~]# docker ps -l CONTAINER ID IMAGE COMMAND CREATED STATUS PORTS NAMES 76818e032218 centos:centos7.7.1908 "/bin/bash" 30 minutes ago Exited (0) 24 minutes ago magical_kapitsa
范例: 显示指定状态的容器
1 2 3 4 5 6 7 8 9 10 11 12 13 14 15 16 17
[root@rocky8 ~]# docker ps -a CONTAINER ID IMAGE COMMAND CREATED STATUS PORTS NAMES 7916dfca4670 nginx "/docker-entrypoint.…" 16 seconds ago Up 14 seconds 0.0.0.0:80->80/tcp, :::80->80/tcp ngnix 76818e032218 centos:centos7.7.1908 "/bin/bash" 30 minutes ago Exited (0) 25 minutes ago magical_kapitsa 1458fb8f2e1c centos:centos7.7.1908 "/bin/bash" 31 minutes ago Exited (0) 30 minutes ago admiring_diffie 939a9ec34aef centos:centos7.7.1908 "/bin/bash" 33 minutes ago Exited (127) 31 minutes ago priceless_jepsen
[root@rocky8 ~]# docker ps CONTAINER ID IMAGE COMMAND CREATED STATUS PORTS NAMES 7916dfca4670 nginx "/docker-entrypoint.…" 20 seconds ago Up 19 seconds 0.0.0.0:80->80/tcp, :::80->80/tcp ngnix
#查看退出状态的容器 [root@rocky8 ~]# docker ps -f 'status=exited' CONTAINER ID IMAGE COMMAND CREATED STATUS PORTS NAMES 76818e032218 centos:centos7.7.1908 "/bin/bash" 31 minutes ago Exited (0) 25 minutes ago magical_kapitsa 1458fb8f2e1c centos:centos7.7.1908 "/bin/bash" 31 minutes ago Exited (0) 31 minutes ago admiring_diffie 939a9ec34aef centos:centos7.7.1908 "/bin/bash" 34 minutes ago Exited (127) 32 minutes ago priceless_jepsen
查看容器内的进程
1
docker top CONTAINER [ps OPTIONS]
范例:
1 2 3 4 5 6 7 8 9 10 11 12 13 14 15 16 17
[root@rocky8 ~]# docker run -d httpd 0186ab10e78a7b1a42e4ff8a96efc41e83e9070d9ff536a8f12fc56f95bcf9f3
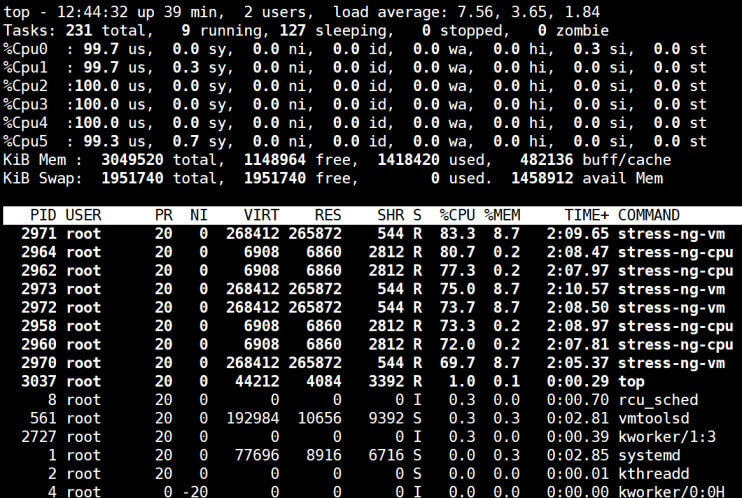
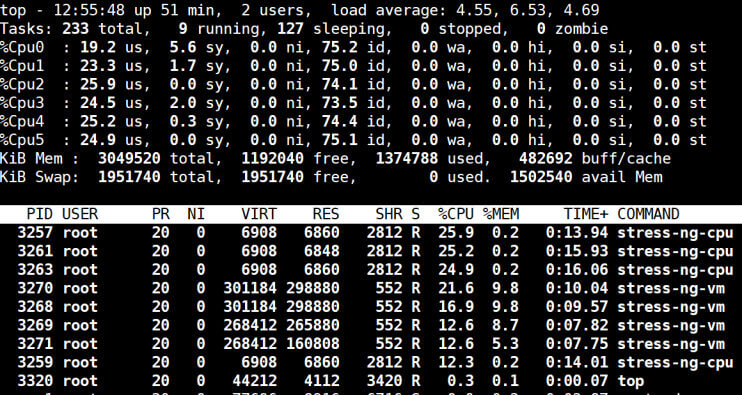
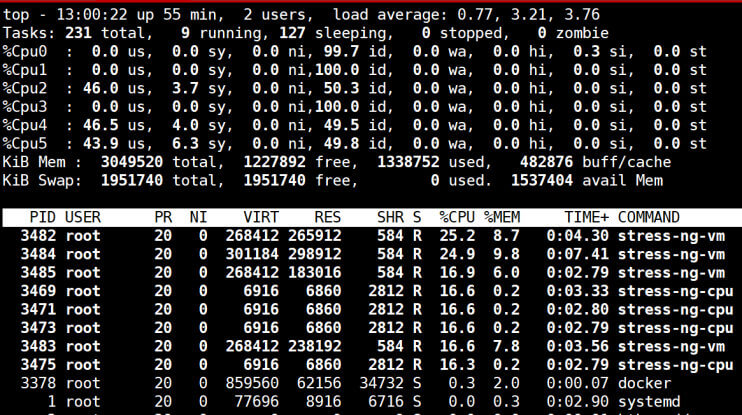
Display a live stream of container(s) resource usage statistics
Options: -a, --all Show all containers (default shows just running) --format string Pretty-print images using a Go template --no-stream Disable streaming stats and only pull the first result --no-trunc Do not truncate output
CONTAINER ID NAME CPU % MEM USAGE / LIMIT MEM % NET I/O BLOCK I/O PIDS 75ac4bb8b6fa elegant_leavitt 0.01% 2.32MiB / 3.799GiB 0.06% 866B / 0B 3.33MB / 0B 2
CONTAINER ID NAME CPU % MEM USAGE / LIMIT MEM % NET I/O BLOCK I/O PIDS 75ac4bb8b6fa elegant_leavitt 0.11% 2.336MiB / 3.799GiB 0.06% 866B / 0B 3.33MB / 0B 2
CONTAINER ID NAME CPU % MEM USAGE / LIMIT MEM % NET I/O BLOCK I/O PIDS 75ac4bb8b6fa elegant_leavitt 0.11% 2.336MiB / 3.799GiB 0.06% 866B / 0B 3.33MB / 0B 2
CONTAINER ID NAME CPU % MEM USAGE / LIMIT MEM % NET I/O BLOCK I/O PIDS 75ac4bb8b6fa elegant_leavitt 0.11% 2.336MiB / 3.799GiB 0.06% 866B / 0B 3.33MB / 0B 2
CONTAINER ID NAME CPU % MEM USAGE / LIMIT MEM % NET I/O BLOCK I/O PIDS 8544b4374f6d elasticsearch 1.17% 385.7MiB / 3.799GiB 9.92% 806B / 0B 0B / 1.69MB 48
查看容器的详细信息
docker inspect 可以查看docker各种对象的详细信息,包括:镜像,容器,网络等
1 2 3 4
docker inspect [OPTIONS] NAME|ID [NAME|ID...] Options: -f, --format string Format the output using the given Go template -s, --size Display total file sizes if the type is container
#选项: -f, --force Force the removal of a running container (uses SIGKILL) -v, --volumes Remove the volumes associated with the container
#删除停止的容器 docker container prune [OPTIONS] Options: --filter filter Provide filter values (e.g. 'until=<timestamp>') -f, --force Do not prompt for confirmation
范例:
1 2 3 4 5 6 7 8 9 10 11 12 13
[root@rocky8 ~]# docker ps -a CONTAINER ID IMAGE COMMAND CREATED STATUS PORTS NAMES 08a0f574a380 alpine "/bin/sh -c 'i=1;whi…" 14 hours ago Exited (137) 12 hours ago ecstatic_goodall 8544b4374f6d elasticsearch:7.6.2 "/usr/local/bin/dock…" 14 hours ago Exited (143) 12 hours ago elasticsearch
[root@rocky8 ~]# docker ps -a CONTAINER ID IMAGE COMMAND CREATED STATUS PORTS NAMES
范例: 删除所有容器
1 2 3 4 5 6 7 8 9 10 11 12 13 14 15 16 17 18 19
[root@rocky8 ~]# docker ps CONTAINER ID IMAGE COMMAND CREATED STATUS PORTS NAMES 85840eb8ad82 alpine "ping 8.8.8.8" 4 seconds ago Up 3 seconds a1 6c8aafb81343 nginx "/docker-entrypoint.…" 36 seconds ago Up 35 seconds 80/tcp relaxed_tu 8a54f8d25ecd httpd "httpd-foreground" 41 seconds ago Up 40 seconds 80/tcp sad_montalcini
[root@rocky8 ~]# docker ps -a CONTAINER ID IMAGE COMMAND CREATED STATUS PORTS NAMES 736f59e27fe4 alpine "/bin/sh" 39 seconds ago Exited (0) 38 seconds ago reverent_burnell 0227d775fbe9 alpine "ping 8.8.8.8" 39 seconds ago Up 38 seconds gracious_austin 0f5ae325ed84 nginx "/docker-entrypoint.…" 40 seconds ago Up 38 seconds 80/tcp intelligent_chandrasekhar 7b03de1b8d6b httpd "httpd-foreground" 40 seconds ago Up 39 seconds 80/tcp elated_elgamal
[root@rocky8 ~]# docker ps -a CONTAINER ID IMAGE COMMAND CREATED STATUS PORTS NAMES 0227d775fbe9 alpine "ping 8.8.8.8" 47 seconds ago Up 46 seconds gracious_austin 0f5ae325ed84 nginx "/docker-entrypoint.…" 48 seconds ago Up 47 seconds 80/tcp intelligent_chandrasekhar 7b03de1b8d6b httpd "httpd-foreground" 48 seconds ago Up 47 seconds 80/tcp elated_elgamal
[root@rocky8 ~]# docker ps -a CONTAINER ID IMAGE COMMAND CREATED STATUS PORTS NAMES 0227d775fbe9 alpine "ping 8.8.8.8" 3 minutes ago Exited (137) 10 seconds ago gracious_austin 0f5ae325ed84 nginx "/docker-entrypoint.…" 3 minutes ago Exited (0) 20 seconds ago intelligent_chandrasekhar 7b03de1b8d6b httpd "httpd-foreground" 3 minutes ago Exited (0) 19 seconds ago elated_elgamal
[root@rocky8 ~]# docker run -d --name nginx1 nginx 9da772bc04c74891bbf755d39f48018dd0be69ffb7f618c554a3cebcc128a7ba
[root@rocky8 ~]# docker ps -a CONTAINER ID IMAGE COMMAND CREATED STATUS PORTS NAMES 9da772bc04c7 nginx "/docker-entrypoint.…" 5 seconds ago Up 5 seconds 80/tcp nginx1
[root@rocky8 ~]# docker stop nginx1 nginx1
[root@rocky8 ~]# docker ps -a CONTAINER ID IMAGE COMMAND CREATED STATUS PORTS NAMES 9da772bc04c7 nginx "/docker-entrypoint.…" 19 seconds ago Exited (0) 2 seconds ago nginx1
[root@rocky8 ~]# docker start nginx1 nginx1
[root@rocky8 ~]# docker ps -a CONTAINER ID IMAGE COMMAND CREATED STATUS PORTS NAMES 9da772bc04c7 nginx "/docker-entrypoint.…" 32 seconds ago Up 2 seconds 80/tcp nginx1
[root@rocky8 ~]# docker restart nginx1 nginx1
[root@rocky8 ~]# docker ps -a CONTAINER ID IMAGE COMMAND CREATED STATUS PORTS NAMES 9da772bc04c7 nginx "/docker-entrypoint.…" 39 seconds ago Up 1 second 80/tcp nginx1
[root@rocky8 ~]# docker run --name c1 -it ubuntu bash Unable to find image 'ubuntu:latest' locally latest: Pulling from library/ubuntu 5a7813e071bf: Pull complete Digest: sha256:72297848456d5d37d1262630108ab308d3e9ec7ed1c3286a32fe09856619a782 Status: Downloaded newer image for ubuntu:latest root@087d1e8eb24c:/# exit exit
[root@rocky8 ~]# docker ps -l CONTAINER ID IMAGE COMMAND CREATED STATUS PORTS NAMES 087d1e8eb24c ubuntu "bash" 13 seconds ago Exited (0) 3 seconds ago c1
[root@rocky8 ~]# docker start c1 c1
[root@rocky8 ~]# docker ps -l CONTAINER ID IMAGE COMMAND CREATED STATUS PORTS NAMES 087d1e8eb24c ubuntu "bash" 21 seconds ago Up 1 second c1
[root@rocky8 ~]# docker stop c1 c1
[root@rocky8 ~]# docker ps -l CONTAINER ID IMAGE COMMAND CREATED STATUS PORTS NAMES 087d1e8eb24c ubuntu "bash" 51 seconds ago Exited (137) 5 seconds ago c1
[root@rocky8 ~]# docker ps -l CONTAINER ID IMAGE COMMAND CREATED STATUS PORTS NAMES 087d1e8eb24c ubuntu "bash" 2 minutes ago Exited (0) 2 seconds ago c1
[root@rocky8 ~]# docker run -d --name nginx1 nginx e091ef51076092115a362c2e7b31a44fef580efc5fbbd681e49fb8c926ce7e4d
[root@rocky8 ~]# docker run -d --name nginx2 nginx 1385dac196bfd5ee5fcb33ee124b29ea6837eab60a7f6b869149974b7df7a1f7
[root@rocky8 ~]# docker ps -a CONTAINER ID IMAGE COMMAND CREATED STATUS PORTS NAMES 1385dac196bf nginx "/docker-entrypoint.…" 3 seconds ago Up 2 seconds 80/tcp nginx2 e091ef510760 nginx "/docker-entrypoint.…" 7 seconds ago Up 6 seconds 80/tcp nginx1
[root@rocky8 ~]# docker ps -a CONTAINER ID IMAGE COMMAND CREATED STATUS PORTS NAMES 1385dac196bf nginx "/docker-entrypoint.…" 16 seconds ago Exited (0) 3 seconds ago nginx2 e091ef510760 nginx "/docker-entrypoint.…" 20 seconds ago Exited (0) 3 seconds ago nginx1
[root@rocky8 ~]# docker ps -a CONTAINER ID IMAGE COMMAND CREATED STATUS PORTS NAMES 1385dac196bf nginx "/docker-entrypoint.…" 26 seconds ago Up 4 seconds 80/tcp nginx2 e091ef510760 nginx "/docker-entrypoint.…" 30 seconds ago Up 3 seconds 80/tcp nginx1
[root@rocky8 ~]# docker run -d --name n1 nginx 3ea6c5504968a12dbe9c3d1bb274888b8157a3b05ca664e164695e07e5516bff
[root@rocky8 ~]# docker top n1 UID PID PPID C STIME TTY TIME CMD root 6206 6185 0 08:30 ? 00:00:00 nginx: master process nginx -g daemon off; 101 6250 6206 0 08:30 ? 00:00:00 nginx: worker process 101 6251 6206 0 08:30 ? 00:00:00 nginx: worker process 101 6252 6206 0 08:30 ? 00:00:00 nginx: worker process 101 6253 6206 0 08:30 ? 00:00:00 nginx: worker process
[root@rocky8 ~]# ps aux | grep nginx root 6206 0.1 0.1 11456 7672 ? Ss 08:30 0:00 nginx: master process nginx -g daemon off; 101 6250 0.0 0.0 11952 2788 ? S 08:30 0:00 nginx: worker process 101 6251 0.0 0.0 11952 2788 ? S 08:30 0:00 nginx: worker process 101 6252 0.0 0.0 11952 2788 ? S 08:30 0:00 nginx: worker process 101 6253 0.0 0.0 11952 2792 ? S 08:30 0:00 nginx: worker process root 6268 0.0 0.0 222012 1100 pts/0 S+ 08:31 0:00 grep --color=autonginx
[root@rocky8 ~]# docker pause n1 n1
[root@rocky8 ~]# docker ps CONTAINER ID IMAGE COMMAND CREATED STATUS PORTS NAMES 3ea6c5504968 nginx "/docker-entrypoint.…" 29 seconds ago Up 28 seconds (Paused) 80/tcp n1
[root@rocky8 ~]# ps aux | grep nginx root 6206 0.0 0.1 11456 7672 ? Ds 08:30 0:00 nginx: master process nginx -g daemon off; 101 6250 0.0 0.0 11952 2788 ? D 08:30 0:00 nginx: worker process 101 6251 0.0 0.0 11952 2788 ? D 08:30 0:00 nginx: worker process 101 6252 0.0 0.0 11952 2788 ? D 08:30 0:00 nginx: worker process 101 6253 0.0 0.0 11952 2792 ? D 08:30 0:00 nginx: worker process root 6289 0.0 0.0 222012 1172 pts/0 S+ 08:31 0:00 grep --color=autonginx
[root@rocky8 ~]# docker unpause n1 n1
[root@rocky8 ~]# ps aux | grep nginx root 6206 0.0 0.1 11456 7672 ? Ss 08:30 0:00 nginx: master process nginx -g daemon off; 101 6250 0.0 0.0 11952 2788 ? S 08:30 0:00 nginx: worker process 101 6251 0.0 0.0 11952 2788 ? S 08:30 0:00 nginx: worker process 101 6252 0.0 0.0 11952 2788 ? S 08:30 0:00 nginx: worker process 101 6253 0.0 0.0 11952 2792 ? S 08:30 0:00 nginx: worker process root 6353 0.0 0.0 222012 1200 pts/0 S+ 08:32 0:00 grep --color=autonginx
[root@rocky8 ~]# docker run -itd centos:8 b96b24033d05fa8de1ce9a79305a78fd34047c38bad4ecbcb187c1e7e33137f3
[root@rocky8 ~]# docker ps -a CONTAINER ID IMAGE COMMAND CREATED STATUS PORTS NAMES b96b24033d05 centos:8 "/bin/bash" 4 seconds ago Up 3 seconds upbeat_khayyam 3ea6c5504968 nginx "/docker-entrypoint.…" 5 minutes ago Up 5 minutes 80/tcp n1
[root@rocky8 ~]# docker ps -a CONTAINER ID IMAGE COMMAND CREATED STATUS PORTS NAMES b96b24033d05 centos:8 "/bin/bash" 26 seconds ago Up 25 seconds (Paused) upbeat_khayyam 3ea6c5504968 nginx "/docker-entrypoint.…" 5 minutes ago Up 5 minutes 80/tcp n1
[root@rocky8 ~]# docker ps -a CONTAINER ID IMAGE COMMAND CREATED STATUS PORTS NAMES b96b24033d05 centos:8 "/bin/bash" 48 seconds ago Up 47 seconds upbeat_khayyam 3ea6c5504968 nginx "/docker-entrypoint.…" 6 minutes ago Up 6 minutes 80/tcp n1
给正在运行的容器发信号
docker kill 可以给容器发信号,默认号SIGKILL,即9信号
格式
1 2 3 4
docker kill [OPTIONS] CONTAINER [CONTAINER...]
#选项: -s, --signal string Signal to send to the container (default "KILL")
1
2
3
4
5
6
7
8
9
10
11
12
[root@rocky8 ~]# docker ps -a CONTAINER ID IMAGE COMMAND CREATED STATUS PORTS NAMES b96b24033d05 centos:8 "/bin/bash" 2 minutes ago Up 2 minutes upbeat_khayyam 3ea6c5504968 nginx "/docker-entrypoint.…" 7 minutes ago Up 7 minutes 80/tcp n1
[root@rocky8 ~]# docker kill n1 n1
[root@rocky8 ~]# docker ps -a CONTAINER ID IMAGE COMMAND CREATED STATUS PORTS NAMES b96b24033d05 centos:8 "/bin/bash" 2 minutes ago Up 2 minutes upbeat_khayyam 3ea6c5504968 nginx "/docker-entrypoint.…" 8 minutes ago Exited (137) 2 seconds ago n1
范例: 关闭所有容器
1 2 3 4 5 6 7 8 9 10 11 12 13 14
[root@rocky8 ~]# docker ps -a CONTAINER ID IMAGE COMMAND CREATED STATUS PORTS NAMES b96b24033d05 centos:8 "/bin/bash" 3 minutes ago Up 3 minutes upbeat_khayyam 3ea6c5504968 nginx "/docker-entrypoint.…" 9 minutes ago Up 1 second 80/tcp n1
[root@rocky8 ~]# docker ps -a CONTAINER ID IMAGE COMMAND CREATED STATUS PORTS NAMES b96b24033d05 centos:8 "/bin/bash" 4 minutes ago Exited (137) 5 seconds ago upbeat_khayyam 3ea6c5504968 nginx "/docker-entrypoint.…" 9 minutes ago Exited (137) 5 seconds ago n1
[root@rocky8 ~]# docker run -it centos:8 [root@a3d06b403f2d /]# cat /etc/redhat-release CentOS Linux release 8.4.2105 #ctrl+p+q 退出
[root@rocky8 ~]# docker ps CONTAINER ID IMAGE COMMAND CREATED STATUS PORTS NAMES a3d06b403f2d centos:8 "/bin/bash" 23 seconds ago Up 22 seconds blissful_kare
[root@rocky8 ~]# docker ps -a CONTAINER ID IMAGE COMMAND CREATED STATUS PORTS NAMES a3d06b403f2d centos:8 "/bin/bash" 2 minutes ago Exited (0) 25 seconds ago blissful_kare
使用exec命令
在运行中的容器启动新进程,可以执行单次命令,以及进入容器
测试环境使用此方式,使用exit退出,但容器还在运行,此为推荐方式
格式:
1 2 3 4 5 6 7 8 9
docker exec [OPTIONS] CONTAINER COMMAND [ARG...] 常用选项: -d, --detach Detached mode: run commandin the background -e, --env list Set environment variables -i, --interactive Keep STDIN open even if not attached -t, --tty Allocate a pseudo-TTY
[root@rocky8 ~]# docker run -itd centos:8 363bd34686630dbfd71ba719d14b9d905347fbb98d72fd9c987679c3203d6885
[root@rocky8 ~]# docker ps CONTAINER ID IMAGE COMMAND CREATED STATUS PORTS NAMES 363bd3468663 centos:8 "/bin/bash" 4 seconds ago Up 3 seconds vibrant_rosalind
[root@rocky8 ~]# docker ps CONTAINER ID IMAGE COMMAND CREATED STATUS PORTS NAMES 363bd3468663 centos:8 "/bin/bash" About a minute ago Up About a minute vibrant_rosalind
暴露所有容器端口
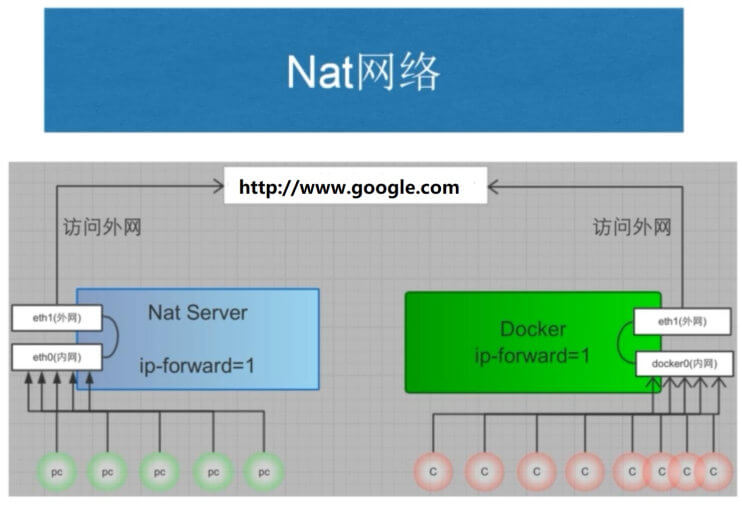
容器启动后,默认处于预定义的NAT网络中,所以外部网络的主机无法直接访问容器中网络服务
docker run -P 可以将事先容器预定义的所有端口映射宿主机的网卡的随机端口,默认从32768开始
使用随机端口 时,当停止容器后再启动可能会导致端口发生变化
1 2 3 4
-P , --publish-all= true | false默认为false
#示例: docker run -d -P --name nginx-c1 nginx #映射容器所有暴露端口至随机本地端口
[root@rocky8 ~]# docker ps -a CONTAINER ID IMAGE COMMAND CREATED STATUS PORTS NAMES
[root@rocky8 ~]# ss -lnt State Recv-Q Send-Q Local Address:Port Peer Address:Port Process LISTEN 0 128 0.0.0.0:22 0.0.0.0:* LISTEN 0 128 [::]:22 [::]:*
#前台启动的会话窗口无法进行其他操作,除非退出,但是退出后容器也会退出 [root@rocky8 ~]# docker run -P nginx /docker-entrypoint.sh: /docker-entrypoint.d/ is not empty, will attempt to perform configuration /docker-entrypoint.sh: Looking for shell scripts in /docker-entrypoint.d/ /docker-entrypoint.sh: Launching /docker-entrypoint.d/10-listen-on-ipv6-by-default.sh 10-listen-on-ipv6-by-default.sh: info: Getting the checksum of /etc/nginx/conf.d/default.conf 10-listen-on-ipv6-by-default.sh: info: Enabled listen on IPv6 in /etc/nginx/conf.d/default.conf /docker-entrypoint.sh: Sourcing /docker-entrypoint.d/15-local-resolvers.envsh /docker-entrypoint.sh: Launching /docker-entrypoint.d/20-envsubst-on-templates.sh /docker-entrypoint.sh: Launching /docker-entrypoint.d/30-tune-worker-processes.sh /docker-entrypoint.sh: Configuration complete; ready for start up 2025/04/08 00:56:05 [notice] 1#1: using the "epoll" event method 2025/04/08 00:56:05 [notice] 1#1: nginx/1.27.4 2025/04/08 00:56:05 [notice] 1#1: built by gcc 12.2.0 (Debian 12.2.0-14) 2025/04/08 00:56:05 [notice] 1#1: OS: Linux 4.18.0-553.el8_10.x86_64 2025/04/08 00:56:05 [notice] 1#1: getrlimit(RLIMIT_NOFILE): 1048576:1048576 2025/04/08 00:56:05 [notice] 1#1: start worker processes 2025/04/08 00:56:05 [notice] 1#1: start worker process 28 2025/04/08 00:56:05 [notice] 1#1: start worker process 29 2025/04/08 00:56:05 [notice] 1#1: start worker process 30 2025/04/08 00:56:05 [notice] 1#1: start worker process 31
#另开一个窗口执行下面命令 [root@rocky8 /]# ss -lnt State Recv-Q Send-Q Local Address:Port Peer Address:Port Process LISTEN 0 128 0.0.0.0:22 0.0.0.0:* LISTEN 0 2048 0.0.0.0:32770 0.0.0.0:* LISTEN 0 128 [::]:22 [::]:* LISTEN 0 2048 [::]:32770 [::]:*
[root@rocky8 /]# docker ps CONTAINER ID IMAGE COMMAND CREATED STATUS PORTS NAMES 33e4f9e80b99 nginx "/docker-entrypoint.…" 56 seconds ago Up 56 seconds 0.0.0.0:32770->80/tcp, :::32770->80/tcp nice_ganguly
[root@rocky8 /]# curl 127.0.0.1:32770 <!DOCTYPE html> <html> <head> <title>Welcome to nginx!</title> <style> html { color-scheme: light dark; } body { width: 35em; margin: 0 auto; font-family: Tahoma, Verdana, Arial, sans-serif; } </style> </head> <body> <h1>Welcome to nginx!</h1> <p>If you see this page, the nginx web server is successfully installed and working. Further configuration is required.</p>
<p>For online documentation and support please refer to <a href="http://nginx.org/">nginx.org</a>.<br/> Commercial support is available at <a href="http://nginx.com/">nginx.com</a>.</p>
<p><em>Thank you for using nginx.</em></p> </body> </html>
#自动生成Iptables规则 [root@rocky8 /]# iptables -vnL -t nat Chain PREROUTING (policy ACCEPT 0 packets, 0 bytes) pkts bytes target prot opt in out source destination 2 104 DOCKER all -- * * 0.0.0.0/0 0.0.0.0/0 ADDRTYPE match dst-type LOCAL
Chain INPUT (policy ACCEPT 0 packets, 0 bytes) pkts bytes target prot opt in out source destination
#回到之前的会话窗口,同时按两个键 ctrl+c 退出容器 [root@rocky8 ~]# docker ps -a CONTAINER ID IMAGE COMMAND CREATED STATUS PORTS NAMES 33e4f9e80b99 nginx "/docker-entrypoint.…" 3 minutes ago Exited (0) 14 seconds ago nice_ganguly
#本地和选程都可以访问 [root@rocky8 ~]# curl 127.0.0.1:32771 <!DOCTYPE html> <html> <head> <title>Welcome to nginx!</title> <style> html { color-scheme: light dark; } body { width: 35em; margin: 0 auto; font-family: Tahoma, Verdana, Arial, sans-serif; } </style> </head> <body> <h1>Welcome to nginx!</h1> <p>If you see this page, the nginx web server is successfully installed and working. Further configuration is required.</p>
<p>For online documentation and support please refer to <a href="http://nginx.org/">nginx.org</a>.<br/> Commercial support is available at <a href="http://nginx.com/">nginx.com</a>.</p>
<p><em>Thank you for using nginx.</em></p> </body> </html>
[root@rocky8 ~]# curl 192.168.1.11:32771 <!DOCTYPE html> <html> <head> <title>Welcome to nginx!</title> <style> html { color-scheme: light dark; } body { width: 35em; margin: 0 auto; font-family: Tahoma, Verdana, Arial, sans-serif; } </style> </head> <body> <h1>Welcome to nginx!</h1> <p>If you see this page, the nginx web server is successfully installed and working. Further configuration is required.</p>
<p>For online documentation and support please refer to <a href="http://nginx.org/">nginx.org</a>.<br/> Commercial support is available at <a href="http://nginx.com/">nginx.com</a>.</p>
<p><em>Thank you for using nginx.</em></p> </body> </html>
[root@rocky8 ~]# iptables -S -P INPUT ACCEPT -P FORWARD DROP -P OUTPUT ACCEPT -N DOCKER -N DOCKER-ISOLATION-STAGE-1 -N DOCKER-ISOLATION-STAGE-2 -N DOCKER-USER -A FORWARD -j DOCKER-USER -A FORWARD -j DOCKER-ISOLATION-STAGE-1 -A FORWARD -o docker0 -m conntrack --ctstate RELATED,ESTABLISHED -j ACCEPT -A FORWARD -o docker0 -j DOCKER -A FORWARD -i docker0 ! -o docker0 -j ACCEPT -A FORWARD -i docker0 -o docker0 -j ACCEPT -A DOCKER -s 192.168.1.11/32 -d 172.17.0.2/32 -p tcp -m tcp --dport 80 -j REJECT --reject-with icmp-port-unreachable -A DOCKER -d 172.17.0.2/32 ! -i docker0 -o docker0 -p tcp -m tcp --dport 80 -j ACCEPT -A DOCKER-ISOLATION-STAGE-1 -i docker0 ! -o docker0 -j DOCKER-ISOLATION-STAGE-2 -A DOCKER-ISOLATION-STAGE-1 -j RETURN -A DOCKER-ISOLATION-STAGE-2 -o docker0 -j DROP -A DOCKER-ISOLATION-STAGE-2 -j RETURN -A DOCKER-USER -j RETURN
#测试访问 [root@rocky8 ~]# docker run -it centos:8 [root@4ff6133ab467 /]# curl 172.17.0.2 curl: (7) Failed to connect to 172.17.0.2 port 80: Connection timed out
指定端口映射
docker run -p 可以将容器的预定义的指定端口映射到宿主机的相应端口
注意: 多个容器映射到宿主机的端口不能冲突,但容器内使用的端口可以相同
方式1: 容器80端口映射宿主机本地随机端口
1
docker run -p 80 --name nginx-test-port1 nginx
方式2: 容器80端口映射到宿主机本地端口81
1
docker run -p 81:80 --name nginx-test-port2 nginx
方式3: 宿主机本地IP:宿主机本地端口:容器端口
1
docker run -p 10.0.0.100:82:80 --name nginx-test-port3 docker.io/nginx
方式4: 宿主机本地IP:宿主机本地随机端口:容器端口,默认从32768开始
1
docker run -p 10.0.0.100::80 --name nginx-test-port4 docker.io/nginx
方式5: 宿主机本机ip:宿主机本地端口:容器端口/协议,默认为tcp协议
1
docker run -p 10.0.0.100:83:80/udp --name nginx-test-port5 docker.io/nginx
选项: --details Show extra details provided to logs -f, --follow Follow log output --since string Show logs since timestamp (e.g. 2013-01-02T13:23:37) or relative (e.g. 42m for 42 minutes) --tail string Number of lines to show from the end of the logs (default "all") -t, --timestamps Show timestamps --until string Show logs before a timestamp (e.g. 2013-01-02T13:23:37) or relative (e.g. 42m for 42 minutes)
[root@rocky8 ~]# docker logs web1 AH00558: httpd: Could not reliably determine the server's fully qualified domain name, using 172.17.0.3. Set the 'ServerName' directive globally to suppress this message AH00558: httpd: Could not reliably determine the server's fully qualified domain name, using 172.17.0.3. Set the 'ServerName' directive globally to suppress this message [Tue Apr 08 02:25:04.722339 2025] [mpm_event:notice] [pid 1:tid 1] AH00489: Apache/2.4.63 (Unix) configured -- resuming normal operations [Tue Apr 08 02:25:04.722480 2025] [core:notice] [pid 1:tid 1] AH00094: Command line: 'httpd -D FOREGROUND'
[root@rocky8 ~]# docker logs -f web1 AH00558: httpd: Could not reliably determine the server's fully qualified domain name, using 172.17.0.3. Set the 'ServerName' directive globally to suppress this message AH00558: httpd: Could not reliably determine the server's fully qualified domain name, using 172.17.0.3. Set the 'ServerName' directive globally to suppress this message [Tue Apr 08 02:25:04.722339 2025] [mpm_event:notice] [pid 1:tid 1] AH00489: Apache/2.4.63 (Unix) configured -- resuming normal operations [Tue Apr 08 02:25:04.722480 2025] [core:notice] [pid 1:tid 1] AH00094: Command line: 'httpd -D FOREGROUND'
[root@rocky8 ~]# docker run -d alpine 6b0764be17d18ae532f048a9f9c70c05e2e0dccdc5577e5024da8e5872ba9507
[root@rocky8 ~]# docker ps -a CONTAINER ID IMAGE COMMAND CREATED STATUS PORTS NAMES 6b0764be17d1 alpine "/bin/sh" 3 seconds ago Exited (0) 2 seconds ago brave_pasteur
[root@rocky8 ~]# docker run -d alpine tail -f /etc/hosts 78138ac0a2f3871f2e6021facdd6f19a4d2054866da308d1a6dcf637bcb1dda9
[root@rocky8 ~]# docker ps -a CONTAINER ID IMAGE COMMAND CREATED STATUS PORTS NAMES 78138ac0a2f3 alpine "tail -f /etc/hosts" 5 seconds ago Up 4 seconds pensive_volhard 6b0764be17d1 alpine "/bin/sh" 27 seconds ago Exited (0) 26 seconds ago brave_pasteur
[root@rocky8 ~]# docker exec -it 78138a sh / # ps aux PID USER TIME COMMAND 1 root 0:00 tail -f /etc/hosts 7 root 0:00 sh 13 root 0:00 ps aux / # exit
[root@rocky8 ~]# docker ps -a CONTAINER ID IMAGE COMMAND CREATED STATUS PORTS NAMES 78138ac0a2f3 alpine "tail -f /etc/hosts" 58 seconds ago Up 56 seconds pensive_volhard 6b0764be17d1 alpine "/bin/sh" About a minute ago Exited (0) About a minute ago brave_pasteur
[root@aae98e2610ba /]# ping aae98e2610ba PING aae98e2610ba (172.17.0.2) 56(84) bytes of data. 64 bytes from aae98e2610ba (172.17.0.2): icmp_seq=1 ttl=64 time=0.033 ms 64 bytes from aae98e2610ba (172.17.0.2): icmp_seq=2 ttl=64 time=0.037 ms 64 bytes from aae98e2610ba (172.17.0.2): icmp_seq=3 ttl=64 time=0.057 ms ^C --- aae98e2610ba ping statistics --- 3 packets transmitted, 3 received, 0% packet loss, time 2060ms rtt min/avg/max/mdev = 0.033/0.042/0.057/0.011 ms
#在另一个会话执行 [root@rocky8 ~]# docker ps CONTAINER ID IMAGE COMMAND CREATED STATUS PORTS NAMES aae98e2610ba centos "/bin/bash" 57 seconds ago Up 56 seconds awesome_leakey
[root@rocky8 ~]# docker run -it --rm centos bash [root@1f89c014042c /]# cat /etc/resolv.conf # Generated by Docker Engine. # This file can be edited; Docker Engine will not make further changes once it # has been modified.
nameserver 223.5.5.5 nameserver 223.6.6.6
# Based on host file: '/etc/resolv.conf' (legacy) # Overrides: [] [root@1f89c014042c /]# exit exit
[root@01037b0422ff /]# cat /etc/resolv.conf # Generated by Docker Engine. # This file can be edited; Docker Engine will not make further changes once it # has been modified.
nameserver 1.1.1.1 nameserver 8.8.8.8
# Based on host file: '/etc/resolv.conf' (legacy) # Overrides: [nameservers] [root@01037b0422ff /]# exit exit
/ # cat /etc/resolv.conf # Generated by Docker Engine. # This file can be edited; Docker Engine will not make further changes once it # has been modified.
[root@rocky8 ~]# systemctl restart docker.service [root@rocky8 ~]# docker run -it --rm centos bash [root@b3299209b405 /]# cat /etc/resolv.conf # Generated by Docker Engine. # This file can be edited; Docker Engine will not make further changes once it # has been modified.
# Based on host file: '/etc/resolv.conf' (legacy) # Overrides: [nameservers search] [root@b3299209b405 /]# exit exit
#用--dns指定优先级更高 [root@rocky8 ~]# docker run -it --rm --dns 1.1.1.1 --dns 8.8.8.8 centos bash [root@39ab9050332b /]# cat /etc/resolv.conf # Generated by Docker Engine. # This file can be edited; Docker Engine will not make further changes once it # has been modified.
[root@rocky8 ~]# docker run -itd centos ea5987185dbc7e3993fe57e3df198704dd10e7d97db6e63cacef1ae7567f3eb9
[root@rocky8 ~]# docker ps CONTAINER ID IMAGE COMMAND CREATED STATUS PORTS NAMES ea5987185dbc centos "/bin/bash" 4 seconds ago Up 3 seconds stupefied_merkle
#将容器内文件复制到宿主机 [root@rocky8 ~]# docker cp -a ea5987:/etc/centos-release . Successfully copied 2.05kB to /root/.
[root@rocky8 ~]# cat centos-release CentOS Linux release 8.4.2105
#MySQL容器运行时需要指定root的口令 [root@rocky8 ~]# docker run --name mysql mysql:8.0.29-oracle You need to specify one of the following: - MYSQL_ROOT_PASSWORD - MYSQL_ALLOW_EMPTY_PASSWORD - MYSQL_RANDOM_ROOT_PASSWORD
Running migrations: Applying account.0001_initial... OK Applying alarm.0001_initial... OK Applying config.0001_initial... OK Applying app.0001_initial... OK Applying repository.0001_initial... OK Applying deploy.0001_initial... OK Applying exec.0001_initial... OK Applying home.0001_initial... OK Applying host.0001_initial... OK Applying monitor.0001_initial... OK Applying notify.0001_initial... OK Applying schedule.0001_initial... OK Applying setting.0001_initial... OK 初始化/更新成功 /usr/local/lib/python3.6/site-packages/OpenSSL/_util.py:6: CryptographyDeprecationWarning: Python 3.6 is no longer supported by the Python core team. Therefore, support for it is deprecated in cryptography. The next release of cryptography will remove support for Python 3.6. from cryptography.hazmat.bindings.openssl.binding import Binding 创建用户成功
[root@rocky8 ~]# docker images REPOSITORY TAG IMAGE ID CREATED SIZE httpd-busybox v2.0 171d8747fd7f 24 seconds ago 4.28MB httpd-busybox v1.0 f9b8dfc20bc0 2 minutes ago 4.28MB
[root@rocky8 ~]# docker run -d -P --name httpd01 httpd-busybox:v1.0 ed184063880e560573a587e62ef866fd04d654588a1028c96a1c2fa5e1f8ff05
[root@rocky8 ~]# docker run -d -P --name httpd02 httpd-busybox:v2.0 c5e31570973b418e157ef2a638fbfacd33226b0df7b029fb08f201b919a4063f
[root@rocky8 ~]# docker ps CONTAINER ID IMAGE COMMAND CREATED STATUS PORTS NAMES 871ddf4c5611 tomcat "catalina.sh run" 42 seconds ago Up 41 seconds 0.0.0.0:8080->8080/tcp, :::8080->8080/tcp heuristic_poitras
[root@rocky8 ~]# docker images REPOSITORY TAG IMAGE ID CREATED SIZE tomcat 11.0.5 e25d1667ae52 4 seconds ago 524MB tomcat latest 88b0f1cee84c 4 weeks ago 519MB
[root@rocky8 ~]# docker ps CONTAINER ID IMAGE COMMAND CREATED STATUS PORTS NAMES bd112dd8a304 tomcat:11.0.5 "catalina.sh run" 4 seconds ago Up 3 seconds 0.0.0.0:8080->8080/tcp, :::8080->8080/tcp tomcat
Please select the geographic area inwhich you live. Subsequent configuration questions will narrow this down by presenting a list of cities, representing the time zones inwhich they are located.
1. Africa 3. Antarctica 5. Asia 7. Australia 9. Indian 11. Etc 2. America 4. Arctic 6. Atlantic 8. Europe 10. Pacific 12. Legacy Geographic area: 5
Please select the city or region corresponding to your time zone.
root@ecb03c42d1f0:/# date Wed Apr 9 09:03:22 CST 2025
root@ecb03c42d1f0:/# cat > /etc/apt/sources.list deb http://mirrors.aliyun.com/ubuntu/ focal main restricted universe multiverse deb-src http://mirrors.aliyun.com/ubuntu/ focal main restricted universe multiverse
deb http://mirrors.aliyun.com/ubuntu/ focal-security main restricted universe multiverse deb-src http://mirrors.aliyun.com/ubuntu/ focal-security main restricted universe multiverse
deb http://mirrors.aliyun.com/ubuntu/ focal-updates main restricted universe multiverse deb-src http://mirrors.aliyun.com/ubuntu/ focal-updates main restricted universe multiverse
deb http://mirrors.aliyun.com/ubuntu/ focal-proposed main restricted universe multiverse deb-src http://mirrors.aliyun.com/ubuntu/ focal-proposed main restricted universe multiverse
deb http://mirrors.aliyun.com/ubuntu/ focal-backports main restricted universe multiverse deb-src http://mirrors.aliyun.com/ubuntu/ focal-backports main restricted universe multiverse ^C
root@ecb03c42d1f0:/# grep include /etc/nginx/nginx.conf include /etc/nginx/modules-enabled/*.conf; include /etc/nginx/mime.types; include /etc/nginx/conf.d/*.conf; include /etc/nginx/sites-enabled/*;
root@ecb03c42d1f0:/# grep root /etc/nginx/sites-enabled/default root /var/www/html; # deny access to .htaccess files, if Apache's document root # root /var/www/example.com;
root@ecb03c42d1f0:/# echo Nginx Website in Docker > /var/www/html/index.html
[root@rocky8 ~]# docker images nginx_ubuntu24.04:v1.18.0 REPOSITORY TAG IMAGE ID CREATED SIZE nginx_ubuntu24.04 v1.18.0 e41ea02f6d24 12 seconds ago 266MB
#更改yum 源 [root@37bb54287e87 /]# rm -rf /etc/yum.repos.d/* [root@37bb54287e87 /]# curl -o /etc/yum.repos.d/CentOS-Base.repo https://mirrors.aliyun.com/repo/Centos-vault-8.5.2111.repo % Total % Received % Xferd Average Speed Time Time Time Current Dload Upload Total Spent Left Speed 100 2495 100 2495 0 0 6160 0 --:--:-- --:--:-- --:--:-- 6175
[root@37bb54287e87 /]# yum repolist Failed to set locale, defaulting to C.UTF-8 repo id repo name AppStream CentOS-8.5.2111 - AppStream - mirrors.aliyun.com base CentOS-8.5.2111 - Base - mirrors.aliyun.com extras CentOS-8.5.2111 - Extras - mirrors.aliyun.com
[root@rocky8 /]# docker ps CONTAINER ID IMAGE COMMAND CREATED STATUS PORTS NAMES c0c74b99406d centos8-nginx:1.16.1.v1 "/usr/sbin/nginx" 5 seconds ago Up 4 seconds 443/tcp, 0.0.0.0:8080->80/tcp, :::8080->80/tcp nginx_centos
访问测试镜像
1 2
[root@rocky8 /]# curl 127.0.0.1:8080 Nginx Page in Docker
实战案例: 基于CentOS 基础镜像手动制作编译版本 nginx 镜像
在CentOS 基础镜像的容器之上手动编译安装nginx,然后再将此容器提交为镜像
下载镜像并初始化系统
1 2 3 4 5 6 7 8 9 10
[root@rocky8 ~]# docker run -it centos /bin/bash
#生成yum源配置 [root@d4641b86e4d3 /]# rm -rf /etc/yum.repos.d/* [root@d4641b86e4d3 /]# curl -o /etc/yum.repos.d/CentOS-Base.repo https://mirrors.aliyun.com/repo/Centos-vault-8.5.2111.repo % Total % Received % Xferd Average Speed Time Time Time Current Dload Upload Total Spent Left Speed 100 2495 100 2495 0 0 6911 0 --:--:-- --:--:-- --:--:-- 6911
[root@rocky8 /]# docker images centos8-nginx:1.26.3 REPOSITORY TAG IMAGE ID CREATED SIZE centos8-nginx 1.26.3 a5f1a17e45cf 11 seconds ago 530MB
从自己的镜像启动容器
1 2 3 4 5 6
[root@rocky8 /]# docker run -d -p 80:80 centos8-nginx:1.26.3 nginx f07cbcf3fdfb0638520fcc30bdf79d9f8e3f9b0ab993b5839c85dd82b7058118
[root@rocky8 /]# docker ps -l CONTAINER ID IMAGE COMMAND CREATED STATUS PORTS NAMES f07cbcf3fdfb centos8-nginx:1.26.3 "nginx" 5 seconds ago Up 4 seconds 0.0.0.0:80->80/tcp, :::80->80/tcp optimistic_cori
FROM [--platform=<platform>] <image> [AS <name>] FROM [--platform=<platform>] <image>[:<tag>] [AS <name>] FROM [--platform=<platform>] <image>[@<digest>] [AS <name>]
#说明: --platform 指定镜像的平台,比如: linux/amd64, linux/arm64, or windows/amd64 tag 和 digest是可选项,如果不指定,默认为latest
说明: 关于scratch 镜像
1 2 3 4 5 6
FROM scratch 参考链接: https://hub.docker.com/_/scratch?tab=description https://docs.docker.com/develop/develop-images/baseimages/ 该镜像是一个空的镜像,可以用于构建busybox等超小镜像,可以说是真正的从零开始构建属于自己的镜像 该镜像在构建基础镜像(例如debian和busybox)或超最小镜像(仅包含一个二进制文件及其所需内容,例如:hello-world)的上下文中最有用。
范例:
1 2 3 4
FROM scratch #所有镜像的起源镜像,相当于Object类 FROM ubuntu FROM ubuntu:bionic FROM debian:buster-slim
#检查结果返回值: 0 #success the container is healthy and ready for use 1 #unhealthy the container is not working correctly 2 #reserved do not use this exit code
#如果健康性检查成功,STATUS会显示 (healthy) [root@rocky8 dockerfile]# docker ps CONTAINER ID IMAGE COMMAND CREATED STATUS PORTS NAMES 56060ebe7bca test:v2.0"/docker-entrypoint.…"12 seconds ago Up 11 seconds (healthy) 80/tcp happy_goldberg 2b7b33437449 nginx "/docker-entrypoint.…"15 minutes ago Up 15 minutes 80/tcp quizzical_tharp
#如果健康性检查不通过,STATUS会显示(unhealthy) [root@rocky8 dockerfile]# docker ps CONTAINER ID IMAGE COMMAND CREATED STATUS PORTS NAMES 56060ebe7bca test:v2.0"/docker-entrypoint.…"12 seconds ago Up 11 seconds (unhealthy) 80/tcp happy_goldberg
#下载基础镜像 [root@rocky8 ~]# docker pull centos:centos7.7.1908 [root@rocky8 ~]# docker images REPOSITORY TAG IMAGE ID CREATED SIZE centos centos7.7.1908 08d05d1d5859 5 years ago 204MB
#先制作基于基础镜像的系统base镜像 [root@rocky8 ~]# cd /data/dockerfile/system/centos/
#创建Dockerfile,注意可以是dockerfile,但无语法着色功能 [root@rocky8 centos]# vim Dockerfile [root@rocky8 centos]# cat Dockerfile FROM centos:centos7.7.1908 LABEL maintainer="wshuaiqing.cn" RUN rm -rf /etc/yum.repos.d/* && curl -o /etc/yum.repos.d/Centos-7.repo http://mirrors.aliyun.com/repo/Centos-7.repo \ && curl -o /etc/yum.repos.d/epel-7.repo http://mirrors.aliyun.com/repo/epel-7.repo \ && yum install -y vim-enhanced tcpdump lrzsz tree telnet bash-completion net-tools wget curl bzip2 lsof zip unzip nfs-utils gcc make gcc-c++ glibc glibc-devel pcre pcre-devel openssl openssl-devel systemd-devel zlib-devel vim \ && yum clean all \ && rm -rf /etc/localtime \ && ln -s /usr/share/zoneinfo/Asia/Shanghai /etc/localtime
[root@rocky8 centos]# docker build -t centos7-base:v1 . [root@rocky8 centos]# docker images REPOSITORY TAG IMAGE ID CREATED SIZE centos7-base v1 4215b0f03391 2 minutes ago 435MB centos centos7.7.1908 08d05d1d5859 5 years ago 204MB
[root@rocky8 centos]# docker history centos7-base:v1 IMAGE CREATED CREATED BY SIZE COMMENT 4215b0f03391 2 minutes ago RUN /bin/sh -c rm -rf /etc/yum.repos.d/* && … 231MB buildkit.dockerfile.v0 <missing> 2 minutes ago LABEL maintainer=wshuaiqing.cn 0B buildkit.dockerfile.v0 <missing> 5 years ago /bin/sh -c #(nop) CMD ["/bin/bash"] 0B <missing> 5 years ago /bin/sh -c #(nop) LABEL org.label-schema.sc… 0B <missing> 5 years ago /bin/sh -c #(nop) ADD file:3e2a127b44ed01afc… 204MB
实战案例: Dockerfile 制作基于Base镜像的 nginx 镜像
在Dockerfile目录下准备编译安装的相关文件
1 2 3 4 5 6 7 8
[root@rocky8 ~]# mkdir /data/dockerfile/web/nginx/1.26 [root@rocky8 ~]# cd /data/dockerfile/web/nginx/1.26 [root@rocky8 1.26]# wget https://nginx.org/download/nginx-1.26.3.tar.gz [root@rocky8 1.26]# mkdir app [root@rocky8 1.26]# echo "Test page in app" > app/index.html [root@rocky8 1.26]# tar zcf app.tar.gz app [root@rocky8 1.26]# ls app app.tar.gz nginx-1.26.3.tar.gz
在一台测试机进行编译安装同一版本的nginx 生成模版配置文件
1 2 3 4 5 6 7 8 9 10 11 12
[root@rocky8 src]# yum install -y vim-enhanced tcpdump lrzsz tree telnet bash-completion net-tools wget curl bzip2 lsof zip unzip nfs-utils gcc make gcc-c++ glibc glibc-devel pcre pcre-devel openssl openssl-devel systemd-devel zlib-devel
[root@rocky8 nginx-1.26.3]# ./configure --prefix=/apps/nginx && make -j 4 && make install
[root@rocky8 ~]# vim /data/dockerfile/web/nginx/1.26/nginx.conf user nginx; worker_processes 1; daemon off; #增加此行,前台运行nginx
编写Dockerfile文件
1 2 3 4 5 6 7 8 9 10 11 12 13 14 15
[root@rocky8 ~]# cd /data/dockerfile/web/nginx/1.26 [root@rocky8 1.26]# vim Dockerfile [root@rocky8 1.26]# cat Dockerfile FROM centos7-base:v1 LABEL maintainers="wshuaiqing.cn" ADD nginx-1.26.3.tar.gz /usr/local/src RUN cd /usr/local/src/nginx-1.26.3 \ && ./configure --prefix=/apps/nginx \ && make && make install \ && rm -rf /usr/local/src/nginx* \ && useradd -r nginx COPY nginx.conf /apps/nginx/conf/ ADD app.tar.gz /apps/nginx/html/ EXPOSE 80 443 CMD ["/apps/nginx/sbin/nginx"]
生成nginx镜像
1 2 3 4 5 6 7 8 9
[root@rocky8 1.26]# ls app app.tar.gz Dockerfile nginx-1.26.3.tar.gz nginx.conf
[root@rocky8 1.26]# docker build -t nginx-centos7:1.26.1 . [root@rocky8 1.26]# docker images REPOSITORY TAG IMAGE ID CREATED SIZE nginx-centos7 1.26.1 e3157f879258 10 seconds ago 446MB centos7-base v1 4215b0f03391 37 minutes ago 435MB centos centos7.7.1908 08d05d1d5859 5 years ago 204MB
生成的容器测试镜像
1 2 3 4 5 6 7 8 9 10 11 12 13 14 15 16 17 18 19
[root@rocky8 ~]# docker run -d -p 80:80 nginx-centos7:1.26.1 7afa7df01d49a11f2ba22582ed5e90df89c0de35e6aff907cf6513ef072eb17b
[root@rocky8 ~]# docker ps CONTAINER ID IMAGE COMMAND CREATED STATUS PORTS NAMES 7afa7df01d49 nginx-centos7:1.26.1 "/apps/nginx/sbin/ng…" 3 seconds ago Up 2 seconds 0.0.0.0:80->80/tcp, :::80->80/tcp, 443/tcp focused_golick
[root@rocky8 ~]# docker exec -it 7afa7df01d49 bash [root@7afa7df01d49 /]# ps aux USER PID %CPU %MEM VSZ RSS TTY STAT START TIME COMMAND root 1 0.0 0.0 20604 2404 ? Ss 20:33 0:00 nginx nginx 7 0.0 0.0 21048 2300 ? S 20:33 0:00 nginx root 14 0.5 0.0 12368 3608 pts/0 Ss 20:33 0:00 bash root 34 0.0 0.0 51772 3536 pts/0 R+ 20:33 0:00 ps au [root@7afa7df01d49 /]# exit exit
[root@rocky8 ~]# curl 127.0.0.1/app/ Test page in app
实战案例: Dockerfile 直接制作 nginx 镜像
在Dockerfile目录下准备编译安装的相关文件
1 2 3 4 5 6 7 8 9 10
[root@rocky8 ~]# cd /data/dockerfile/web/nginx/1.26/
[root@rocky8 go-hello]# docker images go-hello REPOSITORY TAG IMAGE ID CREATED SIZE go-hello v2.0 f94585d3013e About a minute ago 7.35MB go-hello v1.0 e127f2c277ec 4 minutes ago 331MB
[root@rocky8 centos]# bash build.sh [root@rocky8 centos]# docker images centos7-base:v2 REPOSITORY TAG IMAGE ID CREATED SIZE centos7-base v2 356779b33302 About a minute ago 435MB
[root@rocky8 tomcat-base-8.5.50]# tree . ├── apache-tomcat-8.5.50.tar.gz ├── build.sh └── Dockerfile
0 directories, 3 files
[root@rocky8 tomcat-base-8.5.50]# bash build.sh [root@rocky8 tomcat-base-8.5.50]# docker images tomcat-base:v8.5.50 REPOSITORY TAG IMAGE ID CREATED SIZE tomcat-base v8.5.50 49991f088aa0 About a minute ago 819MB
验证镜像构建完成
1 2 3 4 5 6 7 8 9 10 11 12 13 14 15 16
[root@rocky8 tomcat-base-8.5.50]# docker run -itt --rm -p 8080:8080 tomcat-base:v8.5.50 bash
[root@c42f13fbb34d /]# /apps/tomcat/bin/catalina.sh start Using CATALINA_BASE: /apps/tomcat Using CATALINA_HOME: /apps/tomcat Using CATALINA_TMPDIR: /apps/tomcat/temp Using JRE_HOME: /usr/local/jdk/jre Using CLASSPATH: /apps/tomcat/bin/bootstrap.jar:/apps/tomcat/bin/tomcat-juli.jar Tomcat started.
[root@c42f13fbb34d /]# netstat -ntl Active Internet connections (only servers) Proto Recv-Q Send-Q Local Address Foreign Address State tcp6 0 0 127.0.0.1:8005 :::* LISTEN tcp6 0 0 :::8009 :::* LISTEN tcp6 0 0 :::8080 :::* LISTEN
[root@rocky8 tomcat-app1]# docker run -d -p 8080:8080 tomcat-web:app1 a21fcd34f711bc27379fea90137805dfc8b79c55123b1919c1e7b6154d4f52a4
[root@rocky8 tomcat-app1]# curl 127.0.0.1:8080/app/ Tomcat Page in app1
[root@rocky8 tomcat-app1]# docker exec -it a21fcd bash [root@a21fcd34f711 /]# ps aux USER PID %CPU %MEM VSZ RSS TTY STAT START TIME COMMAND root 1 0.0 0.0 13308 3108 ? Ss 04:02 0:00 /bin/ www 26 5.3 2.3 5460176 136224 ? Sl 04:02 0:02 /usr/ root 28 0.0 0.0 83600 4528 ? S 04:02 0:00 su - www 29 0.0 0.0 4420 684 ? Ss 04:02 0:00 tail root 91 0.4 0.0 13972 4068 pts/0 Ss 04:03 0:00 bash root 111 0.0 0.0 53372 3940 pts/0 R+ 04:03 0:00 ps au
[root@a21fcd34f711 /]# vim /data/tomcat/webapps/app/index.jsp [root@a21fcd34f711 /]# cat /data/tomcat/webapps/app/index.jsp Tomcat Page in app1 v2
[root@a21fcd34f711 /]# /apps/tomcat/bin/catalina.sh stop Using CATALINA_BASE: /apps/tomcat Using CATALINA_HOME: /apps/tomcat Using CATALINA_TMPDIR: /apps/tomcat/temp Using JRE_HOME: /usr/local/jdk/jre Using CLASSPATH: /apps/tomcat/bin/bootstrap.jar:/apps/tomcat/bin/tomcat-juli.jar
[root@a21fcd34f711 /]# /apps/tomcat/bin/catalina.sh start Using CATALINA_BASE: /apps/tomcat Using CATALINA_HOME: /apps/tomcat Using CATALINA_TMPDIR: /apps/tomcat/temp Using JRE_HOME: /usr/local/jdk/jre Using CLASSPATH: /apps/tomcat/bin/bootstrap.jar:/apps/tomcat/bin/tomcat-juli.jar Tomcat started.
[root@a21fcd34f711 /]# exit exit
[root@rocky8 tomcat-app1]# curl 127.0.0.1:8080/app/ Tomcat Page in app1 v2
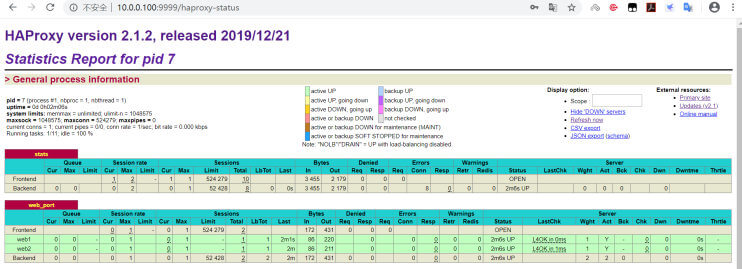
listen stats mode http bind 0.0.0.0:9999 stats enable log global stats uri /haproxy-status stats auth haadmin:123456
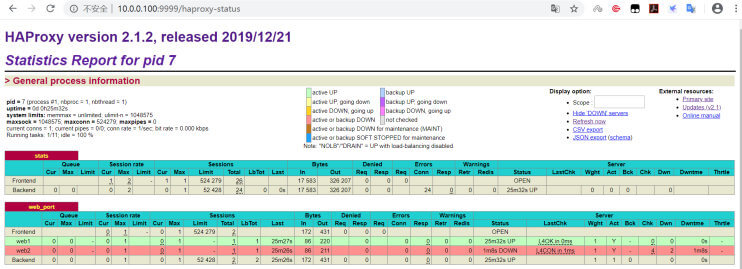
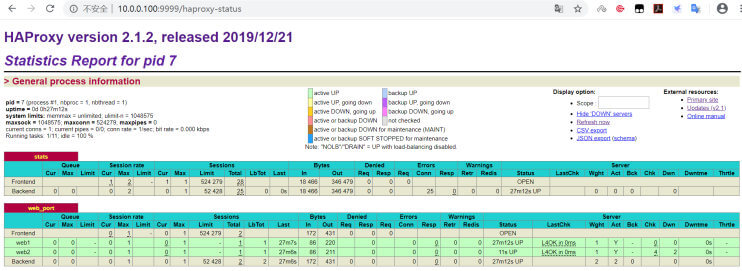
listen web_port bind 0.0.0.0:80 mode http log global balance roundrobin server web1 192.168.1.12:8080 check inter 3000 fall 2 rise 5 server web2 192.168.1.13:8080 check inter 3000 fall 2 rise 5
准备Dockerfile
1 2 3 4 5 6 7 8 9 10 11 12 13 14 15
[root@rocky8 2.1.2-centos7]# vim Dockerfile [root@rocky8 2.1.2-centos7]# cat Dockerfile FROM centos7-base:v1 LABEL maintainer="wshuaiqing.cn" ADD haproxy-2.1.2.tar.gz /usr/local/src/ RUN cd /usr/local/src/haproxy-2.1.2 \ && make ARCH=x86_64 TARGET=linux-glibc USE_PCRE=1 USE_OPENSSL=1 USE_ZLIB=1 USE_SYSTEMD=1 USE_CPU_AFFINITY=1 PREFIX=/apps/haproxy \ && make install PREFIX=/apps/haproxy \ && ln -s /apps/haproxy/sbin/haproxy /usr/sbin/ \ && mkdir /apps/haproxy/run \ && rm -rf /usr/local/src/haproxy* ADD haproxy.cfg /etc/haproxy/ ADD run_haproxy.sh /usr/bin EXPOSE 80 9999 CMD ["run_haproxy.sh"]
[root@rocky8 ~]# docker ps -a CONTAINER ID IMAGE COMMAND CREATED STATUS PORTS NAMES 8d37533a827e tomcat-web:app2 "/apps/tomcat/bin/ru…" 11 minutes ago Exited (137) 3 seconds ago eager_hermann
[root@rocky8 ~]# docker ps CONTAINER ID IMAGE COMMAND CREATED STATUS PORTS NAMES 8d37533a827e tomcat-web:app2 "/apps/tomcat/bin/ru…" 12 minutes ago Up 3 seconds 8009/tcp, 0.0.0.0:8080->8080/tcp, :::8080->8080/tcp eager_hermann
#下载ubuntu1804镜像 [root@rocky8 ~]# docker pull ubuntu:18.04 [root@rocky8 ~]# docker images ubuntu* REPOSITORY TAG IMAGE ID CREATED SIZE ubuntu 18.04 f9a80a55f492 22 months ago 63.2MB
#准备相关文件 [root@rocky8 ~]# mkdir /data/dockerfile/web/nginx/1.16.1-ubuntu1804 [root@rocky8 ~]# cd /data/dockerfile/web/nginx/1.16.1-ubuntu1804 [root@rocky8 1.16.1-ubuntu1804]# vim sources.list [root@rocky8 1.16.1-ubuntu1804]# cat sources.list deb http://mirrors.aliyun.com/ubuntu/ bionic main restricted universe mul deb-src http://mirrors.aliyun.com/ubuntu/ bionic main restricted universe
deb http://mirrors.aliyun.com/ubuntu/ bionic-security main restricted uni deb-src http://mirrors.aliyun.com/ubuntu/ bionic-security main restricted
deb http://mirrors.aliyun.com/ubuntu/ bionic-updates main restricted univ deb-src http://mirrors.aliyun.com/ubuntu/ bionic-updates main restricted
deb http://mirrors.aliyun.com/ubuntu/ bionic-proposed main restricted uni deb-src http://mirrors.aliyun.com/ubuntu/ bionic-proposed main restricted
deb http://mirrors.aliyun.com/ubuntu/ bionic-backports main restricted un deb-src http://mirrors.aliyun.com/ubuntu/ bionic-backports main restricte
[root@rocky8 ~]# mount overlay on /var/lib/docker/overlay2/262df7accd0cfc5a9419c286311d5aa2227036d46f53c90fae3f335a8035bd92/merged type overlay (rw,relatime,lowerdir=/var/lib/docker/overlay2/l/XSKSD5QI45KMGQLHL2SPMZZWE5:/var/lib/docker/overlay2/l/R3QW44B3Y7JFMBAW7OQ2SAHXAI,upperdir=/var/lib/docker/overlay2/262df7accd0cfc5a9419c286311d5aa2227036d46f53c90fae3f335a8035bd92/diff,workdir=/var/lib/docker/overlay2/262df7accd0cfc5a9419c286311d5aa2227036d46f53c90fae3f335a8035bd92/work) nsfs on /run/docker/netns/9d7642d20c01 type nsfs (rw)
-v, --volumes Remove the volumes associated with the container
管理数据卷命令
1 2 3 4 5 6 7 8
docker volume COMMAND
Commands: create Create a volume inspect Display detailed information on one or more volumes ls List volumes prune Remove all unused local volumes rm Remove one or more volumes
查看数据卷的挂载关系
1
docker inspect --format="{{.Mounts}}" <容器ID>
范例: 删除所有数据卷
1
[root@ubuntu1804 ~]# docker volume rm `docker volume ls -q`
[root@rocky8 ~]# mkdir /data/testdir [root@rocky8 ~]# echo Test page on host > /data/testdir/index.html
查看容器相关目录路径
1 2 3 4 5 6 7 8 9 10 11 12 13 14 15 16 17 18 19
[root@rocky8 ~]# docker images nginx* REPOSITORY TAG IMAGE ID CREATED SIZE nginx-ubuntu1804 1.16.1 7d7aa6c8e4ef About an hour ago 394MB nginx-alpine 1.16.1 e7fc09b41ec4 2 hours ago 262MB nginx-centos7 1.26.3-v2 08c66ca1868e 8 hours ago 405MB nginx-centos7 1.26.1 e3157f879258 12 hours ago 446MB nginx latest 53a18edff809 2 months ago 192MB
[root@rocky8 ~]# docker run -it --rm nginx-alpine:1.16.1 sh / # cat /apps/nginx/conf/nginx.conf location / { root html; index index.html index.htm; }
/ # cat apps/nginx/html/index.html Test Page based nginx-alpine
[root@rocky8 ~]# docker pull mysql:5.7.30 [root@rocky8 ~]# docker images mysql REPOSITORY TAG IMAGE ID CREATED SIZE mysql 8.0.29-oracle 33037edcac9b 2 years ago 444MB mysql 5.7.30 9cfcce23593a 4 years ago 448MB
[root@rocky8 ~]# docker ps CONTAINER ID IMAGE COMMAND CREATED STATUS PORTS NAMES 61ad12a974dc mysql:5.7.30 "docker-entrypoint.s…" 16 seconds ago Up 15 seconds 0.0.0.0:3306->3306/tcp, :::3306->3306/tcp, 33060/tcp hungry_williams
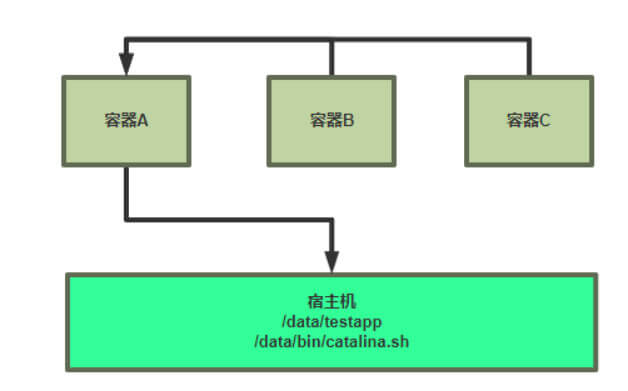
[root@d83a282d18dd /]# mount ...... /dev/mapper/rl-root on /etc/resolv.conf type xfs (rw,relatime,attr2,inode64,logbufs=8,logbsize=32k,noquota) /dev/mapper/rl-root on /etc/hostname type xfs (rw,relatime,attr2,inode64,logbufs=8,logbsize=32k,noquota) /dev/mapper/rl-root on /etc/hosts type xfs (rw,relatime,attr2,inode64,logbufs=8,logbsize=32k,noquota) /dev/mapper/rl-root on /apps/apache-tomcat-8.5.50/logs type xfs (rw,relatime,attr2,inode64,logbufs=8,logbsize=32k,noquota) /dev/mapper/rl-root on /apps/apache-tomcat-8.5.50/bin/catalina.sh type xfs (ro,relatime,attr2,inode64,logbufs=8,logbsize=32k,noquota) /dev/mapper/rl-root on /data/tomcat/webapps/testapp type xfs (rw,relatime,attr2,inode64,logbufs=8,logbsize=32k,noquota) ......
[root@rocky8 ~]# curl 127.0.0.1 <!DOCTYPE html> <html> <head> <title>Welcome to nginx!</title> <style> html { color-scheme: light dark; } body { width: 35em; margin: 0 auto; font-family: Tahoma, Verdana, Arial, sans-serif; } </style> </head> <body> <h1>Welcome to nginx!</h1> <p>If you see this page, the nginx web server is successfully installed and working. Further configuration is required.</p>
<p>For online documentation and support please refer to <a href="http://nginx.org/">nginx.org</a>.<br/> Commercial support is available at <a href="http://nginx.com/">nginx.com</a>.</p>
<p><em>Thank you for using nginx.</em></p> </body> </html>
#查看自动生成的匿名数据卷 [root@rocky8 ~]# docker volume ls DRIVER VOLUME NAME local ef90c2af7491adf2f522a7a312e939d2fb5339f5e7561ba17d954693432d0964
[root@rocky8 ~]# curl 127.0.0.1:8001 <!DOCTYPE html> <html> <head> <title>Welcome to nginx!</title> <style> html { color-scheme: light dark; } body { width: 35em; margin: 0 auto; font-family: Tahoma, Verdana, Arial, sans-serif; } </style> </head> <body> <h1>Welcome to nginx!</h1> <p>If you see this page, the nginx web server is successfully installed and working. Further configuration is required.</p>
<p>For online documentation and support please refer to <a href="http://nginx.org/">nginx.org</a>.<br/> Commercial support is available at <a href="http://nginx.com/">nginx.com</a>.</p>
<p><em>Thank you for using nginx.</em></p> </body> </html>
#显示命名数据卷 [root@rocky8 ~]# docker volume ls DRIVER VOLUME NAME local vol1
[root@rocky8 ~]# docker ps CONTAINER ID IMAGE COMMAND CREATED STATUS PORTS NAMES 1c9e7ccc82c8 tomcat-web:app1 "/apps/tomcat/bin/ru…" 15 seconds ago Up 14 seconds 8009/tcp, 8080/tcp volume-server
[root@rocky8 ~]# docker ps -a CONTAINER ID IMAGE COMMAND CREATED STATUS PORTS NAMES d33c49536182 tomcat-web:app1 "/apps/tomcat/bin/ru…" 15 seconds ago Up 14 seconds 8009/tcp, 0.0.0.0:8083->8080/tcp, :::8083->8080/tcp client3 7d0cf30474af tomcat-web:app1 "/apps/tomcat/bin/ru…" 12 minutes ago Up 12 minutes 8009/tcp, 0.0.0.0:8082->8080/tcp, :::8082->8080/tcp client2 2fb21a5681ca tomcat-web:app1 "/apps/tomcat/bin/ru…" 12 minutes ago Up 12 minutes 8009/tcp, 0.0.0.0:8081->8080/tcp, :::8081->8080/tcp client1 1c9e7ccc82c8 tomcat-web:app1 "/apps/tomcat/bin/ru…" 14 minutes ago Exited (137) About a minute ago volume-server
[root@rocky8 ~]# docker ps -a CONTAINER ID IMAGE COMMAND CREATED STATUS PORTS NAMES d33c49536182 tomcat-web:app1 "/apps/tomcat/bin/ru…" 3 minutes ago Up 3 minutes 8009/tcp, 0.0.0.0:8083->8080/tcp, :::8083->8080/tcp client3 7d0cf30474af tomcat-web:app1 "/apps/tomcat/bin/ru…" 15 minutes ago Up 15 minutes 8009/tcp, 0.0.0.0:8082->8080/tcp, :::8082->8080/tcp client2 2fb21a5681ca tomcat-web:app1 "/apps/tomcat/bin/ru…" 15 minutes ago Up 15 minutes 8009/tcp, 0.0.0.0:8081->8080/tcp, :::8081->8080/tcp client1
[root@rocky8 ~]# docker run -d --name client4 --volumes-from volume-server -p 8084:8080 tomcat-web:app1 docker: Error response from daemon: No such container: volume-server. See 'docker run --help'.
[root@rocky8 ~]# docker ps -a CONTAINER ID IMAGE COMMAND CREATED STATUS PORTS NAMES 74d45f88e427 centos:8 "bash" 34 seconds ago Exited (0) 9 seconds ago volume-server
#基于前面的匿名数据卷容器创建执行备份操作的容器 [root@rocky8 ~]# docker run -it --rm --volumes-from volume-server -v ~/backup:/backup --name backup-server ubuntu root@c02524bf5791:/# ls backup/ root@c02524bf5791:/# ls backup boot dev home lib64 mnt proc run srv tmp var bin datavolume1 etc lib media opt root sbin sys usr
root@c02524bf5791:/# ls backup/ root@c02524bf5791:/# ls /datavolume1/ centos.txt
root@c02524bf5791:/# cd /datavolume1/ root@c02524bf5791:/datavolume1# tar cvf /backup/data.tar . ./ ./centos.txt
[root@rocky8 ~]# docker run -it --rm alpine sh / # ip a 1: lo: <LOOPBACK,UP,LOWER_UP> mtu 65536 qdisc noqueue state UNKNOWN qlen 1000 link/loopback 00:00:00:00:00:00 brd 00:00:00:00:00:00 inet 127.0.0.1/8 scope host lo valid_lft forever preferred_lft forever inet6 ::1/128 scope host valid_lft forever preferred_lft forever 368: eth0@if369: <BROADCAST,MULTICAST,UP,LOWER_UP,M-DOWN> mtu 1500 qdisc noqueue state UP link/ether 02:42:ac:11:00:03 brd ff:ff:ff:ff:ff:ff inet 172.17.0.3/16 brd 172.17.255.255 scope global eth0 valid_lft forever preferred_lft forever / # cat /etc/hosts 127.0.0.1 localhost ::1 localhost ip6-localhost ip6-loopback fe00::0 ip6-localnet ff00::0 ip6-mcastprefix ff02::1 ip6-allnodes ff02::2 ip6-allrouters 172.17.0.3 7e2db63c597b
/ # ping 7f5ae721e596 PING 7f5ae721e596 (205.178.189.129): 56 data bytes 64 bytes from 205.178.189.129: seq=0 ttl=127 time=252.690 ms 64 bytes from 205.178.189.129: seq=1 ttl=127 time=278.889 ms
[root@rocky8 ~]# docker ps CONTAINER ID IMAGE COMMAND CREATED STATUS PORTS NAMES 7e2db63c597b alpine "sh" 2 minutes ago Up 2 minutes hardcore_easley 7f5ae721e596 alpine "sh" 4 minutes ago Up 4 minutes epic_antonelli
#查看默认网络 [root@rocky8 ~]# ip a 1: lo: <LOOPBACK,UP,LOWER_UP> mtu 65536 qdisc noqueue state UNKNOWN group default qlen 1000 link/loopback 00:00:00:00:00:00 brd 00:00:00:00:00:00 inet 127.0.0.1/8 scope host lo valid_lft forever preferred_lft forever inet6 ::1/128 scope host valid_lft forever preferred_lft forever 2: ens160: <BROADCAST,MULTICAST,UP,LOWER_UP> mtu 1500 qdisc mq state UP group default qlen 1000 link/ether 00:0c:29:71:6e:af brd ff:ff:ff:ff:ff:ff altname enp3s0 inet 192.168.1.11/24 brd 192.168.1.255 scope global noprefixroute ens160 valid_lft forever preferred_lft forever inet6 fe80::20c:29ff:fe71:6eaf/64 scope link valid_lft forever preferred_lft forever 3: docker0: <NO-CARRIER,BROADCAST,MULTICAST,UP> mtu 1500 qdisc noqueue state DOWN group default link/ether 02:42:59:31:5b:67 brd ff:ff:ff:ff:ff:ff inet 172.17.0.1/16 brd 172.17.255.255 scope global docker0 valid_lft forever preferred_lft forever inet6 fe80::42:59ff:fe31:5b67/64 scope link valid_lft forever preferred_lft forever
[root@rocky8 ~]# yum install -y bridge-utils [root@rocky8 ~]# brctl addbr br0 [root@rocky8 ~]# ip a a 192.168.100.1/24 dev br0 [root@rocky8 ~]# brctl show bridge name bridge id STP enabled interfaces br0 8000.000000000000 no docker0 8000.024259315b67 no
[root@rocky8 ~]# ip a 1: lo: <LOOPBACK,UP,LOWER_UP> mtu 65536 qdisc noqueue state UNKNOWN group default qlen 1000 link/loopback 00:00:00:00:00:00 brd 00:00:00:00:00:00 inet 127.0.0.1/8 scope host lo valid_lft forever preferred_lft forever inet6 ::1/128 scope host valid_lft forever preferred_lft forever 2: ens160: <BROADCAST,MULTICAST,UP,LOWER_UP> mtu 1500 qdisc mq state UP group default qlen 1000 link/ether 00:0c:29:71:6e:af brd ff:ff:ff:ff:ff:ff altname enp3s0 inet 192.168.1.11/24 brd 192.168.1.255 scope global noprefixroute ens160 valid_lft forever preferred_lft forever inet6 fe80::20c:29ff:fe71:6eaf/64 scope link valid_lft forever preferred_lft forever 3: docker0: <NO-CARRIER,BROADCAST,MULTICAST,UP> mtu 1500 qdisc noqueue state DOWN group default link/ether 02:42:59:31:5b:67 brd ff:ff:ff:ff:ff:ff inet 172.17.0.1/16 brd 172.17.255.255 scope global docker0 valid_lft forever preferred_lft forever inet6 fe80::42:59ff:fe31:5b67/64 scope link valid_lft forever preferred_lft forever 378: br0: <BROADCAST,MULTICAST> mtu 1500 qdisc noop state DOWN group default qlen 1000 link/ether d6:75:ba:11:b8:f2 brd ff:ff:ff:ff:ff:ff inet 192.168.100.1/24 scope global br0 valid_lft forever preferred_lft forever
# 如果daemon.json中也定义了pid则会报错 [root@rocky8 ~]# systemctl restart docker.service Job for docker.service failed because the control process exited with error code. See "systemctl status docker.service" and "journalctl -xe"for details.
/ # ping 4be083330070 PING 4be083330070 (192.168.100.2): 56 data bytes 64 bytes from 192.168.100.2: seq=0 ttl=64 time=0.118 ms ^C --- 4be083330070 ping statistics --- 1 packets transmitted, 1 packets received, 0% packet loss round-trip min/avg/max = 0.118/0.118/0.118 ms
/ # ping a10a01eee894 PING a10a01eee894 (192.168.100.3): 56 data bytes 64 bytes from 192.168.100.3: seq=0 ttl=64 time=0.100 ms 64 bytes from 192.168.100.3: seq=1 ttl=64 time=0.077 ms ^C --- a10a01eee894 ping statistics --- 2 packets transmitted, 2 packets received, 0% packet loss round-trip min/avg/max = 0.077/0.088/0.100 ms
[root@rocky8 /]# docker ps CONTAINER ID IMAGE COMMAND CREATED STATUS PORTS NAMES a10a01eee894 alpine "sh" 2 minutes ago Up 2 minutes server2 4be083330070 alpine "sh" 5 minutes ago Up 5 minutes server1
/ # ping server1-alias2 PING server1-alias2 (172.17.0.4): 56 data bytes 64 bytes from 172.17.0.4: seq=0 ttl=64 time=0.151 ms 64 bytes from 172.17.0.4: seq=1 ttl=64 time=0.128 ms
Docker 网络连接模式
网络模式介绍
Docker 的网络支持5种网络模式:
none
bridge
host
container
network-name
范例: 查看默认的网络模式有三个
1 2 3 4 5
[root@rocky8 ~]# docker network ls NETWORK ID NAME DRIVER SCOPE 4048bc584ca0 bridge bridge local aef2f5228637 host host local 3709f184390d none null local
网络模式指定
默认新建的容器使用Bridge模式,创建容器时,docker run 命令使用以下选项指定网络模式
格式
1 2 3 4 5 6 7 8 9
docker run --network <mode> docker run --net=<mode>
#在另一台主机上建立httpd服务器 [root@centos7 ~]#systemctl is-active httpd active #启动容器,默认是bridge网络模式 [root@ubuntu1804 ~]#docker run -it --rm alpine:3.11 sh / # ip a 1: lo: <LOOPBACK,UP,LOWER_UP> mtu 65536 qdisc noqueue state UNKNOWN qlen 1000 link/loopback 00:00:00:00:00:00 brd 00:00:00:00:00:00 inet 127.0.0.1/8 scope host lo valid_lft forever preferred_lft forever 166: eth0@if167: <BROADCAST,MULTICAST,UP,LOWER_UP,M-DOWN> mtu 1500 qdisc noqueue state UP link/ether 02:42:ac:11:00:02 brd ff:ff:ff:ff:ff:ff inet 172.17.0.2/16 brd 172.17.255.255 scope global eth0 valid_lft forever preferred_lft forever
#可能访问其它宿主机 / # ping 10.0.0.7 PING 10.0.0.7 (10.0.0.7): 56 data bytes 64 bytes from 10.0.0.7: seq=0 ttl=63 time=0.764 ms
/ # ping www.baidu.com PING www.baidu.com (61.135.169.125): 56 data bytes 64 bytes from 61.135.169.125: seq=0 ttl=127 time=5.182 ms
/ # traceroute 10.0.0.7 traceroute to 10.0.0.7 (10.0.0.7), 30 hops max, 46 byte packets 1 172.17.0.1 (172.17.0.1) 0.008 ms 0.008 ms 0.007 ms 2 10.0.0.7 (10.0.0.7) 0.255 ms 0.510 ms 0.798 ms
/ # wget -qO - 10.0.0.7 Website on 10.0.0.7
/ # route -n Kernel IP routing table Destination Gateway Genmask Flags Metric Ref Use Iface 0.0.0.0 172.17.0.1 0.0.0.0 UG 0 0 0 eth0 172.17.0.0 0.0.0.0 255.255.0.0 U 0 0 0 eth0
[root@centos7 ~]# curl 127.0.0.1 Website on 10.0.0.7
#从容器访问远程主机 [root@rocky8 ~]# curl 192.168.1.11 <!DOCTYPE html> <html> <head> <title>Welcome to nginx!</title> <style> html { color-scheme: light dark; } body { width: 35em; margin: 0 auto; font-family: Tahoma, Verdana, Arial, sans-serif; } </style> </head> <body> <h1>Welcome to nginx!</h1> <p>If you see this page, the nginx web server is successfully installed and working. Further configuration is required.</p>
<p>For online documentation and support please refer to <a href="http://nginx.org/">nginx.org</a>.<br/> Commercial support is available at <a href="http://nginx.com/">nginx.com</a>.</p>
<p><em>Thank you for using nginx.</em></p> </body> </html>
范例: host模式下端口映射无法实现
1 2 3 4 5 6 7 8
[root@rocky8 ~]# docker run -d --network host --name web2 -p 81:80 nginx WARNING: Published ports are discarded when using host network mode 2036d93321c622cf004bf38ff6f78c64c327eb6d6446266f3b34e6faddaf3aab
#host模块下端口映射不成功,但是容器可以启动 [root@rocky8 ~]# docker ps -l CONTAINER ID IMAGE COMMAND CREATED STATUS PORTS NAMES 2036d93321c6 nginx "/docker-entrypoint.…" 25 seconds ago Exited (1) 22 seconds ago web2
范例: 对比前面host模式的容器和bridge模式的端口映射
1 2 3 4 5 6 7 8
[root@rocky8 ~]# docker port web1 [root@rocky8 ~]# docker port web2 [root@rocky8 ~]# docker run -d --network bridge -p 8001:80 --name web3 nginx 2a97a0f7764c336c45fb6302c66fc6ee5af647d50fea68f5b2957a9f5d820bd1
[root@rocky8 ~]# docker ps CONTAINER ID IMAGE COMMAND CREATED STATUS PORTS NAMES 1e06466d3bf5 nginx "/docker-entrypoint.…" 4 seconds ago Up 3 seconds web1-none
[root@5207dcbd0aee /]# netstat -ntl Active Internet connections (only servers) Proto Recv-Q Send-Q Local Address Foreign Address State tcp 0 0 0.0.0.0:80 0.0.0.0:* LISTEN
[root@5207dcbd0aee /]# ping www.baidu.com ping: www.baidu.com: Name or service not known
[root@5207dcbd0aee /]# ping 172.17.0.1 connect: Network is unreachable
#创建第一个容器 [root@rocky8 ~]# docker run -it --name server1 -p 80:80 alpine sh / # ifconfig eth0 Link encap:Ethernet HWaddr 02:42:AC:11:00:02 inet addr:172.17.0.2 Bcast:172.17.255.255 Mask:255.255.0.0 UP BROADCAST RUNNING MULTICAST MTU:1500 Metric:1 RX packets:8 errors:0 dropped:0 overruns:0 frame:0 TX packets:0 errors:0 dropped:0 overruns:0 carrier:0 collisions:0 txqueuelen:0 RX bytes:736 (736.0 B) TX bytes:0 (0.0 B)
lo Link encap:Local Loopback inet addr:127.0.0.1 Mask:255.0.0.0 inet6 addr: ::1/128 Scope:Host UP LOOPBACK RUNNING MTU:65536 Metric:1 RX packets:0 errors:0 dropped:0 overruns:0 frame:0 TX packets:0 errors:0 dropped:0 overruns:0 carrier:0 collisions:0 txqueuelen:1000 RX bytes:0 (0.0 B) TX bytes:0 (0.0 B)
/ # netstat -ntl Active Internet connections (only servers) Proto Recv-Q Send-Q Local Address Foreign Address State
#在另一个终端执行下面操作 [root@rocky8 ~]# docker ps CONTAINER ID IMAGE COMMAND CREATED STATUS PORTS NAMES 92287d1cc7fe alpine "sh" 40 seconds ago Up 39 seconds 0.0.0.0:80->80/tcp, :::80->80/tcp server1
#可以访问web服务 [root@rocky8 ~]# curl 127.0.0.1 <!DOCTYPE html> <html> <head> <title>Welcome to nginx!</title> <style> html { color-scheme: light dark; } body { width: 35em; margin: 0 auto; font-family: Tahoma, Verdana, Arial, sans-serif; } </style> </head> <body> <h1>Welcome to nginx!</h1> <p>If you see this page, the nginx web server is successfully installed and working. Further configuration is required.</p>
<p>For online documentation and support please refer to <a href="http://nginx.org/">nginx.org</a>.<br/> Commercial support is available at <a href="http://nginx.com/">nginx.com</a>.</p>
<p><em>Thank you for using nginx.</em></p> </body> </html>
[root@ubuntu1804 ~]# docker run -it --name c2 --network container:c1 centos7.8:v1.0
[root@ubuntu1804 /]# ip a 1: lo: <LOOPBACK,UP,LOWER_UP> mtu 65536 qdisc noqueue state UNKNOWN group default qlen 1000 link/loopback 00:00:00:00:00:00 brd 00:00:00:00:00:00 inet 127.0.0.1/8 scope host lo valid_lft forever preferred_lft forever inet6 ::1/128 scope host valid_lft forever preferred_lft forever 2: eth0: <BROADCAST,MULTICAST,UP,LOWER_UP> mtu 1500 qdisc fq_codel state UP group default qlen 1000 link/ether 00:0c:29:63:8b:ac brd ff:ff:ff:ff:ff:ff inet 10.0.0.100/24 brd 10.0.0.255 scope global eth0 valid_lft forever preferred_lft forever inet6 fe80::20c:29ff:fe63:8bac/64 scope link valid_lft forever preferred_lft forever 3: docker0: <NO-CARRIER,BROADCAST,MULTICAST,UP> mtu 1500 qdisc noqueue state DOWN group default link/ether 02:42:24:86:98:fb brd ff:ff:ff:ff:ff:ff inet 172.17.0.1/16 brd 172.17.255.255 scope global docker0 valid_lft forever preferred_lft forever inet6 fe80::42:24ff:fe86:98fb/64 scope link valid_lft forever preferred_lft forever [root@ubuntu1804 ~]# docker exec -it c1 bash [root@ubuntu1804 /]# ip a 1: lo: <LOOPBACK,UP,LOWER_UP> mtu 65536 qdisc noqueue state UNKNOWN group default qlen 1000 link/loopback 00:00:00:00:00:00 brd 00:00:00:00:00:00 inet 127.0.0.1/8 scope host lo valid_lft forever preferred_lft forever inet6 ::1/128 scope host valid_lft forever preferred_lft forever 2: eth0: <BROADCAST,MULTICAST,UP,LOWER_UP> mtu 1500 qdisc fq_codel state UP group default qlen 1000 link/ether 00:0c:29:63:8b:ac brd ff:ff:ff:ff:ff:ff inet 10.0.0.100/24 brd 10.0.0.255 scope global eth0 valid_lft forever preferred_lft forever inet6 fe80::20c:29ff:fe63:8bac/64 scope link valid_lft forever preferred_lft forever 3: docker0: <NO-CARRIER,BROADCAST,MULTICAST,UP> mtu 1500 qdisc noqueue state DOWN group default link/ether 02:42:24:86:98:fb brd ff:ff:ff:ff:ff:ff inet 172.17.0.1/16 brd 172.17.255.255 scope global docker0 valid_lft forever preferred_lft forever inet6 fe80::42:24ff:fe86:98fb/64 scope link valid_lft forever preferred_lft forever
范例:第一个容器使用none网络模式,第二个容器与之共享网络
1 2 3 4 5 6 7 8 9 10 11
[root@ubuntu1804 ~]#docker run -d --name c1 --network none nginx-centos7.8:v5.0-1.18.0 caf5b57299c8359f21f30b8894c5f8496ff39b44ead6a732056000689cb0c91c
[root@ubuntu1804 ~]#docker run -it --name c2 --network container:c1 centos7.8:v1.0
[root@caf5b57299c8 /]# ip a 1: lo: <LOOPBACK,UP,LOWER_UP> mtu 65536 qdisc noqueue state UNKNOWN group default qlen 1000 link/loopback 00:00:00:00:00:00 brd 00:00:00:00:00:00 inet 127.0.0.1/8 scope host lo valid_lft forever preferred_lft forever
Commands: connect Connect a container to a network create Create a network disconnect Disconnect a container from a network inspect Display detailed information on one or more networks ls List networks prune Remove all unused networks rm Remove one or more networks
[root@rocky8 ~]# docker network ls NETWORK ID NAME DRIVER SCOPE 4048bc584ca0 bridge bridge local aef2f5228637 host host local 3709f184390d none null local 26dc4700293e test-net bridge local
[root@rocky8 ~]# docker network ls NETWORK ID NAME DRIVER SCOPE 4048bc584ca0 bridge bridge local aef2f5228637 host host local 3709f184390d none null local 26dc4700293e test-net bridge local
[root@rocky8 ~]# docker run -it --rm --network test-net --name test1 alpine sh / # ip a 1: lo: <LOOPBACK,UP,LOWER_UP> mtu 65536 qdisc noqueue state UNKNOWN qlen 1000 link/loopback 00:00:00:00:00:00 brd 00:00:00:00:00:00 inet 127.0.0.1/8 scope host lo valid_lft forever preferred_lft forever inet6 ::1/128 scope host valid_lft forever preferred_lft forever 31: eth0@if32: <BROADCAST,MULTICAST,UP,LOWER_UP,M-DOWN> mtu 1500 qdisc noqueue state UP link/ether 02:42:ac:1b:00:02 brd ff:ff:ff:ff:ff:ff inet 172.27.0.2/16 brd 172.27.255.255 scope global eth0 valid_lft forever preferred_lft forever / # cat /etc/hosts 127.0.0.1 localhost ::1 localhost ip6-localhost ip6-loopback fe00::0 ip6-localnet ff00::0 ip6-mcastprefix ff02::1 ip6-allnodes ff02::2 ip6-allrouters 172.27.0.2 2625d628d599
[root@rocky8 ~]# docker run -it --rm --network test-net --name test2 alpine sh / # ip a 1: lo: <LOOPBACK,UP,LOWER_UP> mtu 65536 qdisc noqueue state UNKNOWN qlen 1000 link/loopback 00:00:00:00:00:00 brd 00:00:00:00:00:00 inet 127.0.0.1/8 scope host lo valid_lft forever preferred_lft forever inet6 ::1/128 scope host valid_lft forever preferred_lft forever 33: eth0@if34: <BROADCAST,MULTICAST,UP,LOWER_UP,M-DOWN> mtu 1500 qdisc noqueue state UP link/ether 02:42:ac:1b:00:03 brd ff:ff:ff:ff:ff:ff inet 172.27.0.3/16 brd 172.27.255.255 scope global eth0 valid_lft forever preferred_lft forever / # cat /etc/hosts 127.0.0.1 localhost ::1 localhost ip6-localhost ip6-loopback fe00::0 ip6-localnet ff00::0 ip6-mcastprefix ff02::1 ip6-allnodes ff02::2 ip6-allrouters 172.27.0.3 153409970a1c
/ # ping -c1 test1 PING test1 (172.27.0.2): 56 data bytes 64 bytes from 172.27.0.2: seq=0 ttl=64 time=0.102 ms
# 创建集群 /data # redis-cli -a 123456 --cluster create 172.18.0.11:6379 172.18.0.12:6379 172.18.0.13:6379 172.18.0.14:6379 172.18.0.15:6379 172.18.0.16:6379 --cluster-replicas 1 Can I set the above configuration? (type'yes' to accept): #输入yes
#再次查看cluster状态,可以看到redis-2出错 [root@ubuntu1804 ~]# docker exec -it redis-1 /bin/sh /data # redis-cli -a 123456 --cluster check 127.0.0.1:6379 Could not connect to Redis at 172.18.0.12:6379: Host is unreachable
#默认网络和自定义网络是两个不同的网桥 [root@rocky8 ~]# brctl show bridge name bridge id STP enabled interfaces br-63c2670c48f7 8000.024244685368 no vethe6fc5e8 docker0 8000.02426d39e862 no vethe659da8
Connect a container to a network Options: --alias strings Add network-scoped aliasfor the container --driver-opt strings driver options for the network --ip string IPv4 address (e.g., 172.30.100.104) --ip6 string IPv6 address (e.g., 2001:db8::33) --link list Add link to another container --link-local-ip strings Add a link-local address for the container #将CONTAINER与指定的NETWORK断开连接,使此CONTAINER可以与CONTAINER中的其它容器进行无法通信 #如果将容器从自定义的网络删除,将加入默认的网络,即docker0网桥中,获取172.17.0.0/16 #如果将容器从默认的网络docker0删除,将加入none网络
#用tcpdump抓包80/tcp的包,可以观察到以下内容 [root@ubuntu1804 ~]# tcpdump -i eth0 -nn port 80 tcpdump: verbose output suppressed, use -v or -vv for full protocol decode
[root@rocky8 docker-compose]# docker-compose config validating /data/docker-compose/docker-compose.yml: (root) Additional property service is not allowed
#上面命令是前台执行,所以要查看结果,可以再开一个终端窗口进行观察 [root@rocky8 ~]# docker ps CONTAINER ID IMAGE COMMAND CREATED STATUS PORTS NAMES e2629c116bc4 nginx-centos7:1.26.3 "nginx -g 'daemon of…" 3 minutes ago Up 3 minutes 0.0.0.0:80->80/tcp, :::80->80/tcp, 0.0.0.0:443->443/tcp, :::443->443/tcp nginx-web
[root@rocky8 ~]# docker-compose ps no configuration file provided: not found [root@rocky8 ~]# cd /data/docker-compose/
[root@rocky8 docker-compose]# docker-compose ps NAME IMAGE COMMAND SERVICE CREATED STATUS PORTS nginx-web nginx-centos7:1.26.3 "nginx -g 'daemon of…" nginx-web 4 minutes ago Up 4 minutes 0.0.0.0:80->80/tcp, [::]:80->80/tcp, 0.0.0.0:443->443/tcp, [::]:443->443/tcp
[root@rocky8 docker-compose]# curl 127.0.0.1 Test page in app
[root@rocky8 docker-compose]# docker-compose images CONTAINER REPOSITORY TAG IMAGE ID SIZE nginx-web nginx-centos7 1.26.3 08c66ca1868e 405MB
#ctrl+c键,结束容器 Gracefully stopping... (press Ctrl+C again to force) [+] Stopping 1/1 ✔ Container nginx-web Stopped 0.3s [root@rocky8 docker-compose]# docker-compose ps -a NAME IMAGE COMMAND SERVICE CREATED STATUS PORTS nginx-web nginx-centos7:1.26.3 "nginx -g 'daemon of…" nginx-web 7 minutes ago Exited (0) 23 seconds ago
[root@rocky8 docker-compose]# docker-compose start [+] Running 1/1 ✔ Container nginx-web Started 0.4s [root@rocky8 docker-compose]# docker-compose ps NAME IMAGE COMMAND SERVICE CREATED STATUS PORTS nginx-web nginx-centos7:1.26.3 "nginx -g 'daemon of…" nginx-web 8 minutes ago Up 5 seconds 0.0.0.0:80->80/tcp, [::]:80->80/tcp, 0.0.0.0:443->443/tcp, [::]:443->443/tcp
[root@rocky8 docker-compose]# docker-compose ps -a NAME IMAGE COMMAND SERVICE CREATED STATUS PORTS nginx-web nginx-centos7:1.26.3 "nginx -g 'daemon of…" nginx-web 8 minutes ago Exited (137) 6 seconds ago
[root@rocky8 docker-compose]# docker-compose ps -a NAME IMAGE COMMAND SERVICE CREATED STATUS PORTS nginx-web nginx-centos7:1.26.3 "nginx -g 'daemon of…" nginx-web 8 minutes ago Exited (137) 6 seconds ago
#只删除停止的容器 [root@rocky8 docker-compose]# docker-compose rm ? Going to remove nginx-web Yes [+] Removing 1/1 ✔ Container nginx-web Removed 0.0s [root@rocky8 docker-compose]# docker-compose up -d [+] Running 1/1 ✔ Container nginx-web Started 0.4s [root@rocky8 docker-compose]# docker-compose rm No stopped containers
#停止并删除容器及镜像 [root@rocky8 docker-compose]# docker-compose down [+] Running 2/2 ✔ Container nginx-web Remove... 0.2s ✔ Network docker-compose_default Removed 0.1s [root@rocky8 docker-compose]# docker-compose ps -a NAME IMAGE COMMAND SERVICE CREATED STATUS PORTS
#也会自动删除镜像 [root@rocky8 docker-compose]# docker-compose images CONTAINER REPOSITORY TAG IMAGE ID SIZE
后台执行
1 2 3 4 5 6 7 8 9 10 11
[root@rocky8 docker-compose]# docker-compose up -d [+] Running 2/2 ✔ Network docker-compose_default Created 0.1s ✔ Container nginx-web Starte... 0.5s [root@rocky8 docker-compose]# docker-compose ps NAME IMAGE COMMAND SERVICE CREATED STATUS PORTS nginx-web nginx-centos7:1.26.3 "nginx -g 'daemon of…" nginx-web 9 seconds ago Up 8 seconds 0.0.0.0:80->80/tcp, [::]:80->80/tcp, 0.0.0.0:443->443/tcp, [::]:443->443/tcp
[root@rocky8 docker-compose]# curl 127.0.0.1 Test page in app
[root@rocky8 docker-compose]# docker-compose stop [+] Stopping 1/1 ✔ Container nginx-web Stopped 0.2s [root@rocky8 docker-compose]# docker-compose ps NAME IMAGE COMMAND SERVICE CREATED STATUS PORTS
[root@rocky8 docker-compose]# docker-compose ps -a NAME IMAGE COMMAND SERVICE CREATED STATUS PORTS nginx-web nginx-centos7:1.26.3 "nginx -g 'daemon of…" nginx-web About a minute ago Exited (0) 8 seconds ago
[root@rocky8 docker-compose]# docker-compose start [+] Running 1/1 ✔ Container nginx-web Started 0.4s [root@rocky8 docker-compose]# docker-compose ps NAME IMAGE COMMAND SERVICE CREATED STATUS PORTS nginx-web nginx-centos7:1.26.3 "nginx -g 'daemon of…" nginx-web About a minute ago Up 3 seconds 0.0.0.0:80->80/tcp, [::]:80->80/tcp, 0.0.0.0:443->443/tcp, [::]:443->443/tcp
[root@rocky8 docker-compose]# docker-compose restart [+] Restarting 1/1 ✔ Container nginx-web Started 0.5s [root@rocky8 docker-compose]# docker-compose ps NAME IMAGE COMMAND SERVICE CREATED STATUS PORTS nginx-web nginx-centos7:1.26.3 "nginx -g 'daemon of…" nginx-web 2 minutes ago Up 4 seconds 0.0.0.0:80->80/tcp, [::]:80->80/tcp, 0.0.0.0:443->443/tcp, [::]:443->443/tcp
#以json格式显示日志 [root@rocky8 docker-compose]# docker-compose events --json {"action":"kill","attributes":{"image":"nginx-centos7:1.26.3","maintainers":"wshuaiqing.cn","name":"nginx-web","org.label-schema.build-date":"20191024","org.label-schema.license":"GPLv2","org.label-schema.name":"CentOS Base Image","org.label-schema.schema-version":"1.0","org.label-schema.vendor":"CentOS","signal":"15"},"id":"d16880d07a9f9781d0c1afe8e0344983e81e8d89a5715aee302e4e9e4ff18dde","service":"nginx-web","time":"2025-04-12T11:24:20.453557731+08:00","type":"container"} {"action":"stop","attributes":{"image":"nginx-centos7:1.26.3","maintainers":"wshuaiqing.cn","name":"nginx-web","org.label-schema.build-date":"20191024","org.label-schema.license":"GPLv2","org.label-schema.name":"CentOS Base Image","org.label-schema.schema-version":"1.0","org.label-schema.vendor":"CentOS"},"id":"d16880d07a9f9781d0c1afe8e0344983e81e8d89a5715aee302e4e9e4ff18dde","service":"nginx-web","time":"2025-04-12T11:24:20.590896139+08:00","type":"container"} {"action":"die","attributes":{"execDuration":"33","exitCode":"0","image":"nginx-centos7:1.26.3","maintainers":"wshuaiqing.cn","name":"nginx-web","org.label-schema.build-date":"20191024","org.label-schema.license":"GPLv2","org.label-schema.name":"CentOS Base Image","org.label-schema.schema-version":"1.0","org.label-schema.vendor":"CentOS"},"id":"d16880d07a9f9781d0c1afe8e0344983e81e8d89a5715aee302e4e9e4ff18dde","service":"nginx-web","time":"2025-04-12T11:24:20.592716819+08:00","type":"container"} {"action":"start","attributes":{"image":"nginx-centos7:1.26.3","maintainers":"wshuaiqing.cn","name":"nginx-web","org.label-schema.build-date":"20191024","org.label-schema.license":"GPLv2","org.label-schema.name":"CentOS Base Image","org.label-schema.schema-version":"1.0","org.label-schema.vendor":"CentOS"},"id":"d16880d07a9f9781d0c1afe8e0344983e81e8d89a5715aee302e4e9e4ff18dde","service":"nginx-web","time":"2025-04-12T11:24:20.95955644+08:00","type":"container"} {"action":"restart","attributes":{"image":"nginx-centos7:1.26.3","maintainers":"wshuaiqing.cn","name":"nginx-web","org.label-schema.build-date":"20191024","org.label-schema.license":"GPLv2","org.label-schema.name":"CentOS Base Image","org.label-schema.schema-version":"1.0","org.label-schema.vendor":"CentOS"},"id":"d16880d07a9f9781d0c1afe8e0344983e81e8d89a5715aee302e4e9e4ff18dde","service":"nginx-web","time":"2025-04-12T11:24:20.959621363+08:00","type":"container"}
[root@rocky8 docker-compose]# docker-compose ps -a NAME IMAGE COMMAND SERVICE CREATED STATUS PORTS
[root@rocky8 docker-compose]# docker-compose up -d --scale nginx-web=2 [+] Running 4/4 ✔ Network docker-compose_default Created 0.1s ✔ Container docker-compose-tomcat-app1-1 Started 0.6s ✔ Container docker-compose-nginx-web-2 Started 1.3s ✔ Container docker-compose-nginx-web-1 Started 0.6s [root@rocky8 docker-compose]# docker-compose ps NAME IMAGE COMMAND SERVICE CREATED STATUS PORTS docker-compose-nginx-web-1 nginx-centos7:1.26.3 "nginx -g 'daemon of…" nginx-web 9 seconds ago Up 7 seconds 80/tcp, 443/tcp docker-compose-nginx-web-2 nginx-centos7:1.26.3 "nginx -g 'daemon of…" nginx-web 9 seconds ago Up 7 seconds 80/tcp, 443/tcp docker-compose-tomcat-app1-1 tomcat-web:app1 "/apps/tomcat/bin/ru…" tomcat-app1 9 seconds ago Up 7 seconds 8009/tcp, 8080/tcp
[root@rocky8 docker-compose]# docker-compose up -d --scale nginx-web=3 --scale tomcat-app1=2 [+] Running 5/5 ✔ Container docker-compose-tomcat-app1-1 Running 0.0s ✔ Container docker-compose-nginx-web-1 Running 0.0s ✔ Container docker-compose-nginx-web-2 Running 0.0s ✔ Container docker-compose-nginx-web-3 Started 0.7s ✔ Container docker-compose-tomcat-app1-2 Started 0.8s [root@rocky8 docker-compose]# docker-compose ps NAME IMAGE COMMAND SERVICE CREATED STATUS PORTS docker-compose-nginx-web-1 nginx-centos7:1.26.3 "nginx -g 'daemon of…" nginx-web About a minute ago Up About a minute 80/tcp, 443/tcp docker-compose-nginx-web-2 nginx-centos7:1.26.3 "nginx -g 'daemon of…" nginx-web About a minute ago Up About a minute 80/tcp, 443/tcp docker-compose-nginx-web-3 nginx-centos7:1.26.3 "nginx -g 'daemon of…" nginx-web 7 seconds ago Up 6 seconds 80/tcp, 443/tcp docker-compose-tomcat-app1-1 tomcat-web:app1 "/apps/tomcat/bin/ru…" tomcat-app1 About a minute ago Up About a minute 8009/tcp, 8080/tcp docker-compose-tomcat-app1-2 tomcat-web:app1 "/apps/tomcat/bin/ru…" tomcat-app1 7 seconds ago Up 6 seconds 8009/tcp, 8080/tcp
#登录docker官方仓库方法1 [root@ubuntu1804 ~]# docker login -u wangxiaochun -pP@ssw0rd! docker.io WARNING! Using --password via the CLI is insecure. Use --password-stdin. WARNING! Your password will be stored unencrypted in /root/.docker/config.json. Configure a credential helper to remove this warning. See https://docs.docker.com/engine/reference/commandline/login/#credentials-store
Login Succeeded
#登录docker官方仓库方法2 [root@ubuntu1804 ~]# docker login Login with your Docker ID to push and pull images from Docker Hub. If you don't have a Docker ID, head over to https://hub.docker.com to create one. Username: wangxiaochun Password: WARNING! Your password will be stored unencrypted in /root/.docker/config.json. Configure a credential helper to remove this warning. See https://docs.docker.com/engine/reference/commandline/login/#credentials-store Login Succeeded #登录成功后,自动生成验证信息,下次会自动登录,而无需手动登录 [root@ubuntu1804 ~]#cat .docker/config.json { "auths": { "https://index.docker.io/v1/": { "auth": "d2FuZ3hpYW9jaHVuOmxidG9vdGgwNjE4" } }, "HttpHeaders": { "User-Agent": "Docker-Client/19.03.5 (linux)" } }
给本地镜像打标签
上传本地镜像前必须先给上传的镜像用docker tag 命令打标签
标签格式: docker.io/用户帐号/镜像名:TAG
范例:
1 2 3
[root@ubuntu1804 ~]# docker tag alpine:3.11 docker.io/wangxiaochun/alpine:3.11-v1 [root@ubuntu1804 ~]# docker images wangxiaochun/alpine 3.11-v1 e7d92cdc71fe 12 days ago 5.59MB
[root@centos7 ~]# docker pull wanglinux/alpine-base:3.11 [root@centos7 ~]# docker run -it --rm wanglinux/alpine-base:3.11 sh / # cat /etc/issue Welcome to Alpine Linux 3.11 Kernel \r on an \m (\l)
[root@centos7 ~]#docker run -it --rm b162eecf4da9 sh / # cat /etc/issue Welcome to Alpine Linux 3.11 Kernel \r on an \m (\l)
/ # du -sh / 190.1M /
/ # exit
#上传的centos7-base:v1为私有镜像,需要登录才能下载 [root@centos7 ~]# docker pull registry.cn-beijing.aliyuncs.com/wangxiaochun/centos7-base:v1 Error response from daemon: pull access denied for registry.cn-beijing.aliyuncs.com/wangxiaochun/centos7-base, repository does not exist or may require 'docker login': denied: requested access to the resource is denied
[root@ubuntu1804 ~]# docker pull registry:2.7.1 [root@ubuntu1804 ~]# docker images REPOSITORY TAG IMAGE ID CREATED SIZE registry 2.7.1 708bc6af7e5e 6 days ago 25.8MB
[root@ubuntu1804 ~]#docker ps CONTAINER ID IMAGE COMMAND CREATED STATUS PORTS NAMES 998f970dd8ca registry:2.7.1 "/entrypoint.sh /etc…" About a minute ago Up About a minute 0.0.0.0:5000->5000/tcp registry
[root@ubuntu1804 ~]# ss -ntl LISTEN 0 128 *:5000 *:*
登录仓库
直接登录报错
1 2 3 4 5 6
#docker login 默认使用https登录,而docker registry为http,所以默认登录失败 [root@ubuntu1804 ~]# docker login 10.0.0.100:500 Username: wang Password: Error response from daemon: Get https://10.0.0.100:500/v2/: dial tcp 10.0.0.100:500: connect: connection refused
[root@ubuntu1804 ~]# docker login 10.0.0.100:5000 Username: wang Password: WARNING! Your password will be stored unencrypted in /root/.docker/config.json. Configure a credential helper to remove this warning. See https://docs.docker.com/engine/reference/commandline/login/#credentials-store
[root@ubuntu1804 ~]# docker login 10.0.0.100:5000 Username: wang Password: WARNING! Your password will be stored unencrypted in /root/.docker/config.json. Configure a credential helper to remove this warning. See https://docs.docker.com/engine/reference/commandline/login/#credentials-store
#harbor是由很多容器组成实现完整功能 [root@ubuntu1804 ~]#docker ps -a CONTAINER ID IMAGE COMMAND CREATED STATUS PORTS NAMES 4ec3c3885407 goharbor/nginx-photon:v1.7.6 "nginx -g 'daemon of…" About a minute ago Up About a minute (healthy) 0.0.0.0:80->80/tcp, 0.0.0.0:443->443/tcp, 0.0.0.0:4443->4443/tcp nginx 5707b4ac41d8 goharbor/harbor-portal:v1.7.6 "nginx -g 'daemon of…" About a minute ago Up About a minute (healthy) 80/tcp harbor-portal 0ed230b9b714 goharbor/harbor-jobservice:v1.7.6 "/harbor/start.sh" About a minute ago Up About a minute harbor-jobservice fec659188349 goharbor/harbor-core:v1.7.6 "/harbor/start.sh" About a minute ago Up About a minute (healthy) harbor-core 910d14c1d7f7 goharbor/harbor-adminserver:v1.7.6 "/harbor/start.sh" 2 minutes ago Up About a minute (healthy) harbor-adminserver 4348f503aa0e goharbor/harbor-db:v1.7.6 "/entrypoint.sh post…" 2 minutes ago Up About a minute (healthy) 5432/tcp harbor-db beff6886f0f1 goharbor/harbor-registryctl:v1.7.6 "/harbor/start.sh" 2 minutes ago Up About a minute (healthy) registryctl 428c99d274bf goharbor/registry-photon:v2.6.2-v1.7.6 "/entrypoint.sh /etc…" 2 minutes ago Up About a minute (healthy) 5000/tcp registry 775b4026fa4e goharbor/redis-photon:v1.7.6 "dockerentrypoint.s…" 2 minutes ago Up About a minute 6379/tcp redis
docker login harbor.wang.org Username: admin Password: Error response from daemon: Get "https://harbor.wang.org/v2/": x509: certificate relies on legacy Common Name field, use SANs or temporarily enable Common Name matching with GODEBUG=x509ignoreCN=0
vim /apps/harbor/harbor.yml ...... # https related config https: # https port for harbor, default is 443 port: 443 # The path of cert and key files for nginx certificate: /data/harbor/certs/harbor.wang.org.crt private_key: /data/harbor/certs/harbor.wang.org.key
#使上面的配置生效 cd /apps/harbor/ ./prepare docker-compose down -v docker-compose up -d
Username: admin Password: WARNING! Your password will be stored unencrypted in /root/.docker/config.json. Configure a credential helper to remove this warning. See https://docs.docker.com/engine/reference/commandline/login/#credentials-store
Login Succeeded
Docker 客户端测试推送和拉取镜像
登录harbor 查看推送命令
1 2 3
docker push wangxiaochun/busybox:1.30.0 docker tag wangxiaochun/busybox:1.30.0 harbor.wang.org/library/busybox:1.30.0 docker push harbor.wang.org/library/busybox:1.30.0
[root@centos7 ~]# vim /etc/hosts 10.0.0.103 harbor.wang.org
[root@centos7 ~]# docker pull harbor.wang.org/example/alpine:3.11 Error response from daemon: Get https://harbor.wang.org/v2/: x509: certificate signed by unknown authority
[root@rocky8 ~]# stress-ng --help stress-ng, version 0.15.00 (gcc 8.5, x86_64 Linux 4.18.0-553.el8_10.x86_64) 💻🔥
Usage: stress-ng [OPTION [ARG]]
General control options: --abort abort all stressors if any stressor fails --aggressive enable all aggressive options -a N, --all N start N workers of each stress test -b N, --backoff N wait of N microseconds before work starts --class name specify a class of stressors, use with --sequential -n, --dry-run do not run --ftrace enable kernel function call tracing -h, --help show help --ignite-cpu alter kernel controls to make CPU run hot --ionice-class C specify ionice class (idle, besteffort, realtime) --ionice-level L specify ionice level (0 max, 7 min) -j, --job jobfile run the named jobfile -k, --keep-name keep stress worker names to be 'stress-ng' --keep-files do not remove files or directories --klog-check check kernel message logfor errors --log-brief less verbose log messages --log-file filename log messages to a log file --maximize enable maximum stress options --max-fd set maximum file descriptor limit --mbind set NUMA memory binding to specific nodes -M, --metrics print pseudo metrics of activity --metrics-brief enable metrics and only show non-zero results --minimize enable minimal stress options --no-madvise don't use random madvise options for each mmap --no-rand-seed seed random numbers with the same constant --oomable Do not respawn a stressor if it gets OOM'd --oom-avoid Try to avoid stressors from being OOM' --page-in touch allocated pages that are not in core --parallel N synonym for 'all N' --pathological enable stressors that are known to hang a machine --perf display perf statistics -q, --quiet quiet output -r, --random N start N random workers --sched type set scheduler type --sched-prio N set scheduler priority level N --sched-period N set period for SCHED_DEADLINE to N nanosecs (Linux only) --sched-runtime N set runtime for SCHED_DEADLINE to N nanosecs (Linux only) --sched-deadline N set deadline for SCHED_DEADLINE to N nanosecs (Linux only) --sched-reclaim set reclaim cpu bandwidth for deadline scheduler (Linux only) --seed N set the random number generator seed with a 64 bit value --sequential N run all stressors one by one, invoking N of them --skip-silent silently skip unimplemented stressors --stressors show available stress tests --smart show changes in S.M.A.R.T. data --syslog log messages to the syslog --taskset use specific CPUs (set CPU affinity) --temp-path path specify path for temporary directories and files --thrash force all pages in causing swap thrashing -t N, --timeout T timeout after T seconds --timer-slack enable timer slack mode --times show run time summary at end of the run --timestamp timestamp log output --tz collect temperatures from thermal zones (Linux only) -v, --verbose verbose output --verify verify results (not available on all tests) --verifiable show stressors that enable verification via --verify -V, --version show version -Y, --yaml file output results to YAML formatted file -x, --exclude list of stressors to exclude (not run) Stressor specific options: --access N start N workers that stress file access permissions --access-ops N stop after N file access bogo operations --af-alg N start N workers that stress AF_ALG socket domain --af-alg-dump dump internal list from /proc/crypto to stdout --af-alg-ops N stop after N af-alg bogo operations --affinity N start N workers that rapidly change CPU affinity --affinity-delay D delay in nanoseconds between affinity changes --affinity-ops N stop after N affinity bogo operations --affinity-pin keep per stressor threads pinned to same CPU --affinity-rand change affinity randomly rather than sequentially --affinity-sleep sleep in nanoseconds between affinity changes --aio N start N workers that issue async I/O requests --aio-ops N stop after N bogo async I/O requests --aio-requests N number of async I/O requests per worker --aiol N start N workers that exercise Linux async I/O --aiol-ops N stop after N bogo Linux aio async I/O requests --aiol-requests N number of Linux aio async I/O requests per worker --apparmor start N workers exercising AppArmor interfaces --apparmor-ops N stop after N bogo AppArmor worker bogo operations --alarm N start N workers exercising alarm timers --alarm-ops N stop after N alarm bogo operations --atomic start N workers exercising GCC atomic operations --atomic-ops stop after N bogo atomic bogo operations --bad-altstack N start N workers exercising bad signal stacks --bad-altstack-ops N stop after N bogo signal stack SIGSEGVs --bad-ioctl N start N stressors that perform illegal read ioctls on devices --bad-ioctl-ops N stop after N bad ioctl bogo operations -B N, --bigheap N start N workers that grow the heap using realloc() --bigheap-growth N grow heap by N bytes per iteration --bigheap-ops N stop after N bogo bigheap operations --bind-mount N start N workers exercising bind mounts --bind-mount-ops N stop after N bogo bind mount operations --binderfs N start N workers exercising binderfs --binderfs-ops N stop after N bogo binderfs operations --branch N start N workers that force branch misprediction --branch-ops N stop after N branch misprediction branches --brk N start N workers performing rapid brk calls --brk-mlock attempt to mlock newly mapped brk pages --brk-notouch don't touch (page in) new data segment page --brk-ops N stop after N brk bogo operations --bsearch N start N workers that exercise a binary search --bsearch-ops N stop after N binary search bogo operations --bsearch-size N number of 32 bit integers to bsearch -C N, --cache N start N CPU cache thrashing workers --cache-cldemote cache line demote (x86 only) --cache-clflushopt optimized cache line flush (x86 only) --cache-enable-all enable all cache options (fence,flush,sfence,etc..) --cache-fence serialize stores --cache-flush flush cache after every memory write (x86 only) --cache-level N only exercise specified cache --cache-no-affinity do not change CPU affinity --cache-ops N stop after N cache bogo operations --cache-prefetch prefetch on memory reads/writes --cache-sfence serialize stores with sfence --cache-ways N only fill specified number of cache ways --cache-wb cache line writeback (x86 only) --cacheline N start N workers that exercise cachelines --cacheline-affinity modify CPU affinity --cacheline-method M use cacheline stressing method M --cacheline-ops N stop after N cacheline bogo operations --cap N start N workers exercising capget --cap-ops N stop cap workers after N bogo capget operations --chattr N start N workers thrashing chattr file mode bits --chattr-ops N stop chattr workers after N bogo operations --chdir N start N workers thrashing chdir on many paths --chdir-dirs N select number of directories to exercise chdir on --chdir-ops N stop chdir workers after N bogo chdir operations --chmod N start N workers thrashing chmod file mode bits --chmod-ops N stop chmod workers after N bogo operations --chown N start N workers thrashing chown file ownership --chown-ops N stop chown workers after N bogo operations --chroot N start N workers thrashing chroot --chroot-ops N stop chroot workers after N bogo operations --clock N start N workers thrashing clocks and POSIX timers --clock-ops N stop clock workers after N bogo operations --clone N start N workers that rapidly create and reap clones --clone-max N set upper limit of N clones per worker --clone-ops N stop after N bogo clone operations --close N start N workers that exercise races on close --close-ops N stop after N bogo close operations --context N start N workers exercising user context --context-ops N stop context workers after N bogo operations --copy-file N start N workers that copy file data --copy-file-bytes N specify size of file to be copied --copy-file-ops N stop after N copy bogo operations -c N, --cpu N start N workers that perform CPU only loading -l P, --cpu-load P load CPU by P %, 0=sleep, 100=full load (see -c) --cpu-load-slice S specify time slice during busy load --cpu-method M specify stress cpu method M, default is all --cpu-old-metrics use old CPU metrics instead of normalized metrics --cpu-ops N stop after N cpu bogo operations --cpu-online N start N workers offlining/onlining the CPUs --cpu-online-ops N stop after N offline/online operations --crypt N start N workers performing password encryption --crypt-ops N stop after N bogo crypt operations --cyclic N start N cyclic real time benchmark stressors --cyclic-dist N calculate distribution of interval N nanosecs --cyclic-method M specify cyclic method M, default is clock_ns --cyclic-ops N stop after N cyclic timing cycles --cyclic-policy P used rr or fifo scheduling policy --cyclic-prio N real time scheduling priority 1..100 --cyclic-samples N number of latency samples to take --cyclic-sleep N sleep time of real time timer in nanosecs --daemon N start N workers creating multiple daemons --daemon-ops N stop when N daemons have been created --dccp N start N workers exercising network DCCP I/O --dccp-domain D specify DCCP domain, default is ipv4 --dccp-if I use network interface I, e.g. lo, eth0, etc. --dccp-ops N stop after N DCCP bogo operations --dccp-opts option DCCP data send options [send|sendmsg|sendmmsg] --dccp-port P use DCCP ports P to P + number of workers - 1 --dekker N start N workers that exercise ther Dekker algorithm --dekker-ops N stop after N dekker mutex bogo operations -D N, --dentry N start N dentry thrashing stressors --dentry-ops N stop after N dentry bogo operations --dentry-order O specify unlink order (reverse, forward, stride) --dentries N create N dentries per iteration --dev N start N device entry thrashing stressors --dev-file name specify the /dev/ file to exercise --dev-ops N stop after N device thrashing bogo ops --dev-shm N start N /dev/shm file and mmap stressors --dev-shm-ops N stop after N /dev/shm bogo ops --dir N start N directory thrashing stressors --dir-dirs N select number of directories to exercise dir on --dir-ops N stop after N directory bogo operations --dirdeep N start N directory depth stressors --dirdeep-bytes N size of files to create per level (see --dirdeep-files) --dirdeep-dirs N create N directories per level --dirdeep-files N create N files per level (see --dirdeep-bytes) --dirdeep-inodes N create a maximum N inodes (N can also be %) --dirdeep-ops N stop after N directory depth bogo operations --dirmany N start N directory file populating stressors --dirmany-filsize specify size of files (default 0 --dirmany-ops N stop after N directory file bogo operations --dnotify N start N workers exercising dnotify events --dnotify-ops N stop dnotify workers after N bogo operations --dup N start N workers exercising dup/close --dup-ops N stop after N dup/close bogo operations --dynlib N start N workers exercising dlopen/dlclose --dynlib-ops N stop after N dlopen/dlclose bogo operations --efivar N start N workers that read EFI variables --efivar-ops N stop after N EFI variable bogo read operations --enosys N start N workers that call non-existent system calls --enosys-ops N stop after N enosys bogo operations --env N start N workers setting environment vars --env-ops N stop after N env bogo operations --epoll N start N workers doing epoll handled socket activity --epoll-domain D specify socket domain, default is unix --epoll-ops N stop after N epoll bogo operations --epoll-port P use socket ports P upwards --epoll-sockets N specify maximum number of open sockets --eventfd N start N workers stressing eventfd read/writes --eventfs-nonblock poll with non-blocking I/O on eventfd fd --eventfd-ops N stop eventfd workers after N bogo operations --exec N start N workers spinning on fork() and exec() --exec-fork-method M select exec fork method: clone fork spawn vfork --exec-max P create P workers per iteration, default is 4096 --exec-method M select exec method: all, execve, execveat --exec-no-pthread do not use pthread_create --exec-ops N stop after N exec bogo operations --exit-group N start N workers that exercise exit_group --exit-group-ops N stop exit_group workers after N bogo exit_group loops --fallocate N start N workers fallocating 16MB files --fallocate-bytes N specify size of file to allocate --fallocate-ops N stop after N fallocate bogo operations --fanotify N start N workers exercising fanotify events --fanotify-ops N stop fanotify workers after N bogo operations --far-branch N start N far branching workers --far-branch-ops N stop after N far branching bogo operations --fault N start N workers producing page faults --fault-ops N stop after N page fault bogo operations --fcntl N start N workers exercising fcntl commands --fcntl-ops N stop after N fcntl bogo operations --fiemap N start N workers exercising the FIEMAP ioctl --fiemap-bytes N specify size of file to fiemap --fiemap-ops N stop after N FIEMAP ioctl bogo operations --fifo N start N workers exercising fifo I/O --fifo-ops N stop after N fifo bogo operations --fifo-readers N number of fifo reader stressors to start --file-ioctl N start N workers exercising file specific ioctls --file-ioctl-ops N stop after N file ioctl bogo operations --filename N start N workers exercising filenames --filename-ops N stop after N filename bogo operations --filename-opts opt specify allowed filename options --flock N start N workers locking a single file --flock-ops N stop after N flock bogo operations --flushcache N start N CPU instruction + data cache flush workers --flushcache-ops N stop after N flush cache bogo operations -f N, --fork N start N workers spinning on fork() and exit() --fork-max P create P workers per iteration, default is 1 --fork-ops N stop after N fork bogo operations --fork-vm enable extra virtual memory pressure --fp-error N start N workers exercising floating point errors --fp-error-ops N stop after N fp-error bogo operations --fpunch N start N workers punching holes in a 16MB file --fpunch-ops N stop after N punch bogo operations --fsize N start N workers exercising file size limits --fsize-ops N stop after N fsize bogo operations --fstat N start N workers exercising fstat on files --fstat-dir path fstat files in the specified directory --fstat-ops N stop after N fstat bogo operations --full N start N workers exercising /dev/full --full-ops N stop after N /dev/full bogo I/O operations --funccall N start N workers exercising 1 to 9 arg functions --funccall-method M select function call method M --funccall-ops N stop after N function call bogo operations --funcret N start N workers exercising functionreturn copying --funcret-method M select method of exercising a functionreturn type --funcret-ops N stop after N functionreturn bogo operations --futex N start N workers exercising a fast mutex --futex-ops N stop after N fast mutex bogo operations --get N start N workers exercising the get*() system calls --get-ops N stop after N get bogo operations --getdent N start N workers reading directories using getdents --getdent-ops N stop after N getdents bogo operations --getrandom N start N workers fetching random data via getrandom() --getrandom-ops N stop after N getrandom bogo operations --goto N start N workers that exercise heavy branching --goto-direction D select goto direction forward, backward, random --goto-ops N stop after 1024 x N goto bogo operations --gpu N start N GPU worker --gpu-devnode name specify CPU device node name --gpu-frag N specify shader core usage per pixel --gpu-ops N stop after N gpu render bogo operations --gpu-tex-size N specify upload texture NxN --gpu-upload N specify upload texture N times per frame --gpu-xsize X specify framebuffer size x --gpu-ysize Y specify framebuffer size y --handle N start N workers exercising name_to_handle_at --handle-ops N stop after N handle bogo operations --hash N start N workers that exercise various hash functions --hash-method M specify stress hash method M, default is all --hash-ops N stop after N hash bogo operations -d N, --hdd N start N workers spinning on write()/unlink() --hdd-bytes N write N bytes per hdd worker (default is 1GB) --hdd-ops N stop after N hdd bogo operations --hdd-opts list specify list of various stressor options --hdd-write-size N set the default write size to N bytes --heapsort N start N workers heap sorting 32 bit random integers --heapsort-ops N stop after N heap sort bogo operations --heapsort-size N number of 32 bit integers to sort --hrtimers N start N workers that exercise high resolution timers --hrtimers-adjust adjust rate to try and maximum timer rate --hrtimers-ops N stop after N bogo high-res timer bogo operations --hsearch N start N workers that exercise a hash table search --hsearch-ops N stop after N hash search bogo operations --hsearch-size N number of integers to insert into hash table --icache N start N CPU instruction cache thrashing workers --icache-ops N stop after N icache bogo operations --icmp-flood N start N ICMP packet flood workers --icmp-flood-ops N stop after N ICMP bogo operations (ICMP packets) --idle-page N start N idle page scanning workers --idle-page-ops N stop after N idle page scan bogo operations --inode-flags N start N workers exercising various inode flags --inode-flags-ops N stop inode-flags workers after N bogo operations --inotify N start N workers exercising inotify events --inotify-ops N stop inotify workers after N bogo operations -i N, --io N start N workers spinning on sync() --io-ops N stop sync I/O after N io bogo operations --iomix N start N workers that have a mix of I/O operations --iomix-bytes N write N bytes per iomix worker (default is 1GB) --iomix-ops N stop iomix workers after N iomix bogo operations --ioport N start N workers exercising port I/O --ioport-ops N stop ioport workers after N port bogo operations --ioprio N start N workers exercising set/get iopriority --ioprio-ops N stop after N io bogo iopriority operations --io-uring N start N workers that issue io-uring I/O requests --io-uring-ops N stop after N bogo io-uring I/O requests --ipsec-mb N start N workers exercising the IPSec MB encoding --ipsec-mb-feature F specify CPU feature F --ipsec-mb-jobs N specify number of jobs to run per round (default 1) --ipsec-mb-ops N stop after N ipsec bogo encoding operations --itimer N start N workers exercising interval timers --itimer-ops N stop after N interval timer bogo operations --itimer-rand enable random interval timer frequency --jpeg N start N workers that burn cycles with no-ops --jpeg-height N image height in pixels --jpeg-image type image type: one of brown, flat, gradient, noise, plasma or xstripes --jpeg-ops N stop after N jpeg bogo no-op operations --jpeg-quality Q compression quality 1 (low) .. 100 (high) --jpeg-width N image width in pixels --judy N start N workers that exercise a judy array search --judy-ops N stop after N judy array search bogo operations --judy-size N number of 32 bit integers to insert into judy array --kcmp N start N workers exercising kcmp --kcmp-ops N stop after N kcmp bogo operations --key N start N workers exercising key operations --key-ops N stop after N key bogo operations --kill N start N workers killing with SIGUSR1 --kill-ops N stop after N kill bogo operations --klog N start N workers exercising kernel syslog interface --klog-ops N stop after N klog bogo operations --kvm N start N workers exercising /dev/kvm --kvm-ops N stop after N kvm create/run/destroy operations --l1cache N start N CPU level 1 cache thrashing workers --l1cache-line-size N specify level 1 cache line size --l1cache-sets N specify level 1 cache sets --l1cache-size N specify level 1 cache size --l1cache-ways N only fill specified number of cache ways --landlock N start N workers stressing landlock file operations --landlock-ops N stop after N landlock bogo operations --lease N start N workers holding and breaking a lease --lease-breakers N number of lease breaking workers to start --lease-ops N stop after N lease bogo operations --link N start N workers creating hard links --link-ops N stop after N link bogo operations --link-sync enablesync'ing after linking/unlinking --list N start N workers that exercise list structures --list-method M select list method: all, circleq, list, slist, slistt, stailq, tailq --list-ops N stop after N bogo list operations --list-size N N is the number of items in the list --llc-affinity N start N workers exercising low level cache over all CPUs --llc-affinity-ops N stop after N low-level-cache bogo operations --loadavg N start N workers that create a large load average --loadavg-ops N stop load average workers after N bogo operations --loadavg-max N set upper limit on number of pthreads to create --locka N start N workers locking a file via advisory locks --locka-ops N stop after N locka bogo operations --lockbus N start N workers locking a memory increment --lockbus-nosplit disable split locks --lockbus-ops N stop after N lockbus bogo operations --lockf N start N workers locking a single file via lockf --lockf-nonblock don't block if lock cannot be obtained, re-try --lockf-ops N stop after N lockf bogo operations --lockofd N start N workers using open file description locking --lockofd-ops N stop after N lockofd bogo operations --longjmp N start N workers exercising setjmp/longjmp --longjmp-ops N stop after N longjmp bogo operations --loop N start N workers exercising loopback devices --loop-ops N stop after N bogo loopback operations --lsearch N start N workers that exercise a linear search --lsearch-ops N stop after N linear search bogo operations --lsearch-size N number of 32 bit integers to lsearch --madvise N start N workers exercising madvise on memory --madvise-ops N stop after N bogo madvise operations --malloc N start N workers exercising malloc/realloc/free --malloc-bytes N allocate up to N bytes per allocation --malloc-max N keep up to N allocations at a time --malloc-ops N stop after N malloc bogo operations --malloc-pthreads N number of pthreads to run concurrently --malloc-thresh N threshold where malloc uses mmap instead of sbrk --malloc-touch touch pages force pages to be populated --malloc-zerofree zero free'd memory --matrix N start N workers exercising matrix operations --matrix-method M specify matrix stress method M, default is all --matrix-ops N stop after N maxtrix bogo operations --matrix-size N specify the size of the N x N matrix --matrix-yx matrix operation is y by x instead of x by y --matrix-3d N start N workers exercising 3D matrix operations --matrix-3d-method M specify 3D matrix stress method M, default is all --matrix-3d-ops N stop after N 3D maxtrix bogo operations --matrix-3d-size N specify the size of the N x N x N matrix --matrix-3d-zyx matrix operation is z by y by x instead of x by y by z --mcontend N start N workers that produce memory contention --mcontend-ops N stop memory contention workers after N bogo-ops --membarrier N start N workers performing membarrier system calls --membarrier-ops N stop after N membarrier bogo operations --memcpy N start N workers performing memory copies --memcpy-method M set memcpy method (M = all, libc, builtin, naive..) --memcpy-ops N stop after N memcpy bogo operations --memfd N start N workers allocating memory with memfd_create --memfd-bytes N allocate N bytes for each stress iteration --memfd-fds N number of memory fds to open per stressors --memfd-ops N stop after N memfd bogo operations --memhotplug N start N workers that exercise memory hotplug --memhotplug-ops N stop after N memory hotplug operations --memrate N start N workers exercised memory read/writes --memrate-bytes N size of memory buffer being exercised --memrate-ops N stop after N memrate bogo operations --memrate-rd-mbs N read rate from buffer in megabytes per second --memrate-wr-mbs N write rate to buffer in megabytes per second --memthrash N start N workers thrashing a 16MB memory buffer --memthrash-method M specify memthrash method M, default is all --memthrash-ops N stop after N memthrash bogo operations --mergesort N start N workers merge sorting 32 bit random integers --mergesort-ops N stop after N merge sort bogo operations --mergesort-size N number of 32 bit integers to sort --mincore N start N workers exercising mincore --mincore-ops N stop after N mincore bogo operations --mincore-random randomly select pages rather than linear scan --misaligned N start N workers performing misaligned read/writes --misaligned-method M use misaligned memory read/write method --misaligned-ops N stop after N misaligned bogo operations --mknod N start N workers that exercise mknod --mknod-ops N stop after N mknod bogo operations --mlock N start N workers exercising mlock/munlock --mlock-ops N stop after N mlock bogo operations --mlockmany N start N workers exercising many mlock/munlock processes --mlockmany-ops N stop after N mlockmany bogo operations --mlockmany-procs N use N child processes to mlock regions --mmap N start N workers stressing mmap and munmap --mmap-async using asynchronous msyncs for file based mmap --mmap-bytes N mmap and munmap N bytes for each stress iteration --mmap-file mmap onto a file using synchronous msyncs --mmap-mprotect enable mmap mprotect stressing --mmap-odirect enable O_DIRECT on file --mmap-ops N stop after N mmap bogo operations --mmap-osync enable O_SYNC on file --mmapaddr N start N workers stressing mmap with random addresses --mmapaddr-ops N stop after N mmapaddr bogo operations --mmapfixed N start N workers stressing mmap with fixed mappings --mmapfixed-ops N stop after N mmapfixed bogo operations --mmapfork N start N workers stressing many forked mmaps/munmaps --mmapfork-ops N stop after N mmapfork bogo operations --mmaphuge N start N workers stressing mmap with huge mappings --mmaphuge-mmaps N select number of memory mappings per iteration --mmaphuge-ops N stop after N mmaphuge bogo operations --mmapmany N start N workers stressing many mmaps and munmaps --mmapmany-ops N stop after N mmapmany bogo operations --mprotect N start N workers exercising mprotect on memory --mprotect-ops N stop after N bogo mprotect operations --mq N start N workers passing messages using POSIX messages --mq-ops N stop mq workers after N bogo messages --mq-size N specify the size of the POSIX message queue --mremap N start N workers stressing mremap --mremap-bytes N mremap N bytes maximum for each stress iteration --mremap-lock mlock remap pages, force pages to be unswappable --mremap-ops N stop after N mremap bogo operations --msg N start N workers stressing System V messages --msg-ops N stop msg workers after N bogo messages --msg-types N enable N different message types --msync N start N workers syncing mmap'd data with msync --msync-bytes N size of file and memory mapped region to msync --msync-ops N stop msync workers after N bogo msyncs --msyncmany N start N workers stressing msync on many mapped pages --msyncmany-ops N stop after N msyncmany bogo operations --munmap N start N workers stressing munmap --munmap-ops N stop after N munmap bogo operations --mutex N start N workers exercising mutex operations --mutex-affinity change CPU affinity randomly across locks --mutex-ops N stop after N mutex bogo operations --mutex-procs N select the number of concurrent processes --nanosleep N start N workers performing short sleeps --nanosleep-ops N stop after N bogo sleep operations --netdev N start N workers exercising netdevice ioctls --netdev-ops N stop netdev workers after N bogo operations --netlink-proc N start N workers exercising netlink process events --netlink-proc-ops N stop netlink-proc workers after N bogo events --netlink-task N start N workers exercising netlink tasks events --netlink-task-ops N stop netlink-task workers after N bogo events --nice N start N workers that randomly re-adjust nice levels --nice-ops N stop after N nice bogo operations --nop N start N workers that burn cycles with no-ops --nop-instr INSTR specify nop instruction to use --nop-ops N stop after N nop bogo no-op operations --null N start N workers writing to /dev/null --null-ops N stop after N /dev/null bogo write operations --numa N start N workers stressing NUMA interfaces --numa-ops N stop after N NUMA bogo operations --oom-pipe N start N workers exercising large pipes --oom-pipe-ops N stop after N oom-pipe bogo operations --opcode N start N workers exercising random opcodes --opcode-method M set opcode stress method (M = random, inc, mixed, text) --opcode-ops N stop after N opcode bogo operations -o N, --open N start N workers exercising open/close --open-fd open files in /proc/$pid/fd --open-max N specficify maximum number of files to open --open-ops N stop after N open/close bogo operations --pagemove N start N workers that shuffle move pages --pagemove-bytes N size of mmap'd region to exercise page moving in bytes --pagemove-ops N stop after N page move bogo operations --pageswap N start N workers that swap pages out and in --pageswap-ops N stop after N page swap bogo operations --pci N start N workers that read and mmap PCI regions --pci-ops N stop after N PCI bogo operations --personality N start N workers that change their personality --personality-ops N stop after N bogo personality calls --peterson N start N workers that exercise Peterson's algorithm --peterson-ops N stop after N peterson mutex bogo operations --physpage N start N workers performing physical page lookup --physpage-ops N stop after N physical page bogo operations --pidfd N start N workers exercising pidfd system call --pidfd-ops N stop after N pidfd bogo operations --ping-sock N start N workers that exercises a ping socket --ping-sock-ops N stop after N ping sendto messages -p N, --pipe N start N workers exercising pipe I/O --pipe-data-size N set pipe size of each pipe write to N bytes --pipe-ops N stop after N pipe I/O bogo operations --pipe-size N set pipe size to N bytes -p N, --pipeherd N start N multi-process workers exercising pipes I/O --pipeherd-ops N stop after N pipeherd I/O bogo operations --pipeherd-yield force processes to yield after each write --pkey N start N workers exercising pkey_mprotect --pkey-ops N stop after N bogo pkey_mprotect bogo operations --plugin N start N workers exercising random plugins --plugin-method M set plugin stress method --plugin-ops N stop after N plugin bogo operations --plugin-so file specify plugin shared object file -P N, --poll N start N workers exercising zero timeout polling --poll-fds N use N file descriptors --poll-ops N stop after N poll bogo operations --procfs N start N workers reading portions of /proc --procfs-ops N stop procfs workers after N bogo read operations --prefetch N start N workers exercising memory prefetching --prefetch-l3-size N specify the L3 cache size of the CPU --prefetch-ops N stop after N bogo prefetching operations --procfs N start N workers reading portions of /proc --procfs-ops N stop procfs workers after N bogo read operations --pthread N start N workers that create multiple threads --pthread-max P create P threads at a time by each worker --pthread-ops N stop pthread workers after N bogo threads created --ptrace N start N workers that trace a child using ptrace --ptrace-ops N stop ptrace workers after N system calls are traced --pty N start N workers that exercise pseudoterminals --pty-max N attempt to open a maximum of N ptys --pty-ops N stop pty workers after N pty bogo operations -Q N, --qsort N start N workers qsorting 32 bit random integers --qsort-ops N stop after N qsort bogo operations --qsort-size N number of 32 bit integers to sort --quota N start N workers exercising quotactl commands --quota-ops N stop after N quotactl bogo operations --race-sched N start N workers that race cpu affinity --race-sched-ops N stop after N bogo race operations --race-sched-method M method M: all, rand, next, prev, yoyo, randinc --radixsort N start N workers radix sorting random strings --radixsort-ops N stop after N radixsort bogo operations --radixsort-size N number of strings to sort --randlist N start N workers that exercise random ordered list --randlist-compact reduce mmap and malloc overheads --randlist-items N number of items in the random ordered list --randlist-ops N stop after N randlist bogo no-op operations --randlist-size N size of data in each item in the list --ramfs N start N workers exercising ramfs mounts --ramfs-size N set the ramfs size in bytes, e.g. 2M is 2MB --ramfs-fill attempt to fill ramfs --ramfs-ops N stop after N bogo ramfs mount operations --rawdev N start N workers that read a raw device --rawdev-method M specify the rawdev read method to use --rawdev-ops N stop after N rawdev read operations --rawpkt N start N workers exercising raw packets --rawpkt-ops N stop after N raw packet bogo operations --rawpkt-port P use raw packet ports P to P + number of workers - 1 --rawsock N start N workers performing raw socket send/receives --rawsock-ops N stop after N raw socket bogo operations --rawsock-port P use socket P to P + number of workers - 1 --rawudp N start N workers exercising raw UDP socket I/O --rawudp-if I use network interface I, e.g. lo, eth0, etc. --rawudp-ops N stop after N raw socket UDP bogo operations --rawudp-port P use raw socket ports P to P + number of workers - 1 --rdrand N start N workers exercising rdrand (x86 only) --rdrand-ops N stop after N rdrand bogo operations --rdrand-seed use rdseed instead of rdrand --readahead N start N workers exercising file readahead --readahead-bytes N size of file to readahead on (default is 1GB) --readahead-ops N stop after N readahead bogo operations --reboot N start N workers that exercise bad reboot calls --reboot-ops N stop after N bogo reboot operations --regs N start N workers exercising CPU generic registers --regs-ops N stop after N x 1000 rounds of register shuffling --remap N start N workers exercising page remappings --remap-ops N stop after N remapping bogo operations -R, --rename N start N workers exercising file renames --rename-ops N stop after N rename bogo operations --resched N start N workers that spawn renicing child processes --resched-ops N stop after N nice bogo nice'd yield operations --resources N start N workers consuming system resources --resources-ops N stop after N resource bogo operations --revio N start N workers performing reverse I/O --revio-ops N stop after N revio bogo operations --ring-pipe N start N workers exercising a ring of pipes --ring-pipe-num number of pipes to use --ring-pipe-ops N stop after N ring pipe I/O bogo operations --ring-pipe-size size of data to be written and read --ring-pipe-splice use splice instread of read+write --rmap N start N workers that stress reverse mappings --rmap-ops N stop after N rmap bogo operations --rmap N start N workers that stress reverse mappings --rmap-ops N stop after N rmap bogo operations --rseq N start N workers that exercise restartable sequences --rseq-ops N stop after N bogo restartable sequence operations --rtc N start N workers that exercise the RTC interfaces --rtc-ops N stop after N RTC bogo operations --schedpolicy N start N workers that exercise scheduling policy --schedpolicy-ops N stop after N scheduling policy bogo operations --sctp N start N workers performing SCTP send/receives --sctp-domain D specify sctp domain, default is ipv4 --sctp-if I use network interface I, e.g. lo, eth0, etc. --sctp-ops N stop after N SCTP bogo operations --sctp-port P use SCTP ports P to P + number of workers - 1 --sctp-sched S specify sctp scheduler --seal N start N workers performing fcntl SEAL commands --seal-ops N stop after N SEAL bogo operations --seccomp N start N workers performing seccomp call filtering --seccomp-ops N stop after N seccomp bogo operations --secretmem N start N workers that use secretmem mappings --secretmem-ops N stop after N secretmem bogo operations --seek N start N workers performing random seek r/w IO --seek-ops N stop after N seek bogo operations --seek-punch punch random holes in file to stress extents --seek-size N length of file to do random I/O upon --sem N start N workers doing semaphore operations --sem-ops N stop after N semaphore bogo operations --sem-procs N number of processes to start per worker --sem-sysv N start N workers doing System V semaphore operations --sem-sysv-ops N stop after N System V sem bogo operations --sem-sysv-procs N number of processes to start per worker --sendfile N start N workers exercising sendfile --sendfile-ops N stop after N bogo sendfile operations --sendfile-size N size of data to be sent with sendfile -f N, --session N start N workers that exercise new sessions --session-ops N stop after N session bogo operations --set N start N workers exercising the set*() system calls --set-ops N stop after N set bogo operations --shellsort N start N workers shell sorting 32 bit random integers --shellsort-ops N stop after N shell sort bogo operations --shellsort-size N number of 32 bit integers to sort --shm N start N workers that exercise POSIX shared memory --shm-bytes N allocate/free N bytes of POSIX shared memory --shm-ops N stop after N POSIX shared memory bogo operations --shm-segs N allocate N POSIX shared memory segments per iteration --shm-sysv N start N workers that exercise System V shared memory --shm-sysv-bytes N allocate and free N bytes of shared memory per loop --shm-sysv-ops N stop after N shared memory bogo operations --shm-sysv-segs N allocate N shared memory segments per iteration --sigabrt N start N workers generating segmentation faults --sigabrt-ops N stop after N bogo segmentation faults --sigchld N start N workers that handle SIGCHLD --sigchld-ops N stop after N bogo SIGCHLD signals --sigfd N start N workers reading signals via signalfd reads --sigfd-ops N stop after N bogo signalfd reads --sigfpe N start N workers generating floating point math faults --sigfpe-ops N stop after N bogo floating point math faults --sigio N start N workers that exercise SIGIO signals --sigio-ops N stop after N bogo sigio signals --signal N start N workers that exercise signal --signal-ops N stop after N bogo signals --signest N start N workers generating nested signals --signest-ops N stop after N bogo nested signals --sigpending N start N workers exercising sigpending --sigpending-ops N stop after N sigpending bogo operations --sigpipe N start N workers exercising SIGPIPE --sigpipe-ops N stop after N SIGPIPE bogo operations --sigq N start N workers sending sigqueue signals --sigq-ops N stop after N sigqueue bogo operations --sigrt N start N workers sending real time signals --sigrt-ops N stop after N real time signal bogo operations --sigsegv N start N workers generating segmentation faults --sigsegv-ops N stop after N bogo segmentation faults --sigsuspend N start N workers exercising sigsuspend --sigsuspend-ops N stop after N bogo sigsuspend wakes --sigtrap N start N workers generating segmentation faults --sigtrap-ops N stop after N bogo segmentation faults --skiplist N start N workers that exercise a skiplist search --skiplist-ops N stop after N skiplist search bogo operations --skiplist-size N number of 32 bit integers to add to skiplist --sleep N start N workers performing various duration sleeps --sleep-max P create P threads at a time by each worker --sleep-ops N stop after N bogo sleep operations --smi N start N workers that trigger SMIs --smi-ops N stop after N SMIs have been triggered -S N, --sock N start N workers exercising socket I/O --sock-domain D specify socket domain, default is ipv4 --sock-if I use network interface I, e.g. lo, eth0, etc. --sock-nodelay disable Nagle algorithm, send data immediately --sock-ops N stop after N socket bogo operations --sock-opts option socket options [send|sendmsg|sendmmsg] --sock-port P use socket ports P to P + number of workers - 1 --sock-protocol use socket protocol P, default is tcp, can be mptcp --sock-type T socket type (stream, seqpacket) --sock-zerocopy enable zero copy sends --sockabuse N start N workers abusing socket I/O --sockabuse-ops N stop after N socket abusing bogo operations --sockabuse-port P use socket ports P to P + number of workers - 1 --sockdiag N start N workers exercising sockdiag netlink --sockdiag-ops N stop sockdiag workers after N bogo messages --sockfd N start N workers sending file descriptors over sockets --sockfd-ops N stop after N sockfd bogo operations --sockfd-port P use socket fd ports P to P + number of workers - 1 --sockpair N start N workers exercising socket pair I/O activity --sockpair-ops N stop after N socket pair bogo operations --sockmany N start N workers exercising many socket connections --sockmany-if I use network interface I, e.g. lo, eth0, etc. --sockmany-ops N stop after N sockmany bogo operations --sockmany-port use socket ports P to P + number of workers - 1 --softlockup N start N workers that cause softlockups --softlockup-ops N stop after N softlockup bogo operations --spawn N start N workers spawning stress-ng using posix_spawn --spawn-ops N stop after N spawn bogo operations --sparsematrix N start N workers that exercise a sparse matrix --sparsematrix-items NN is the number of items in the spare matrix --sparsematrix-method Mselect storage method: all, hash, judy, list or rb --sparsematrix-ops N stop after N bogo sparse matrix operations --sparsematrix-size N M is the width and height X x Y of the matrix --splice N start N workers reading/writing using splice --splice-bytes N number of bytes to transfer per splice call --splice-ops N stop after N bogo splice operations --stack N start N workers generating stack overflows --stack-fill fill stack, touches all new pages --stack-mlock mlock stack, force pages to be unswappable --stack-ops N stop after N bogo stack overflows --stack-pageout use madvise to try to swap out stack --stackmmap N start N workers exercising a filebacked stack --stackmmap-ops N stop after N bogo stackmmap operations --str N start N workers exercising lib C string functions --str-method func specify the string function to stress --str-ops N stop after N bogo string operations --stream N start N workers exercising memory bandwidth --stream-index specify number of indices into the data (0..3) --stream-l3-size N specify the L3 cache size of the CPU --stream-madvise M specify mmap'd stream buffer madvise advice --stream-ops N stop after N bogo stream operations --swap N start N workers exercising swapon/swapoff --swap-ops N stop after N swapon/swapoff operations -s N, --switch N start N workers doing rapid context switches --switch-freq N set frequency of context switches --switch-method M mq | pipe | sem-sysv --switch-ops N stop after N context switch bogo operations --symlink N start N workers creating symbolic links --symlink-ops N stop after N symbolic link bogo operations --symlink-sync enablesync'ing after symlinking/unsymlinking --sync-file N start N workers exercise sync_file_range --sync-file-bytes N size of file to be sync'd --sync-file-ops N stop after N sync_file_range bogo operations --syncload N start N workers that synchronize load spikes --syncload-msbusy M maximum busy duration in milliseconds --syncload-mssleep M maximum sleep duration in milliseconds --syncload-ops N stop after N syncload bogo operations --sysbadaddr N start N workers that pass bad addresses to syscalls --sysbadaddr-ops N stop after N sysbadaddr bogo syscalls --syscall N start N workers that exercise a wide range of system calls --syscall-ops N stop after N syscall bogo operations --sysinfo N start N workers reading system information --sysinfo-ops N stop after sysinfo bogo operations --sysinval N start N workers that pass invalid args to syscalls --sysinval-ops N stop after N sysinval bogo syscalls --sysfs N start N workers reading files from /sys --sysfs-ops N stop after sysfs bogo operations --tee N start N workers exercising the tee system call --tee-ops N stop after N tee bogo operations -T N, --timer N start N workers producing timer events --timer-freq F run timer(s) at F Hz, range 1 to 1000000000 --timer-ops N stop after N timer bogo events --timer-rand enable random timer frequency --timerfd N start N workers producing timerfd events --timerfd-fds N number of timerfd file descriptors to open --timerfd-freq F run timer(s) at F Hz, range 1 to 1000000000 --timerfd-ops N stop after N timerfd bogo events --timerfd-rand enable random timerfd frequency --tlb-shootdown N start N workers that force TLB shootdowns --tlb-shootdown-ops N stop after N TLB shootdown bogo ops --tmpfs N start N workers mmap'ing a file on tmpfs --tmpfs-mmap-async using asynchronous msyncs for tmpfs file based mmap --tmpfs-mmap-file mmap onto a tmpfs file using synchronous msyncs --tmpfs-ops N stop after N tmpfs bogo ops --touch N start N stressors that touch and remove files --touch-method specify method to touch tile file, open | create --touch-ops N stop after N touch bogo operations --touch-opts touch open options all,direct,dsync,excl,noatime,sync,trunc --tree N start N workers that exercise tree structures --tree-method M select tree method: all,avl,binary,btree,rb,splay --tree-ops N stop after N bogo tree operations --tree-size N N is the number of items in the tree --tsc N start N workers reading the time stamp counter --tsc-ops N stop after N TSC bogo operations --tsearch N start N workers that exercise a tree search --tsearch-ops N stop after N tree search bogo operations --tsearch-size N number of 32 bit integers to tsearch --tun N start N workers exercising tun interface --tun-ops N stop after N tun bogo operations --tun-tap use TAP interface instead of TUN --udp N start N workers performing UDP send/receives --udp-domain D specify domain, default is ipv4 --udp-gro enable UDP-GRO --udp-if I use network interface I, e.g. lo, eth0, etc. --udp-lite use the UDP-Lite (RFC 3828) protocol --udp-ops N stop after N udp bogo operations --udp-port P use ports P to P + number of workers - 1 --udp-flood N start N workers that performs a UDP flood attack --udp-flood-domain D specify domain, default is ipv4 --udp-flood-if I use network interface I, e.g. lo, eth0, etc. --udp-flood-ops N stop after N udp flood bogo operations --unshare N start N workers exercising resource unsharing --unshare-ops N stop after N bogo unshare operations --uprobe N start N workers that generate uprobe events --uprobe-ops N stop after N uprobe events -u N, --urandom N start N workers reading /dev/urandom --urandom-ops N stop after N urandom bogo read operations --userfaultfd N start N page faulting workers with userspace handling --userfaultfd-ops N stop after N page faults have been handled --usersyscall N start N workers exercising a userspace system call handler --usersyscall-ops N stop after N successful SIGSYS system callls --utime N start N workers updating file timestamps --utime-fsync force utime meta data sync to the file system --utime-ops N stop after N utime bogo operations --vdso N start N workers exercising functions in the VDSO --vdso-func F use just vDSO function F --vdso-ops N stop after N vDSO function calls --vecfp N start N workers performing vector math ops --vecfp-ops N stop after N vector math bogo operations --vecmath N start N workers performing vector math ops --vecmath-ops N stop after N vector math bogo operations --vecshuf N start N workers performing vector shuffle ops --vecshuf-method M select vector shuffling method --vecshuf-ops N stop after N vector shuffle bogo operations --vecwide N start N workers performing vector math ops --vecwide-ops N stop after N vector math bogo operations --verity N start N workers exercising file verity ioctls --verity-ops N stop after N file verity bogo operations --vfork N start N workers spinning on vfork() and exit() --vfork-ops N stop after N vfork bogo operations --vfork-max P create P processes per iteration, default is 1 --vforkmany N start N workers spawning many vfork children --vforkmany-ops N stop after spawning N vfork children --vforkmany-vm enable extra virtual memory pressure -m N, --vm N start N workers spinning on anonymous mmap --vm-bytes N allocate N bytes per vm worker (default 256MB) --vm-hang N sleep N seconds before freeing memory --vm-keep redirty memory instead of reallocating --vm-locked lock the pages of the mapped region into memory --vm-madvise M specify mmap'd vm buffer madvise advice --vm-method M specify stress vm method M, default is all --vm-ops N stop after N vm bogo operations --vm-populate populate (prefault) page tables for a mapping --vm-addr N start N vm address exercising workers --vm-addr-ops N stop after N vm address bogo operations --vm-rw N start N vm read/write process_vm* copy workers --vm-rw-bytes N transfer N bytes of memory per bogo operation --vm-rw-ops N stop after N vm process_vm* copy bogo operations --vm-segv N start N workers that unmap their address space --vm-segv-ops N stop after N vm-segv unmap'd SEGV faults --vm-splice N start N workers reading/writing using vmsplice --vm-splice-bytes N number of bytes to transfer per vmsplice call --vm-splice-ops N stop after N bogo splice operations --wait N start N workers waiting on child being stop/resumed --wait-ops N stop after N bogo wait operations --watchdog N start N workers that exercise /dev/watchdog --watchdog-ops N stop after N bogo watchdog operations --wcs N start N workers on lib C wide char string functions --wcs-method func specify the wide character string function to stress --wcs-ops N stop after N bogo wide character string operations --x86syscall N start N workers exercising functions using syscall --x86syscall-func F use just syscall function F --x86syscall-ops N stop after N syscall function calls --xattr N start N workers stressing file extended attributes --xattr-ops N stop after N bogo xattr operations -y N, --yield N start N workers doing sched_yield() calls --yield-ops N stop after N bogo yield operations --zero N start N workers reading /dev/zero --zero-ops N stop after N /dev/zero bogo read operations --zlib N start N workers compressing data with zlib --zlib-level L specify zlib compression level 0=fast, 9=best --zlib-mem-level L specify zlib compression state memory usage 1=minimum, 9=maximum --zlib-method M specify zlib random data generation method M --zlib-ops N stop after N zlib bogo compression operations --zlib-strategy S specify zlib strategy 0=default, 1=filtered, 2=huffman only, 3=rle, 4=fixed --zlib-stream-bytes S specify the number of bytes to deflate until the current stream will be closed --zlib-window-bits W specify zlib window bits -8-(-15) | 8-15 | 24-31 | 40-47 --zombie N start N workers that rapidly create and reap zombies --zombie-max N set upper limit of N zombies per worker --zombie-ops N stop after N bogo zombie fork operations Example: stress-ng --cpu 8 --io 4 --vm 2 --vm-bytes 128M --fork 4 --timeout 10s Note: Sizes can be suffixed with B,K,M,G and times with s,m,h,d,y
#在另一个终端窗口执行 [root@ubuntu1804 ~]# docker stats --no-stream CONTAINER ID NAME CPU % MEM USAGE / LIMIT MEM % NET I/O BLOCK I/O PIDS 6a93f6b22034 c1 27.06% 297.2MiB / 300MiB 99.07% 1.45kB / 0B 4.98GB / 5.44GB 5
范例:
1 2 3 4 5 6 7 8 9 10
[root@ubuntu1804 ~]# docker run --name c2 -it --rm lorel/docker-stress-ng --vm 4 stress-ng: info: [1] defaulting to a 86400 second run per stressor stress-ng: info: [1] dispatching hogs: 4 vm
#一次性查看资源使用情况 [root@ubuntu1804 ~]# docker stats --no-stream CONTAINER ID NAME CPU % MEM USAGE / LIMIT MEM % NET I/O BLOCK I/O PIDS fd5fff3c04f7 c2 21.20% 591.1MiB / 962MiB 61.45% 1.31kB / 0B 1.07GB / 46.6MB 9
[root@ubuntu1804 ~]# docker run -it --rm --name c1 lorel/docker-stress-ng --vm 6 stress-ng: info: [1] defaulting to a 86400 second run per stressor stress-ng: info: [1] dispatching hogs: 6 vm
#另一个终端窗中同时执行下面命令 [root@ubuntu1804 ~]# docker run -it --rm --name c2 lorel/docker-stress-ng --vm 6 stress-ng: info: [1] defaulting to a 86400 second run per stressor stress-ng: info: [1] dispatching hogs: 6 vm
[root@ubuntu1804 ~]# docker stats CONTAINER ID NAME CPU % MEM USAGE / LIMIT MEM % NET I/O BLOCK I/O PIDS f33cebf5b55d c2 -- -- / -- -- -- -- -- b14b597c5a4f cool_banach -- -- / -- -- -- -- --
#观察日志出现OOM现象 [root@ubuntu1804 ~]# tail /var/log/syslog Feb 4 22:59:40 ubuntu1804 kernel: [ 785.928842] Out of memory: Kill process 2570 (stress-ng-vm) score 1090 or sacrifice child Feb 4 22:59:40 ubuntu1804 kernel: [ 785.929493] Killed process 2570 (stress-ng-vm) total-vm:268416kB, anon-rss:170352kB, file-rss:632kB, shmem-rss:28kB Feb 4 22:59:40 ubuntu1804 kernel: [ 786.018319] oom_reaper: reaped process 2570 (stress-ng-vm), now anon-rss:0kB, file-rss:0kB, shmem-rss:28kB
#启动两个工作进程,每个工作进程最大允许使用内存 256M,且宿主机不限制当前容器最大内存 [root@ubuntu1804 ~]# docker run -it --name c1 --rm lorel/docker-stress-ng --vm 2 stress-ng: info: [1] defaulting to a 86400 second run per stressor stress-ng: info: [1] dispatching hogs: 2 vm
[root@ubuntu1804 ~]# docker ps -a CONTAINER ID IMAGE COMMAND CREATED STATUS PORTS NAMES 13e46172e1ae lorel/docker-stress-ng "/usr/bin/stress-ng …" 24 seconds ago Up 22 seconds gallant_moore
[root@ubuntu1804 ~]# docker run -it --rm -m 256m --memory-reservation 128m --name c1 lorel/docker-stress-ng --vm 2 --vm-bytes 256M stress-ng: info: [1] defaulting to a 86400 second run per stressor stress-ng: info: [1] dispatching hogs: 2 vm
[root@ubuntu1804 ~]# docker stats --no-stream CONTAINER ID NAME CPU % MEM USAGE / LIMIT MEM % NET I/O BLOCK I/O PIDS aeb38acde581 c1 72.45% 253.9MiB / 256MiB 99.20% 976B / 0B 9.47GB / 39.4GB 5
#软限制不能高于硬限制 [root@ubuntu1804 ~]# docker run -it --rm --name c1 -m 256m --memory-reservation 257m --name c1 lorel/docker-stress-ng --vm 2 --vm-bytes 256M docker: Error response from daemon: Minimum memory limit can not be less than memory reservation limit, see usage. See 'docker run --help'.
#启动容器时关闭OOM机制 [root@ubuntu1804 ~]# docker run -it --rm -m 200m --name c1 --oom-kill-disable lorel/docker-stress-ng --vm 2 --vm-bytes 256M stress-ng: info: [1] defaulting to a 86400 second run per stressor stress-ng: info: [1] dispatching hogs: 2 vm
[root@ubuntu1804 ~]# docker stats --no-stream CONTAINER ID NAME CPU % MEM USAGE / LIMIT MEM % NET I/O BLOCK I/O PIDS b655d88228c0 silly_borg 0.00% 197.2MiB / 200MiB 98.58% 1.31kB / 0B 1.84MB / 484MB 5
[root@ubuntu1804 ~]#docker run -it --rm --name c1 -m 200m --memory-swap 512m lorel/docker-stress-ng --vm 2 stress-ng: info: [1] defaulting to a 86400 second run per stressor stress-ng: info: [1] dispatching hogs: 2 vm
过时选项,在容器上添加 CPU CFS 配额,计算方式为 cpu-quota / cpu-period的结果值,docker1.13 及以上版本通常使用–cpus 设置此值
–cpuset-cpus
用于指定容器运行的 CPU 编号,也就是所谓的CPU绑定。如果一个或多个CPU,则容器可以使用逗号分隔的列表或用连字符分隔的CPU范围。第一个CPU的编号为0。有效值可能是 0-3 (使用第一,第二,第三和第四CPU)或 1,3(使用第二和第四CPU)
–cpu-shares
用于设置 cfs 中调度的相对最大比例权重,cpu-share 的值越高的容器,将会分得更多的时间片(宿主机多核 CPU 总数为 100%,假如容器 A 为1024,容器 B为 2048,那么容器 B 将最大是容器 A 的可用 CPU 的两倍 ),默认的时间片1024,最大 262144。这是一个软限制。注意:进程数要多个CPU的核数才能看到效果,此值不能设置太小
使用 Stress-ng 测试 Cpu 配置
范例: 查看 stress-n 关于cpu的帮助
1 2 3 4 5 6
[root@ubuntu1804 ~]#docker run -it --rm --name c1 lorel/docker-stress-ng |grep cpu -c N, --cpu N start N workers spinning on sqrt(rand()) --cpu-ops N stop when N cpu bogo operations completed -l P, --cpu-load P load CPU by P %%, 0=sleep, 100=full load (see -c) --cpu-method m specify stress cpu method m, default is all Example: stress-ng --cpu 8 --io 4 --vm 2 --vm-bytes 128M --fork 4 --timeout 10s
[root@ubuntu1804 ~]# lscpu |grep CPU CPU op-mode(s): 32-bit, 64-bit CPU(s): 6 On-line CPU(s) list: 0-5 CPU family: 6 Model name: Intel(R) Core(TM) i7-4710HQ CPU @ 2.50GHz CPU MHz: 2494.236 NUMA node0 CPU(s): 0-5
#占用4个CPU资源.但只是平均的使用CPU资源 [root@ubuntu1804 ~]# docker run -it --rm --name c1 lorel/docker-stress-ng --cpu 4 stress-ng: info: [1] defaulting to a 86400 second run per stressor stress-ng: info: [1] dispatching hogs: 4 cpu, 4 vm
[root@ubuntu1804 ~]# docker stats --no-stream CONTAINER ID NAME CPU % MEM USAGE / LIMIT MEM % NET I/O BLOCK I/O PIDS 818a85e1da2f frosty_taussig 595.57% 1.037GiB / 2.908GiB 35.64% 1.12kB / 0B 0B / 0B 13 [root@ubuntu1804 ~]# cat /sys/fs/cgroup/cpuset/docker/818a85e1da2f9a4ef297178a9dc09b338b2308108195ad8d4197a1c47febcbff/cpuset.cpus 0-5
[root@ubuntu1804 ~]# top
范例: 限制使用CPU
1 2 3 4 5 6 7 8 9 10 11
[root@ubuntu1804 ~]# docker run -it --rm --name c1 --cpus 1.5 lorel/docker-stress-ng --cpu 4 stress-ng: info: [1] defaulting to a 86400 second run per stressor stress-ng: info: [1] dispatching hogs: 4 cpu, 4 vm
[root@ubuntu1804 ~]# docker stats --no-stream CONTAINER ID NAME CPU % MEM USAGE / LIMIT MEM % NET I/O BLOCK I/O PIDS 9f8b2e693113 busy_hodgkin 147.71% 786.8MiB / 2.908GiB 26.42% 836B / 0B 0B / 0B 13 [root@ubuntu1804 ~]# top
范例: 限制CPU
1 2 3 4 5 6 7 8 9
[root@ubuntu1804 ~]# docker run -it --rm --name c1 --cpu-quota 2000 --cpu-period 1000 lorel/docker-stress-ng --cpu 4 stress-ng: info: [1] defaulting to a 86400 second run per stressor stress-ng: info: [1] dispatching hogs: 4 cpu, 4 vm
[root@ubuntu1804 ~]# docker stats --no-stream CONTAINER ID NAME CPU % MEM USAGE / LIMIT MEM % NET I/O BLOCK I/O PIDS bd949bb6698e affectionate_chebyshev 185.03% 1.037GiB / 2.908GiB 35.64% 836B / 0B 0B / 0B 13
#同时开两个容器 [root@ubuntu1804 ~]# docker run -it --rm --name c1 --cpu-shares 1000 lorel/docker-stress-ng --cpu 4 stress-ng: info: [1] defaulting to a 86400 second run per stressor stress-ng: info: [1] dispatching hogs: 4 cpu, 4 vm
[root@ubuntu1804 ~]# docker run -it --rm --name c2 --cpu-shares 500 lorel/docker-stress-ng --cpu 4 stress-ng: info: [1] defaulting to a 86400 second run per stressor stress-ng: info: [1] dispatching hogs: 4 cpu, 4 vm
#注意:进程数要多于CPU的核数才能看到效果,如果两个容器使用的CPU总数不超过CPU实际的核心数,两个容器都显示400% [root@ubuntu1804 ~]# docker stats --no-stream CONTAINER ID NAME CPU % MEM USAGE / LIMIT MEM % NET I/O BLOCK I/O PIDS a1d4c6e6802d c2 195.88% 925.3MiB / 2.908GiB 31.07% 726B / 0B 0B / 0B 13 d5944104aff4 c1 398.20% 1.036GiB / 2.908GiB 35.64% 906B / 0B 0B / 0B 13