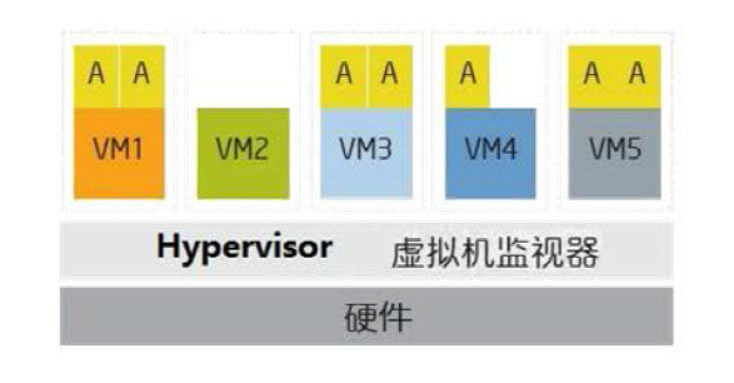
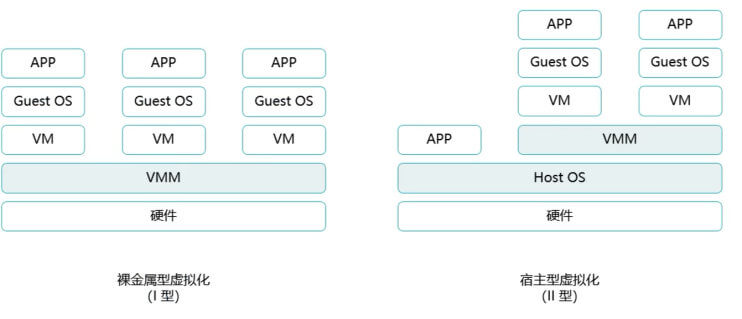
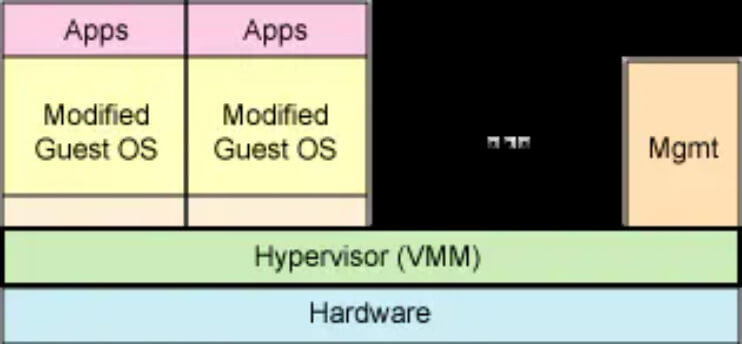
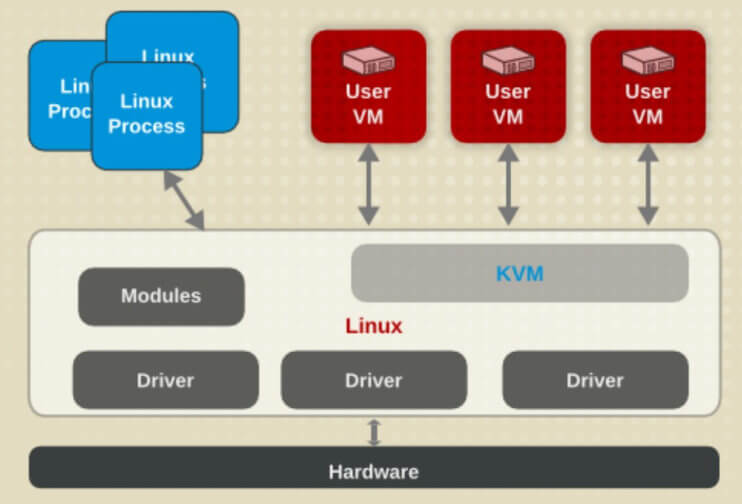
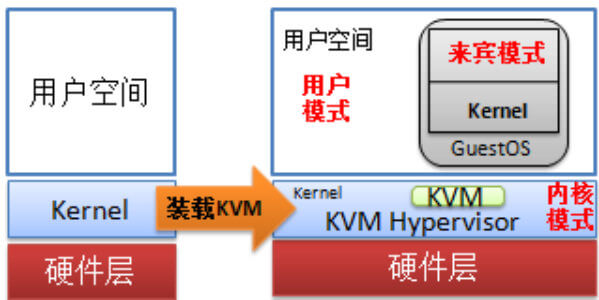
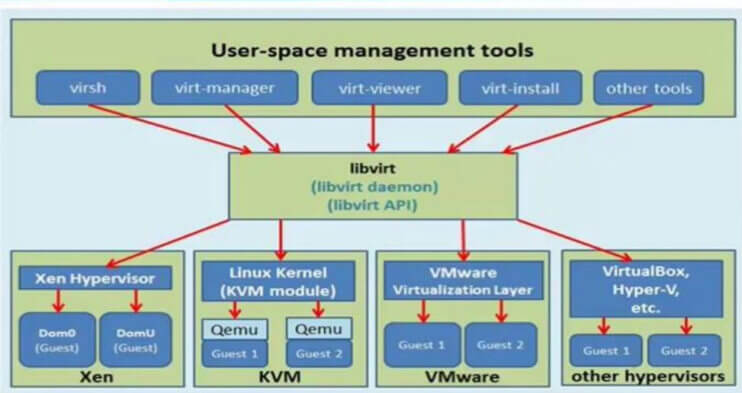
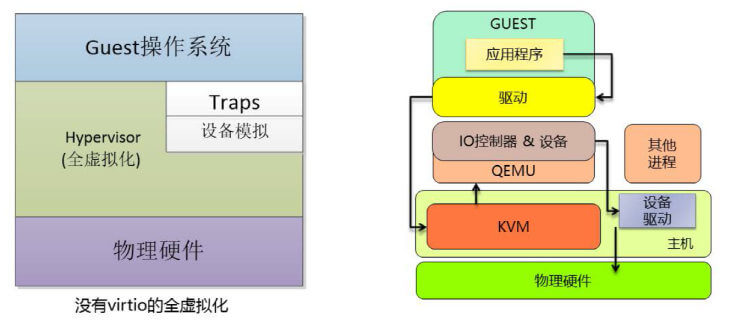
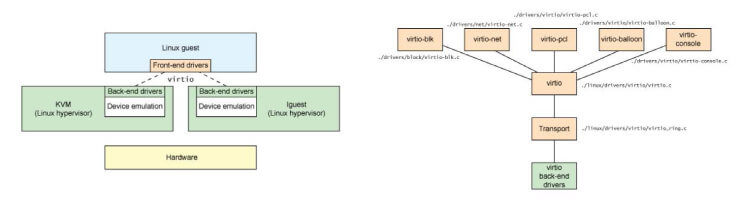
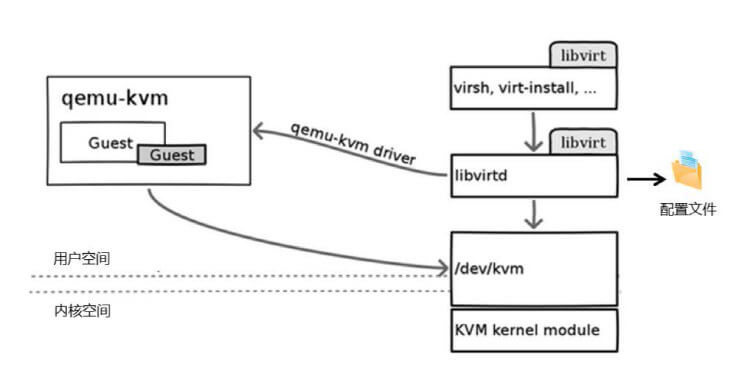
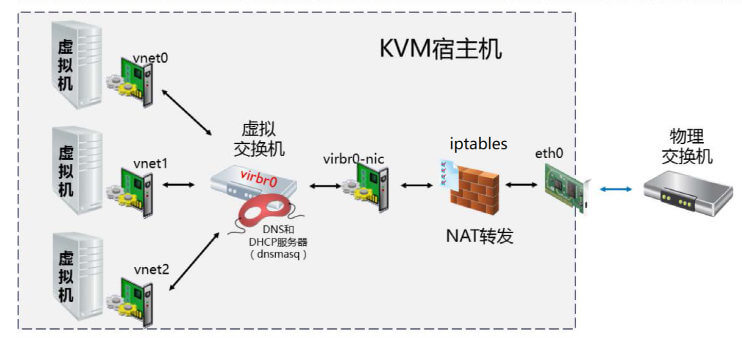
KVM 是基于虚拟化扩展(Intel VT 或者 AMD-V)的 X86 硬件的开源的 Linux 原生的全虚拟化解决方案。KVM 中,虚拟机被实现为常规的 Linux 进程,由标准 Linux 调度程序进行调度;虚机的每个虚拟CPU被实现为一个常规的 Linux 进程。这使得 KVM 能够使用 Linux 内核的已有功能。
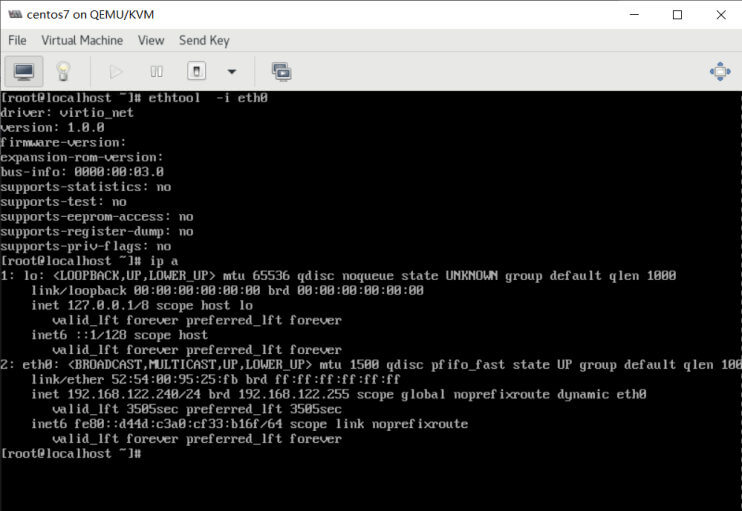
[root@centos8 ~]# ip a 1: lo: <LOOPBACK,UP,LOWER_UP> mtu 65536 qdisc noqueue state UNKNOWN group default qlen 1000 link/loopback 00:00:00:00:00:00 brd 00:00:00:00:00:00 inet 127.0.0.1/8 scope host lo valid_lft forever preferred_lft forever inet6 ::1/128 scope host valid_lft forever preferred_lft forever 2: eth0: <BROADCAST,MULTICAST,UP,LOWER_UP> mtu 1500 qdisc fq_codel state UP group default qlen 1000 link/ether 00:0c:29:8a:51:21 brd ff:ff:ff:ff:ff:ff inet 10.0.0.8/24 brd 10.0.0.255 scope global noprefixroute eth0 valid_lft forever preferred_lft forever inet6 fe80::20c:29ff:fe8a:5121/64 scope link valid_lft forever preferred_lft forever 3: virbr0: <NO-CARRIER,BROADCAST,MULTICAST,UP> mtu 1500 qdisc noqueue state DOWN group default qlen 1000 link/ether 52:54:00:97:eb:e3 brd ff:ff:ff:ff:ff:ff inet 192.168.122.1/24 brd 192.168.122.255 scope global virbr0 valid_lft forever preferred_lft forever 4: virbr0-nic: <BROADCAST,MULTICAST> mtu 1500 qdisc fq_codel master virbr0 state DOWN group default qlen 1000 link/ether 52:54:00:97:eb:e3 brd ff:ff:ff:ff:ff:ff [root@centos8 ~]# grep -R 192.168.122.1 /etc/libvirt/* /etc/libvirt/qemu/networks/autostart/default.xml: <ip address='192.168.122.1' netmask='255.255.255.0'> /etc/libvirt/qemu/networks/default.xml: <ip address='192.168.122.1' netmask='255.255.255.0'>
[root@centos8 ~]# ip a show virbr0 3: virbr0: <NO-CARRIER,BROADCAST,MULTICAST,UP> mtu 1500 qdisc noqueue state DOWN group default qlen 1000 link/ether 52:54:00:97:eb:e3 brd ff:ff:ff:ff:ff:ff inet 192.168.122.1/24 brd 192.168.122.255 scope global virbr0 valid_lft forever preferred_lft forever
WARNING No operating system detected, VM performance may suffer. Specify an OS with --os-variant for optimal results.
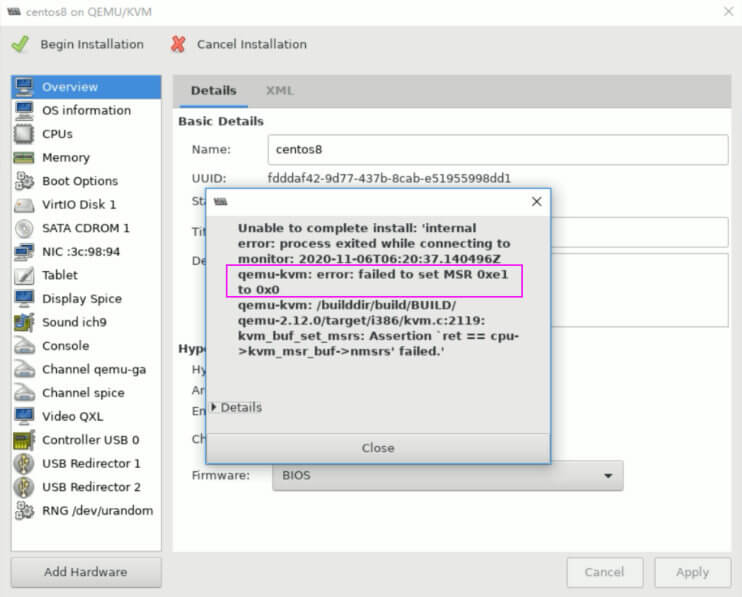
Starting install... ERROR internal error: qemu unexpectedly closed the monitor: 2020-08-09T15:57:08.872365Z qemu-kvm: error: failed to set MSR 0xe1 to 0x0 qemu-kvm: /builddir/build/BUILD/qemu-2.12.0/target/i386/kvm.c:2119: kvm_buf_set_msrs: Assertion `ret == cpu->kvm_msr_buf->nmsrs' failed. Domain installation does not appear to have been successful. If it was, you can restart your domain by running: virsh --connect qemu:///system start centos7 otherwise, please restart your installation.
WARNING No operating system detected, VM performance may suffer. Specify an OS with --os-variant for optimal results. Starting install... Domain creation completed.
#查看支持的Windows版本 [root@centos8 ~]# osinfo-query os| grep win win1.0 | Microsoft Windows 1.0 | 1.0 | http://microsoft.com/win/1.0 win10 | Microsoft Windows 10 | 10.0 | http://microsoft.com/win/10 win11 | Microsoft Windows 11 | 11.0 | http://microsoft.com/win/11 win2.0 | Microsoft Windows 2.0 | 2.0 | http://microsoft.com/win/2.0 win2.1 | Microsoft Windows 2.1 | 2.1 | http://microsoft.com/win/2.1 win2k | Microsoft Windows 2000 | 5.0 | http://microsoft.com/win/2k win2k12 | Microsoft Windows Server 2012 | 6.3 | http://microsoft.com/win/2k12 win2k12r2 | Microsoft Windows Server 2012 R2 | 6.3 | http://microsoft.com/win/2k12r2 win2k16 | Microsoft Windows Server 2016 | 10.0 | http://microsoft.com/win/2k16 win2k19 | Microsoft Windows Server 2019 | 10.0 | http://microsoft.com/win/2k19 win2k22 | Microsoft Windows Server 2022 | 10.0 | http://microsoft.com/win/2k22 win2k3 | Microsoft Windows Server 2003 | 5.2 | http://microsoft.com/win/2k3 win2k3r2 | Microsoft Windows Server 2003 R2 | 5.2 | http://microsoft.com/win/2k3r2 win2k8 | Microsoft Windows Server 2008 | 6.0 | http://microsoft.com/win/2k8 win2k8r2 | Microsoft Windows Server 2008 R2 | 6.1 | http://microsoft.com/win/2k8r2 win3.1 | Microsoft Windows 3.1 | 3.1 | http://microsoft.com/win/3.1 win7 | Microsoft Windows 7 | 6.1 | http://microsoft.com/win/7 win8 | Microsoft Windows 8 | 6.2 | http://microsoft.com/win/8 win8.1 | Microsoft Windows 8.1 | 6.3 | http://microsoft.com/win/8.1 win95 | Microsoft Windows 95 | 4.0 | http://microsoft.com/win/95 win98 | Microsoft Windows 98 | 4.1 | http://microsoft.com/win/98 winme | Microsoft Windows Millennium Edition | 4.9 | http://microsoft.com/win/me winnt3.1 | Microsoft Windows NT Server 3.1 | 3.1 | http://microsoft.com/winnt/3.1 winnt3.5 | Microsoft Windows NT Server 3.5 | 3.5 | http://microsoft.com/winnt/3.5 winnt3.51 | Microsoft Windows NT Server 3.51 | 3.51 | http://microsoft.com/winnt/3.51 winnt4.0 | Microsoft Windows NT Server 4.0 | 4.0 | http://microsoft.com/winnt/4.0 winvista | Microsoft Windows Vista | 6.0 | http://microsoft.com/win/vista winxp | Microsoft Windows XP | 5.1 | http://microsoft.com/win/xp
[root@centos8 ~]# systemctl stop libvirtd [root@centos8 ~]# virsh list error: failed to connect to the hypervisor error: Failed to connect socket to '/var/run/libvirt/libvirt-sock': No such file or directory #virt-manager工具也无法连接虚拟机
1
2
3
4
5
6
7
8
[root@centos8 ~]# systemctl start libvirtd [root@centos8 ~]# virsh list Id Name State ---------------------------------------------------- 2 centos8 running 3 Win_2008_r2-x86_64 running
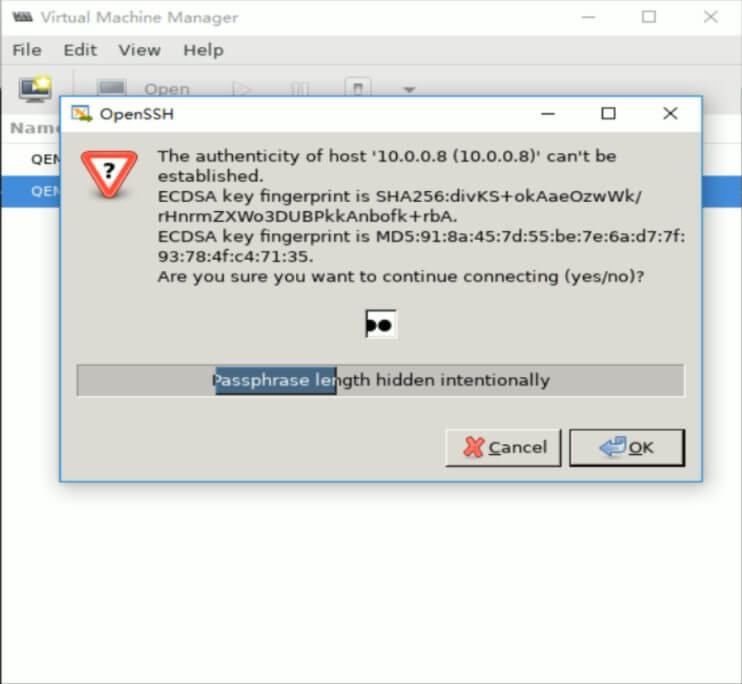
#方法2:实现基于本机到远程主机的key验证 [root@centos8 ~]# ssh-copy-id 10.0.0.18 /usr/bin/ssh-copy-id: INFO: Source of key(s) to be installed: "/root/.ssh/id_rsa.pub" The authenticity of host '10.0.0.18 (10.0.0.18)' can't be established. ECDSA key fingerprint is SHA256:divKS+okAaeOzwWk/rHnrmZXWo3DUBPkkAnbofk+rbA. Are you sure you want to continue connecting (yes/no/[fingerprint])? yes /usr/bin/ssh-copy-id: INFO: attempting to log in with the new key(s), to filter out any that are already installed /usr/bin/ssh-copy-id: INFO: 1 key(s) remain to be installed -- if you are prompted now it is to install the new keys root@10.0.0.18's password:
Number of key(s) added: 1
Now try logging into the machine, with: "ssh '10.0.0.18'" and check to make sure that only the key(s) you wanted were added.
options: -c | --connect=URI hypervisor connection URI -d | --debug=NUM debug level [0-4] -e | --escape <char> set escape sequence for console -h | --help this help -k | --keepalive-interval=NUM keepalive interval in seconds, 0 fordisable -K | --keepalive-count=NUM number of possible missed keepalive messages -l | --log=FILE output logging to file -q | --quiet quiet mode -r | --readonly connect readonly -t | --timing print timing information -v short version -V long version --version[=TYPE] version, TYPE is short or long (default short)
[root@centos8 ~]# virsh help list NAME list - list domains
OPTIONS --inactive list inactive domains --all list inactive & active domains --transient list transient domains --persistent list persistent domains --with-snapshot list domains with existing snapshot --without-snapshot list domains without a snapshot --state-running list domains in running state --state-paused list domains in paused state --state-shutoff list domains in shutoff state --state-other list domains in other states --autostart list domains with autostart enabled --no-autostart list domains with autostart disabled --with-managed-save list domains with managed save state --without-managed-save list domains without managed save --uuid list uuid's only --name list domain names only --table list table (default) --managed-save mark inactive domains with managed save state --title show domain title
#查看当前启动的虚拟机 [root@centos8 ~]# virsh list Id Name State ---------------------------------------------------- 1 Win_2008_r2-x86_64 running
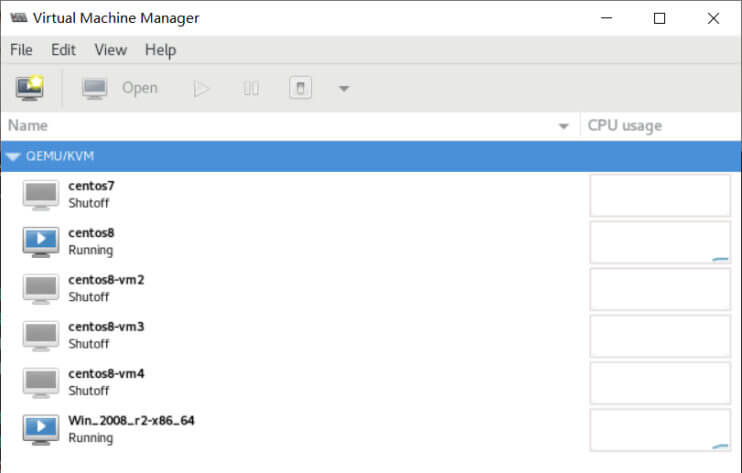
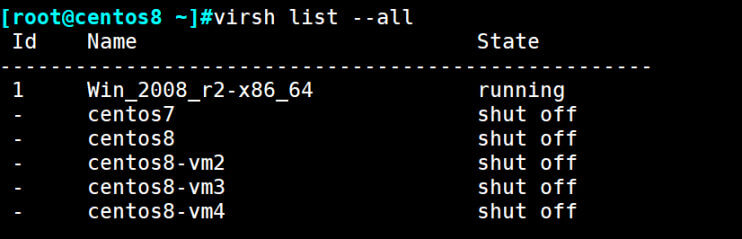
#查看所有虚拟机 [root@centos8 ~]# virsh list --all Id Name State ---------------------------------------------------- 1 Win_2008_r2-x86_64 running - centos7 shut off - centos8 shut off - centos8-vm2 shut off - centos8-vm3 shut off - centos8-vm4 shut off
#启动 [root@centos8 ~]# virsh start centos8 Domain centos8 started
[root@centos8 ~]# virsh list Id Name State ---------------------------------------------------- 1 Win_2008_r2-x86_64 running 2 centos8 running
#正常关机 [root@centos8 ~]# virsh shutdown 1 Domain 1 is being shutdown
[root@centos8 ~]# virsh list Id Name State ---------------------------------------------------- 1 Win_2008_r2-x86_64 running 2 centos8 running
[root@centos8 ~]# virsh list Id Name State ----------------------------------------------------
[root@centos8 ~]# virsh list --all Id Name State ---------------------------------------------------- - centos7 shut off - centos8 shut off - centos8-vm2 shut off - centos8-vm3 shut off - centos8-vm4 shut off - Win_2008_r2-x86_64 shut off
[root@centos8 ~]# virsh list --all Id Name State ---------------------------------------------------- 1 Win_2008_r2-x86_64 running - centos7 shut off - centos8 shut off - centos8-vm2 shut off - centos8-vm3 shut off - centos8-vm4 shut off
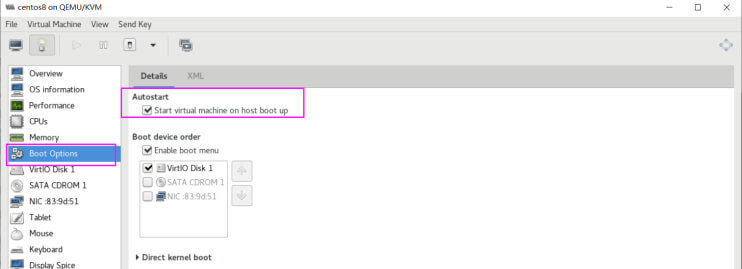
[root@centos8 ~]# virsh autostart centos8 Domain centos8 marked as autostarted
[root@centos8 ~]# virsh list --all Id Name State ---------------------------------------------------- 2 centos8 running - centos7 shut off - centos8-vm2 shut off - centos8-vm3 shut off - centos8-vm4 shut off - Win_2008_r2-x86_64 shut off
[root@centos8 ~]# virsh list --all Id Name State ---------------------------------------------------- 2 centos8 running - centos7 shut off - centos8-vm2 shut off - centos8-vm3 shut off - centos8-vm4 shut off - Win_2008_r2-x86_64 shut off
#删除虚拟机配置,但不删除磁盘文件 [root@centos8 ~]# virsh undefine centos8-vm4 Domain centos8-vm4 has been undefined
[root@centos8 ~]# virsh list --all Id Name State ---------------------------------------------------- 2 centos8 running - centos7 shut off - centos8-vm2 shut off - centos8-vm3 shut off - Win_2008_r2-x86_64 shut off
[root@centos8 ~]# qemu-img create -f raw -o ? Supported options: size Virtual disk size
[root@centos8 ~]# qemu-img create -f qcow2 -o ? Supported options: size Virtual disk size compat Compatibility level (0.10 or 1.1) backing_file File name of a base image backing_fmt Image format of the base image encryption Encrypt the image with format 'aes'. (Deprecated in favor of encrypt.format=aes) encrypt.format Encrypt the image, format choices: 'aes', 'luks' encrypt.key-secret ID of secret providing qcow AES key or LUKS passphrase encrypt.cipher-alg Name of encryption cipher algorithm encrypt.cipher-mode Name of encryption cipher mode encrypt.ivgen-alg Name of IV generator algorithm encrypt.ivgen-hash-alg Name of IV generator hash algorithm encrypt.hash-alg Name of encryption hash algorithm encrypt.iter-time Time to spend in PBKDF in milliseconds cluster_size qcow2 cluster size preallocation Preallocation mode (allowed values: off, metadata, falloc, full) lazy_refcounts Postpone refcount updates refcount_bits Width of a reference count entry in bits
[root@centos8 ~]# virsh list Id Name State ---------------------------------------------------- 2 centos8 running
[root@centos8 ~]# qemu-img check /var/lib/libvirt/images/centos8.qcow2 qemu-img: Could not open '/var/lib/libvirt/images/centos8.qcow2': Failed to get shared "write" lock Is another process using the image [/var/lib/libvirt/images/centos8.qcow2]?
[root@centos8 ~]# virsh list Id Name State ---------------------------------------------------- 2 centos8 paused
[root@centos8 ~]# qemu-img check /var/lib/libvirt/images/centos8.qcow2 qemu-img: Could not open '/var/lib/libvirt/images/centos8.qcow2': Failed to get shared "write" lock Is another process using the image [/var/lib/libvirt/images/centos8.qcow2]?
[root@centos8 ~]# qemu-img check /var/lib/libvirt/images/centos7.qcow2 No errors were found on the image. 25572/327680 = 7.80% allocated, 1.44% fragmented, 0.00% compressed clusters Image end offset: 1676869632
snapshot is the name of the snapshot to create, apply or delete -a applies a snapshot (revert disk to saved state) -c creates a snapshot -d deletes a snapshot -l lists all snapshots in the given image
#查看快照 [root@centos8 ~]# qemu-img snapshot -l /var/lib/libvirt/images/centos7.qcow2 Snapshot list: ID TAG VM SIZE DATE VM CLOCK 1 centos7-s1 0 2020-09-20 17:39:59 00:00:00.000
#查看快照信息 [root@centos8 ~]# qemu-img info /var/lib/libvirt/images/centos7.qcow2 image: /var/lib/libvirt/images/centos7.qcow2 file format: qcow2 virtual size: 20G (21474836480 bytes) disk size: 1.6G cluster_size: 65536 Snapshot list: ID TAG VM SIZE DATE VM CLOCK 1 centos7-s1 0 2020-09-20 17:39:59 00:00:00.000 Format specific information: compat: 1.1 lazy refcounts: false refcount bits: 16 corrupt: false #删除文件,模拟破坏
1 2 3
#关机后才能还原快照修复故障 [root@centos8 ~]# qemu-img snapshot -a centos7-s1 /var/lib/libvirt/images/centos7.qcow2
[root@centos8 ~]# virsh snapshot-list centos8 Name Creation Time State ------------------------------------------------------------
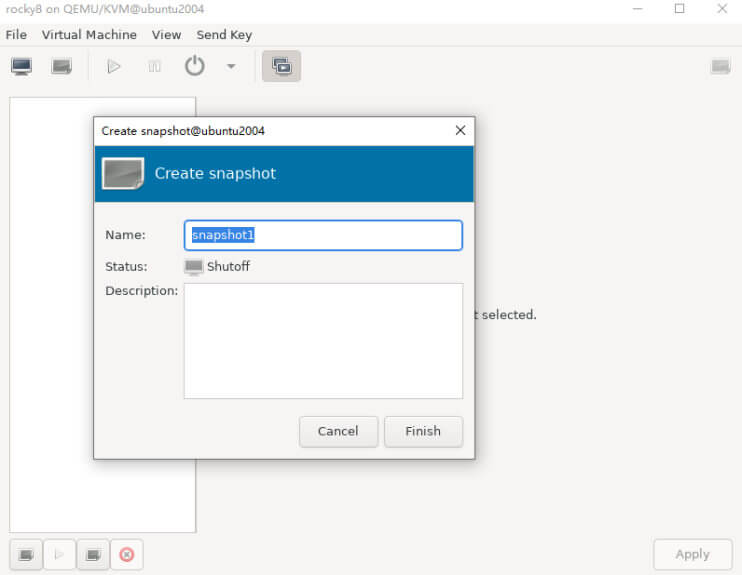
#创建虚拟机快照 [root@centos8 ~]# virsh snapshot-create centos8 Domain snapshot 1600593611 created
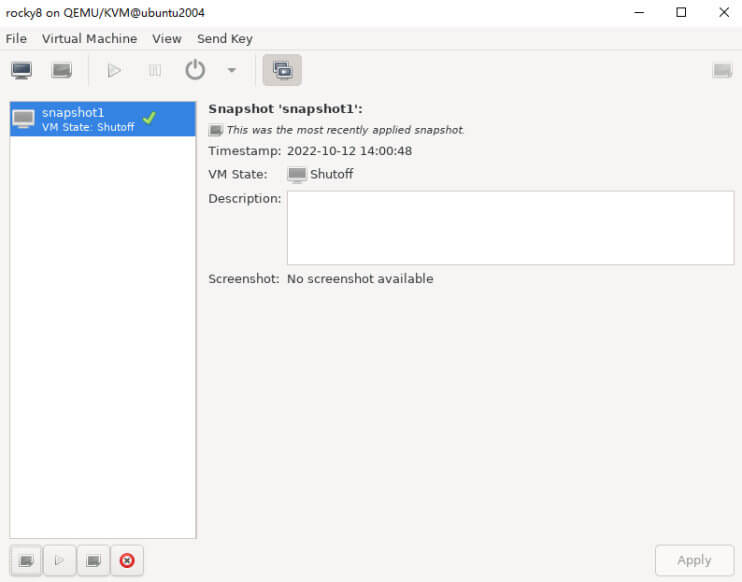
[root@centos8 ~]# virsh snapshot-list centos8 Name Creation Time State ------------------------------------------------------------ 1600593611 2020-09-20 17:20:11 +0800 shutoff
使用virsh 命令还原快照
1 2 3 4 5 6 7 8 9 10
[root@centos8 ~]# virsh list
 Id   Name                           State
----------------------------------------------------

#无需关机,即可还原快照
[root@centos8 ~]# virsh snapshot-revert centos8 --snapshotname 1600593611 --running
[root@centos8 ~]# virsh list
 Id   Name                           State
----------------------------------------------------
23   centos7                         running
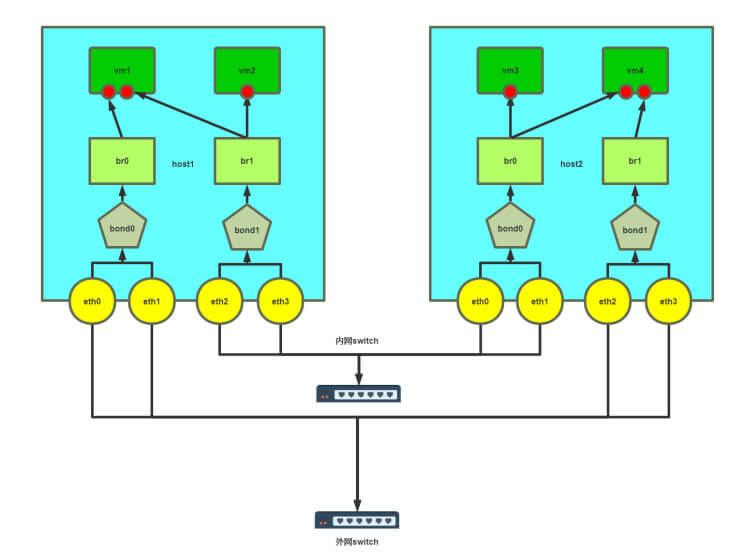
#创建网桥 nmcli con add type bridge con-name br0 ifname br0 nmcli connection modify br0 ipv4.addresses 10.0.0.100/24 ipv4.method manual nmcli con up br0
#加入物理网卡 nmcli con add type bridge-slave con-name br0-port0 ifname eth0 master br0 nmcli con add type bridge-slave con-name br0-port1 ifname eth1 master br0 nmcli con up br0-port0 nmcli con up br0-port1
#Ubuntu20.04 [root@ubuntu2004 ~]# dpkg -l dnsmasq-base Desired=Unknown/Install/Remove/Purge/Hold | Status=Not/Inst/Conf-files/Unpacked/halF-conf/Half-inst/trig-aWait/Trig-pend |/ Err?=(none)/Reinst-required (Status,Err: uppercase=bad) ||/ Name Version Architecture Description +++-==============-=================-============- ============================================ ii dnsmasq-base 2.80-1.1ubuntu1.5 amd64 Small caching DNS proxy and DHCP/TFTP server
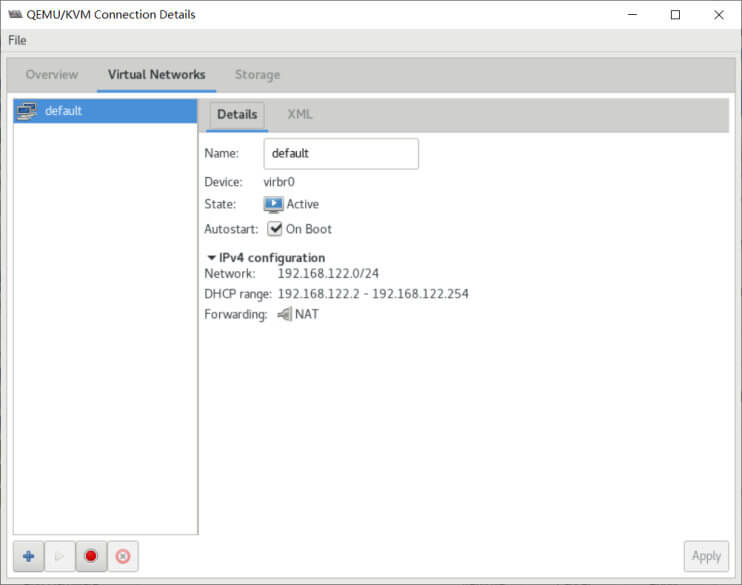
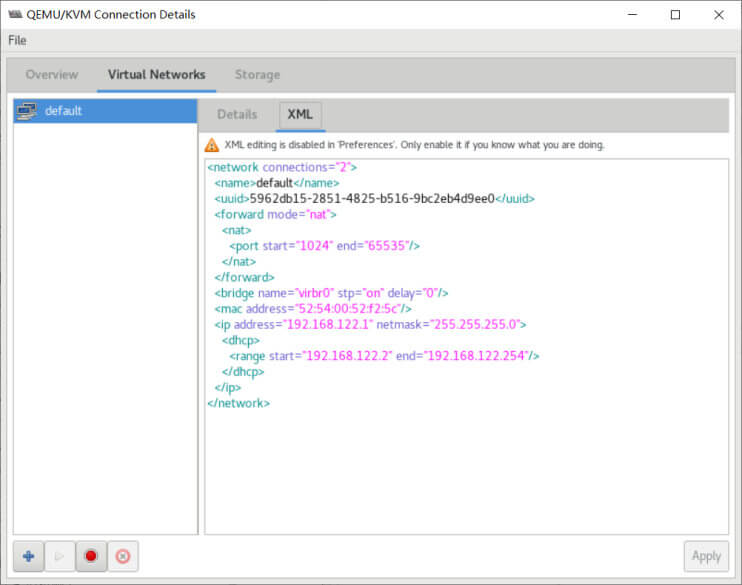
[root@ubuntu2004 ~]# systemctl status libvirtd ● libvirtd.service - Virtualization daemon Loaded: loaded (/lib/systemd/system/libvirtd.service; enabled; vendor preset: enabled) Active: active (running) since Fri 2022-10-14 08:28:10 CST; 7min ago TriggeredBy: ● libvirtd-admin.socket ● libvirtd.socket ● libvirtd-ro.socket Docs: man:libvirtd(8) https://libvirt.org Main PID: 909 (libvirtd) Tasks: 20 (limit: 32768) Memory: 50.7M CGroup: /system.slice/libvirtd.service ├─ 909 /usr/sbin/libvirtd ├─1034 /usr/sbin/dnsmasq --conf-file=/var/lib/libvirt/dnsmasq/default.conf --leasefile-ro --dhcp-script=/usr/lib/libvirt/libvirt_leaseshelper └─1035 /usr/sbin/dnsmasq --conf-file=/var/lib/libvirt/dnsmasq/default.conf --leasefile-ro --dhcp-script=/usr/lib/libvirt/libvirt_leaseshelpe [root@ubuntu2004 ~]# cat /var/lib/libvirt/dnsmasq/default.conf ##WARNING: THIS IS AN AUTO-GENERATED FILE. CHANGES TO IT ARE LIKELY TO BE ##OVERWRITTEN AND LOST. Changes to this configuration should be made using: ## virsh net-edit default ## or other application using the libvirt API. ## ## dnsmasq conf file created by libvirt strict-order user=libvirt-dnsmasq pid-file=/run/libvirt/network/default.pid except-interface=lo bind-dynamic interface=virbr0 dhcp-range=192.168.122.2,192.168.122.254,255.255.255.0 dhcp-no-override dhcp-authoritative dhcp-lease-max=253 dhcp-hostsfile=/var/lib/libvirt/dnsmasq/default.hostsfile addn-hosts=/var/lib/libvirt/dnsmasq/default.addnhosts
[root@centos8 ~]# cat /var/lib/libvirt/dnsmasq/default.conf ##WARNING: THIS IS AN AUTO-GENERATED FILE. CHANGES TO IT ARE LIKELY TO BE ##OVERWRITTEN AND LOST. Changes to this configuration should be made using: ## virsh net-edit default ## or other application using the libvirt API. ## ## dnsmasq conf file created by libvirt strict-order pid-file=/var/run/libvirt/network/default.pid except-interface=lo bind-dynamic interface=virbr0 dhcp-range=192.168.122.2,192.168.122.254 dhcp-no-override dhcp-authoritative dhcp-lease-max=253 dhcp-hostsfile=/var/lib/libvirt/dnsmasq/default.hostsfile addn-hosts=/var/lib/libvirt/dnsmasq/default.addnhosts
[root@centos8 ~]# virsh list --all Id Name State ---------------------------------------------------- - centos7 shut off - centos7-2 shut off - centos8 shut off - Win_2008_r2-x86_64 shut off
[root@centos8 ~]# ip a 1: lo: <LOOPBACK,UP,LOWER_UP> mtu 65536 qdisc noqueue state UNKNOWN group default qlen 1000 link/loopback 00:00:00:00:00:00 brd 00:00:00:00:00:00 inet 127.0.0.1/8 scope host lo valid_lft forever preferred_lft forever inet6 ::1/128 scope host valid_lft forever preferred_lft forever 2: eth0: <BROADCAST,MULTICAST,UP,LOWER_UP> mtu 1500 qdisc fq_codel state UP group default qlen 1000 link/ether 00:0c:29:44:c3:fe brd ff:ff:ff:ff:ff:ff inet 10.0.0.8/24 brd 10.0.0.255 scope global noprefixroute eth0 valid_lft forever preferred_lft forever inet6 fe80::20c:29ff:fe44:c3fe/64 scope link valid_lft forever preferred_lft forever 3: virbr0: <NO-CARRIER,BROADCAST,MULTICAST,UP> mtu 1500 qdisc noqueue state DOWN group default qlen 1000 link/ether 52:54:00:52:f2:5c brd ff:ff:ff:ff:ff:ff inet 192.168.122.1/24 brd 192.168.122.255 scope global virbr0 valid_lft forever preferred_lft forever 4: virbr0-nic: <BROADCAST,MULTICAST> mtu 1500 qdisc fq_codel master virbr0 state DOWN group default qlen 1000 link/ether 52:54:00:52:f2:5c brd ff:ff:ff:ff:ff:ff [root@centos8 ~]# virsh list Id Name State ---------------------------------------------------- 2 centos7 running 3 centos8 running
[root@centos8 ~]# virsh start centos7 Domain centos7 started
[root@centos8 ~]# virsh start centos8 Domain centos8 started
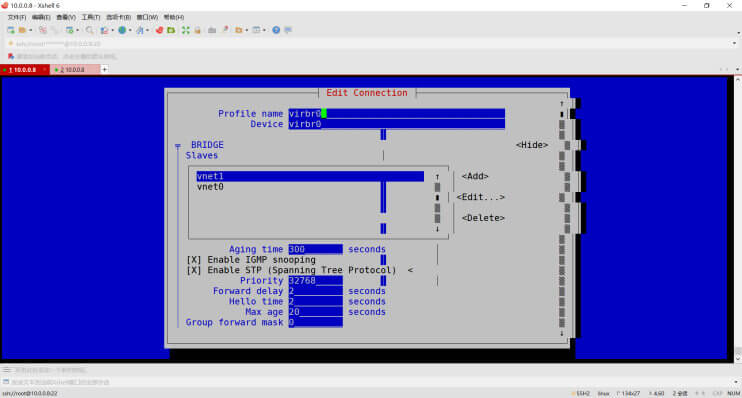
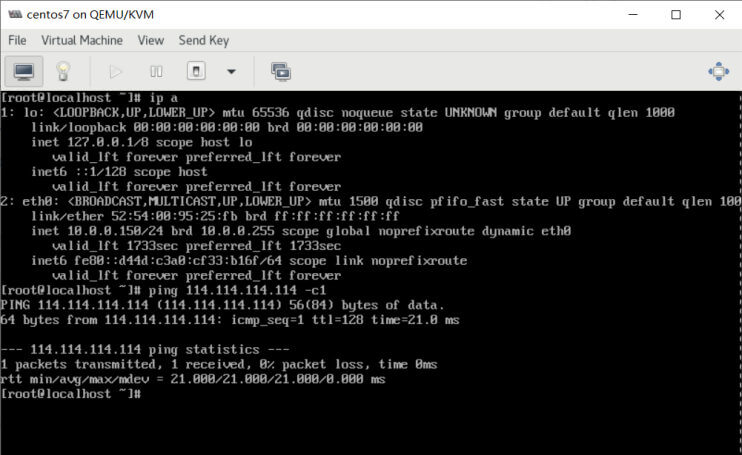
[root@centos8 ~]# ip a 1: lo: <LOOPBACK,UP,LOWER_UP> mtu 65536 qdisc noqueue state UNKNOWN group default qlen 1000 link/loopback 00:00:00:00:00:00 brd 00:00:00:00:00:00 inet 127.0.0.1/8 scope host lo valid_lft forever preferred_lft forever inet6 ::1/128 scope host valid_lft forever preferred_lft forever 2: eth0: <BROADCAST,MULTICAST,UP,LOWER_UP> mtu 1500 qdisc fq_codel state UP group default qlen 1000 link/ether 00:0c:29:44:c3:fe brd ff:ff:ff:ff:ff:ff inet 10.0.0.8/24 brd 10.0.0.255 scope global noprefixroute eth0 valid_lft forever preferred_lft forever inet6 fe80::20c:29ff:fe44:c3fe/64 scope link valid_lft forever preferred_lft forever 3: virbr0: <BROADCAST,MULTICAST,UP,LOWER_UP> mtu 1500 qdisc noqueue state UP group default qlen 1000 link/ether 52:54:00:52:f2:5c brd ff:ff:ff:ff:ff:ff inet 192.168.122.1/24 brd 192.168.122.255 scope global virbr0 valid_lft forever preferred_lft forever 4: virbr0-nic: <BROADCAST,MULTICAST> mtu 1500 qdisc fq_codel master virbr0 state DOWN group default qlen 1000 link/ether 52:54:00:52:f2:5c brd ff:ff:ff:ff:ff:ff 6: vnet0: <BROADCAST,MULTICAST,UP,LOWER_UP> mtu 1500 qdisc fq_codel master virbr0 state UNKNOWN group default qlen 1000 link/ether fe:54:00:95:25:fb brd ff:ff:ff:ff:ff:ff inet6 fe80::fc54:ff:fe95:25fb/64 scope link valid_lft forever preferred_lft forever 7: vnet1: <BROADCAST,MULTICAST,UP,LOWER_UP> mtu 1500 qdisc fq_codel master virbr0 state UNKNOWN group default qlen 1000 link/ether fe:54:00:83:9d:51 brd ff:ff:ff:ff:ff:ff inet6 fe80::fc54:ff:fe83:9d51/64 scope link valid_lft forever preferred_lft forever #查看virbr0网络的情况 [root@centos8 ~]# ip link show master virbr0 4: virbr0-nic: <BROADCAST,MULTICAST> mtu 1500 qdisc fq_codel master virbr0 state DOWN mode DEFAULT group default qlen 1000 link/ether 52:54:00:52:f2:5c brd ff:ff:ff:ff:ff:ff 8: vnet0: <BROADCAST,MULTICAST,UP,LOWER_UP> mtu 1500 qdisc fq_codel master virbr0 state UNKNOWN mode DEFAULT group default qlen 1000 link/ether fe:54:00:95:25:fb brd ff:ff:ff:ff:ff:ff 9: vnet1: <BROADCAST,MULTICAST,UP,LOWER_UP> mtu 1500 qdisc fq_codel master virbr0 state UNKNOWN mode DEFAULT group default qlen 1000 link/ether fe:54:00:83:9d:51 brd ff:ff:ff:ff:ff:ff #查看所有桥接网卡信息及对应网桥 [root@centos8 ~]# bridge link show 4: virbr0-nic: <BROADCAST,MULTICAST> mtu 1500 master virbr0 state disabled priority 32 cost 100 8: vnet0: <BROADCAST,MULTICAST,UP,LOWER_UP> mtu 1500 master virbr0 state forwarding priority 32 cost 100 9: vnet1: <BROADCAST,MULTICAST,UP,LOWER_UP> mtu 1500 master virbr0 state forwarding priority 32 cost 100
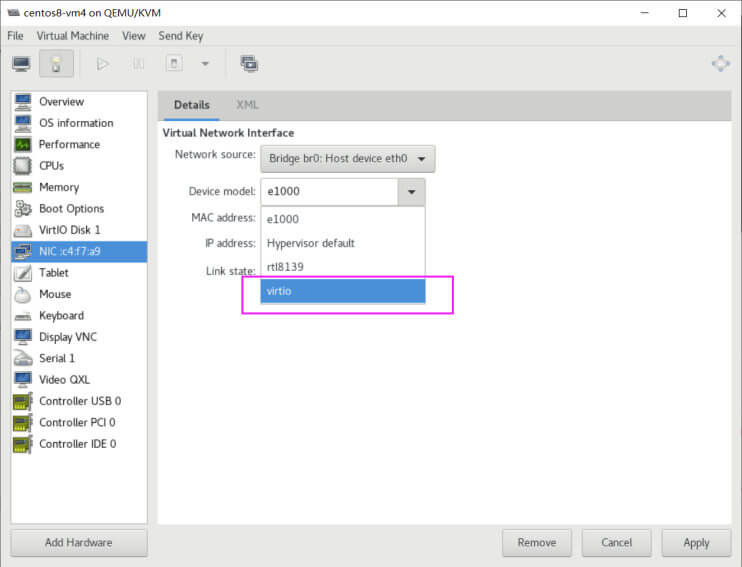
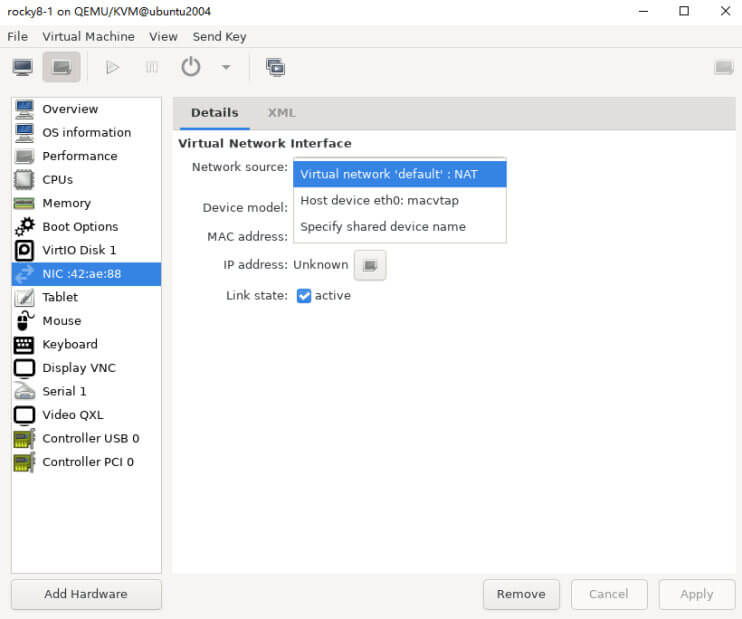
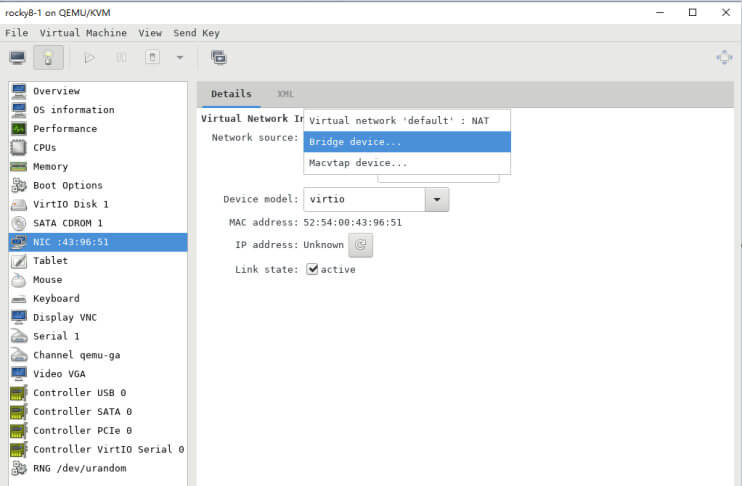
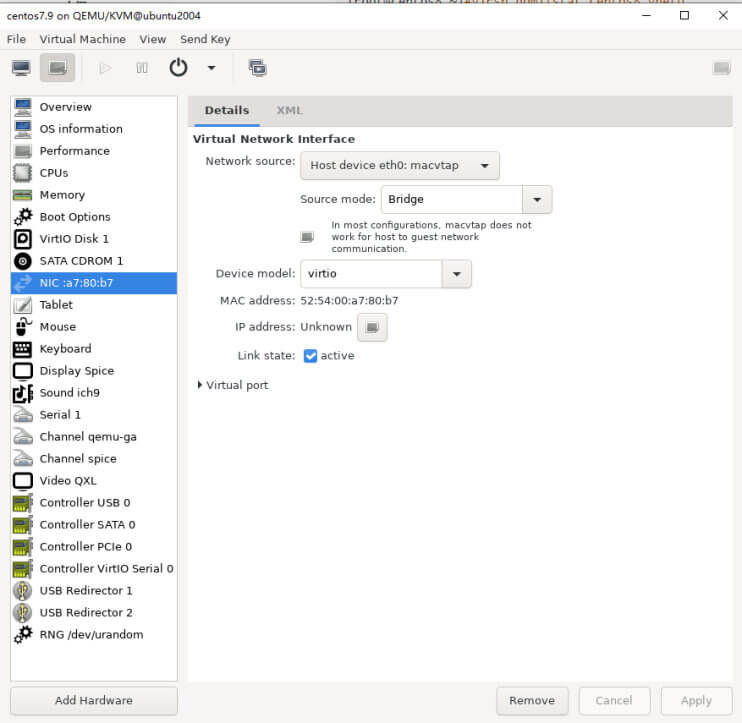
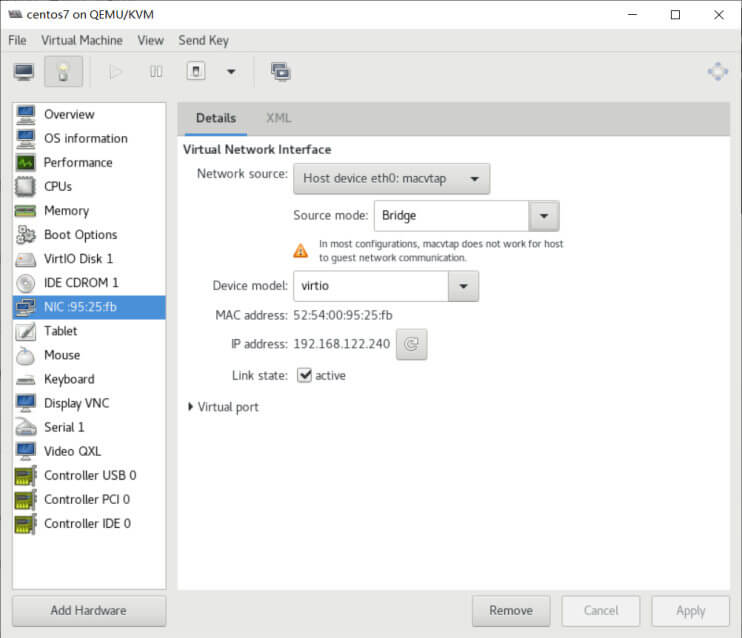
[root@centos8 ~]# virsh domiflist centos7
Interface Type       Source     Model       MAC
-------------------------------------------------------
macvtap0   direct     eth0       virtio      52:54:00:95:25:fb

[root@centos8 ~]# virsh domifaddr centos7
 Name       MAC address         Protocol     Address
-------------------------------------------------------------------------------
[root@centos8 network-scripts]# nmcli connection reload [root@centos8 network-scripts]# nmcli connection up eth0 virbr1 [root@centos8 ~]# ip a 1: lo: <LOOPBACK,UP,LOWER_UP> mtu 65536 qdisc noqueue state UNKNOWN group default qlen 1000 link/loopback 00:00:00:00:00:00 brd 00:00:00:00:00:00 inet 127.0.0.1/8 scope host lo valid_lft forever preferred_lft forever inet6 ::1/128 scope host valid_lft forever preferred_lft forever 2: eth0: <BROADCAST,MULTICAST,UP,LOWER_UP> mtu 1500 qdisc fq_codel master virbr1 state UP group default qlen 1000 link/ether 00:0c:29:44:c3:fe brd ff:ff:ff:ff:ff:ff 4: virbr0: <NO-CARRIER,BROADCAST,MULTICAST,UP> mtu 1500 qdisc noqueue state DOWN group default qlen 1000 link/ether 52:54:00:52:f2:5c brd ff:ff:ff:ff:ff:ff inet 192.168.122.1/24 brd 192.168.122.255 scope global virbr0 valid_lft forever preferred_lft forever 5: virbr0-nic: <BROADCAST,MULTICAST> mtu 1500 qdisc fq_codel master virbr0 state DOWN group default qlen 1000 link/ether 52:54:00:52:f2:5c brd ff:ff:ff:ff:ff:ff 18: virbr1: <BROADCAST,MULTICAST,UP,LOWER_UP> mtu 1500 qdisc noqueue state UP group default qlen 1000 link/ether 00:0c:29:44:c3:fe brd ff:ff:ff:ff:ff:ff inet 10.0.0.8/24 brd 10.0.0.255 scope global noprefixroute virbr1 valid_lft forever preferred_lft forever inet6 fe80::8055:c0ff:fe4e:411e/64 scope link valid_lft forever preferred_lft forever [root@centos8 ~]# bridge link show 2: eth0: <BROADCAST,MULTICAST,UP,LOWER_UP> mtu 1500 master virbr1 state forwarding priority 32 cost 100 5: virbr0-nic: <BROADCAST,MULTICAST> mtu 1500 master virbr0 state disabled priority 32 cost 100
[root@centos8 ~]# ip link show master virbr1 2: eth0: <BROADCAST,MULTICAST,UP,LOWER_UP> mtu 1500 qdisc fq_codel master virbr1 state UP mode DEFAULT group default qlen 1000 link/ether 00:0c:29:44:c3:fe brd ff:ff:ff:ff:ff:ff
[root@ubuntu2004 ~]# cat /etc/netplan/01-netcfg.yaml
# This file describes the network interfaces available on your system
# For more information, see netplan(5).
network:
 version: 2
 renderer: networkd
 ethernets:
   eth0:
     dhcp4: no
     dhcp6: no
   bridges:
     br0:
     dhcp4: no
     dhcp6: no
     addresses: [10.0.0.100/16]
     gateway4: 10.0.0.2
     nameservers:
       addresses: [223.6.6.6]
     interfaces:
       - eth0
WARNING No operating system detected, VM performance may suffer. Specify an OS with --os-variant for optimal results. Starting install... Domain creation completed.