集群综合项目实战
网站架构的演变
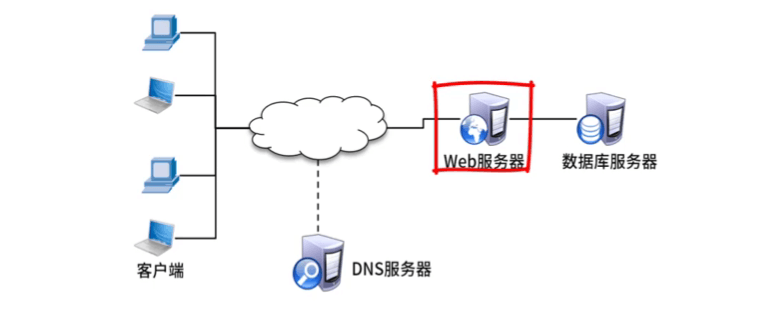
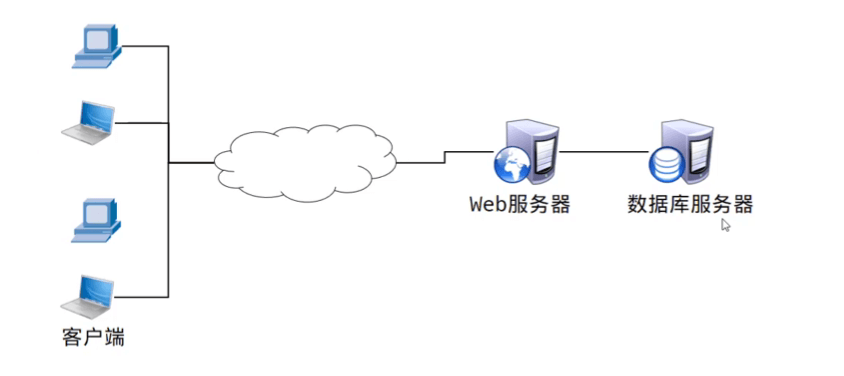
单机版LNMP
- 用户量少时使用,简单、成本低、存在单点故障

独立数据库服务器
- 解耦
- 将数据库分类
- PHP或JAVA代码的执行需要消耗大量CPU资源
- 数据库的增删改查 需要调用大量的内存资源
- 将两者分离可以减轻服务器的压力
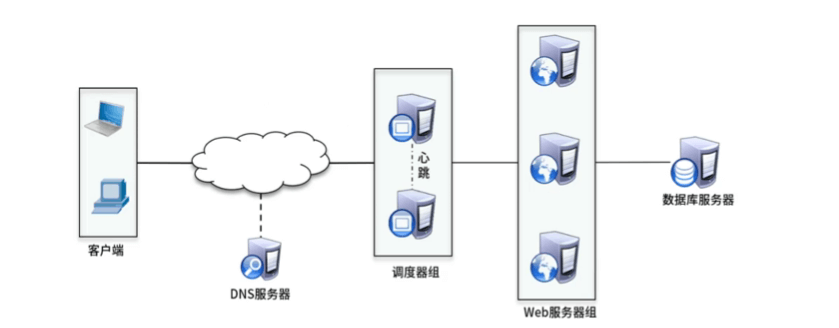
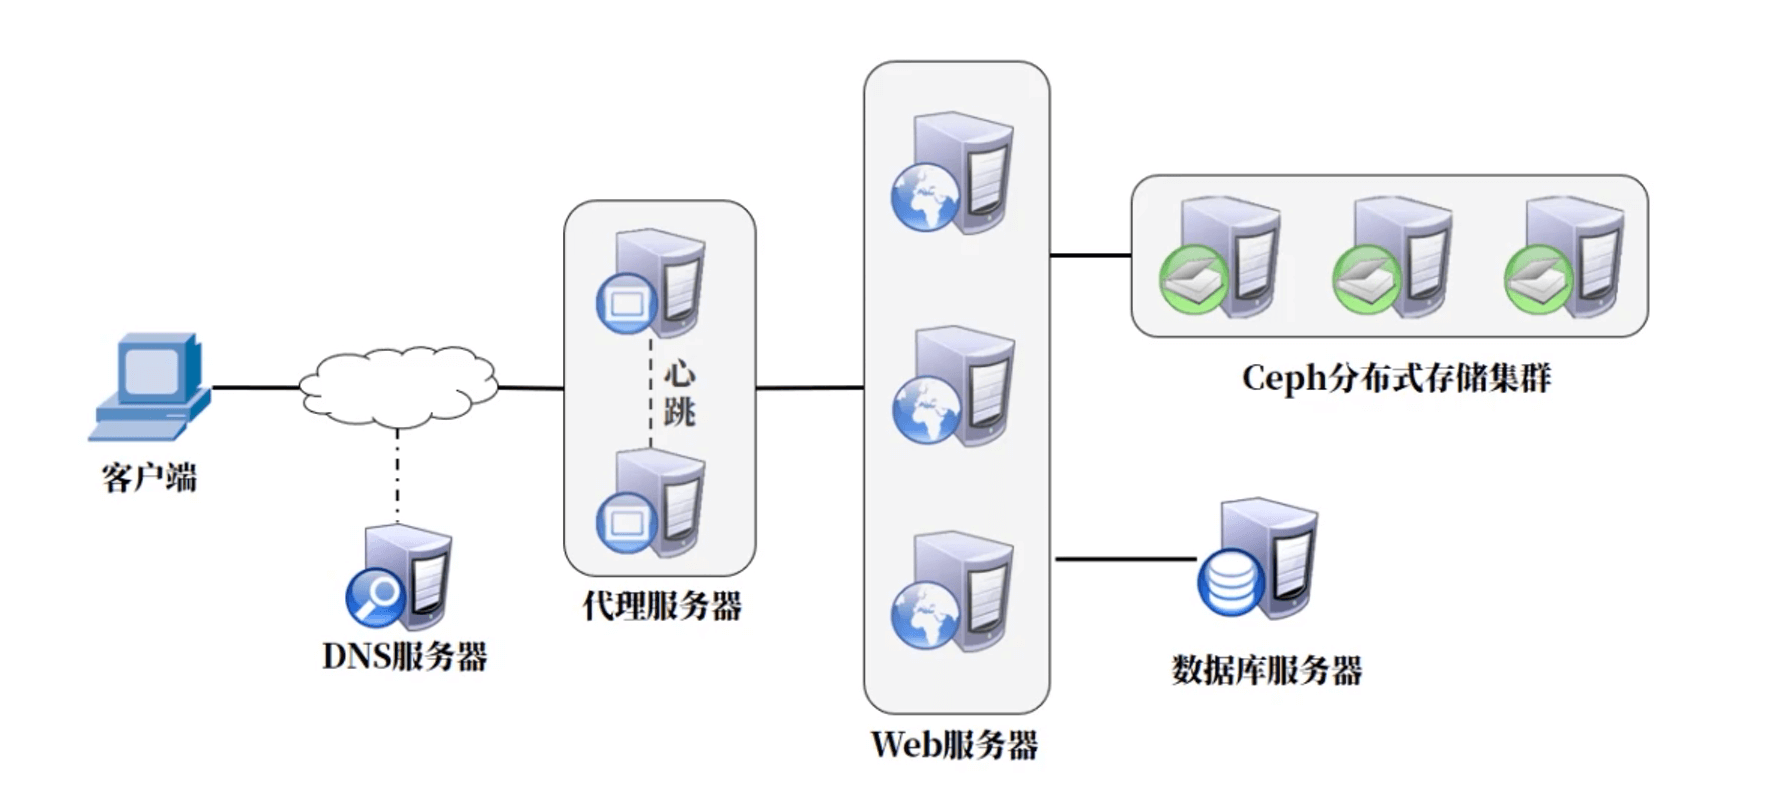
高可用服务器集群
- 我们可以通过Nginx、Haproxy代理服务器实现Web负载均衡集群,也可以使用LVS调度器实现Web负载均衡集群
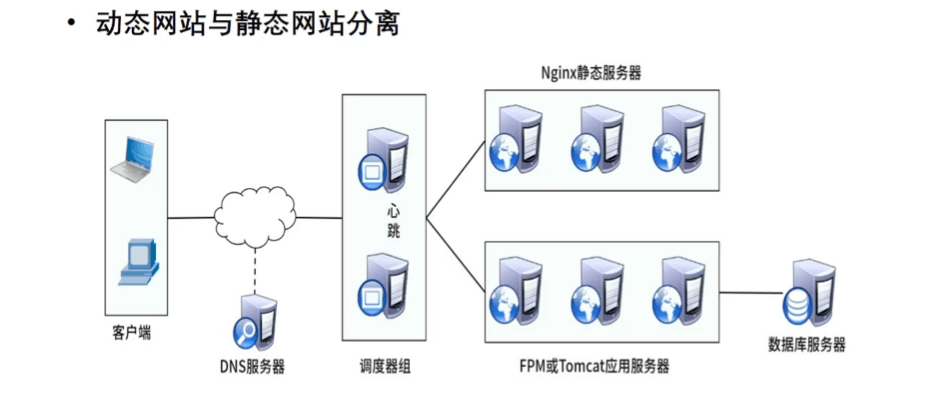
动静分离
- 动态网站与静态网站分离
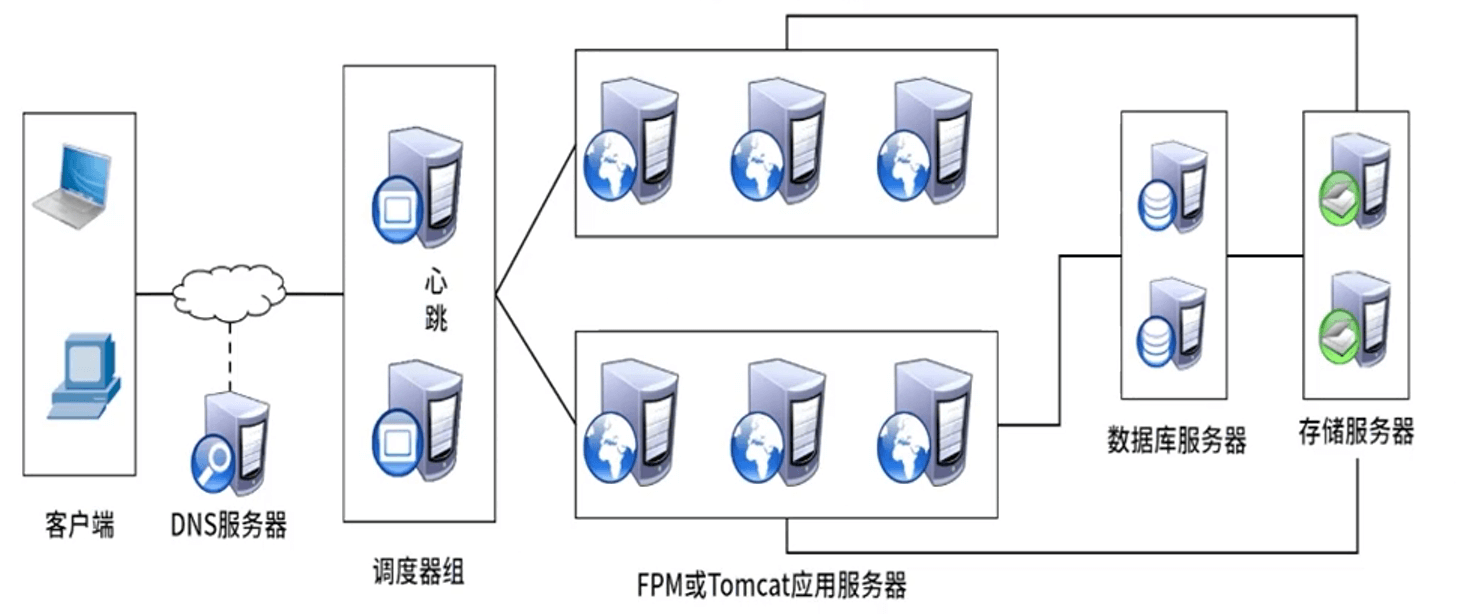
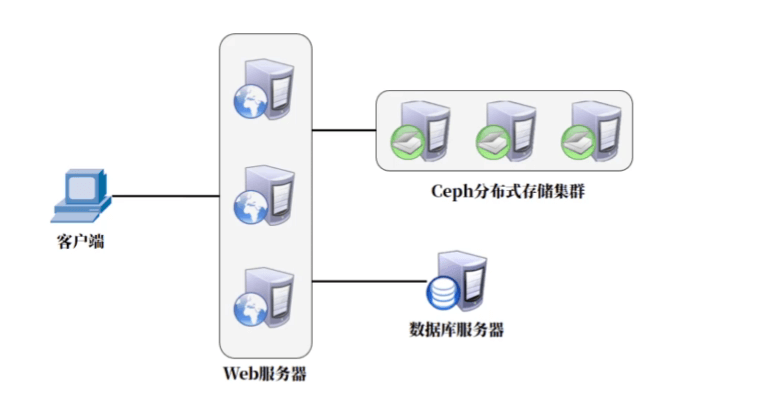
数据库集群
- 主从数据库、分库分表、读写分离
- 共享存储
缓存服务器与业务模型
- 对于静态数据我们可以通过varnish、squid或者nginx进行缓存,将数据缓存到距离用户更近的位置,构建CDN(内容分发服务)架构
综合实战项目
项目整体拓扑
| 主机角色 | 主机名 | ip |
|---|---|---|
| 代理服务器1 | proxy1 | ens33(192.168.4.5/24) ens34(192.168.2.5/24) |
| 代理服务器2 | proxy2 | ens33(192.168.4.6/24) ens34(192.168.2.6/24) |
| web1服务器 | web1 | ens33(192.168.2.11/24) |
| web2服务器 | web2 | ens33(192.168.2.12/24) |
| web3服务器 | web3 | ens33(192.168.2.13/24) |
| 数据库服务器 | database | ens33(192.168.2.21/24) |
| ceph-node1 | node1 | ens33(192.168.2.31/24) |
| ceph-node2 | node2 | ens33(192.168.2.31/24) |
| ceph-node3 | node3 | ens33(192.168.2.31/24) |
项目一期
部署LNP服务器
- Linux+Nginx+PHP(仅先部署一台web)
- 安装软件
1 | [root@web1 ~]# yum install -y gcc openssl-devel pcre-devel make |
- 修改配置实现动静分离
1 | [root@web1 ~]# vim /usr/local/nginx/conf/nginx.conf |
- 启动服务
1 | [root@web1 ~]# ln -s /usr/local/nginx/sbin/nginx /usr/local/bin/ |
- 关闭防火墙
1 | [root@web1 ~]# systemctl disable --now firewalld |
systemd
- 使用systemd管理nginx
- 可拷贝sshd服务文件修改
1 | [root@web1 ~]# vim /usr/lib/systemd/system/nginx.service |
部署Maria DB数据库
- database主机安装数据库
1 | [root@database ~]# yum -y install mariadb mariadb-server mariadb-devel |
上线Word Press
- 将代码上线到LNMP平台
1 | [root@web1 ~]# tar xf wordpress-4.7.3-zh_CN.tar.gz |
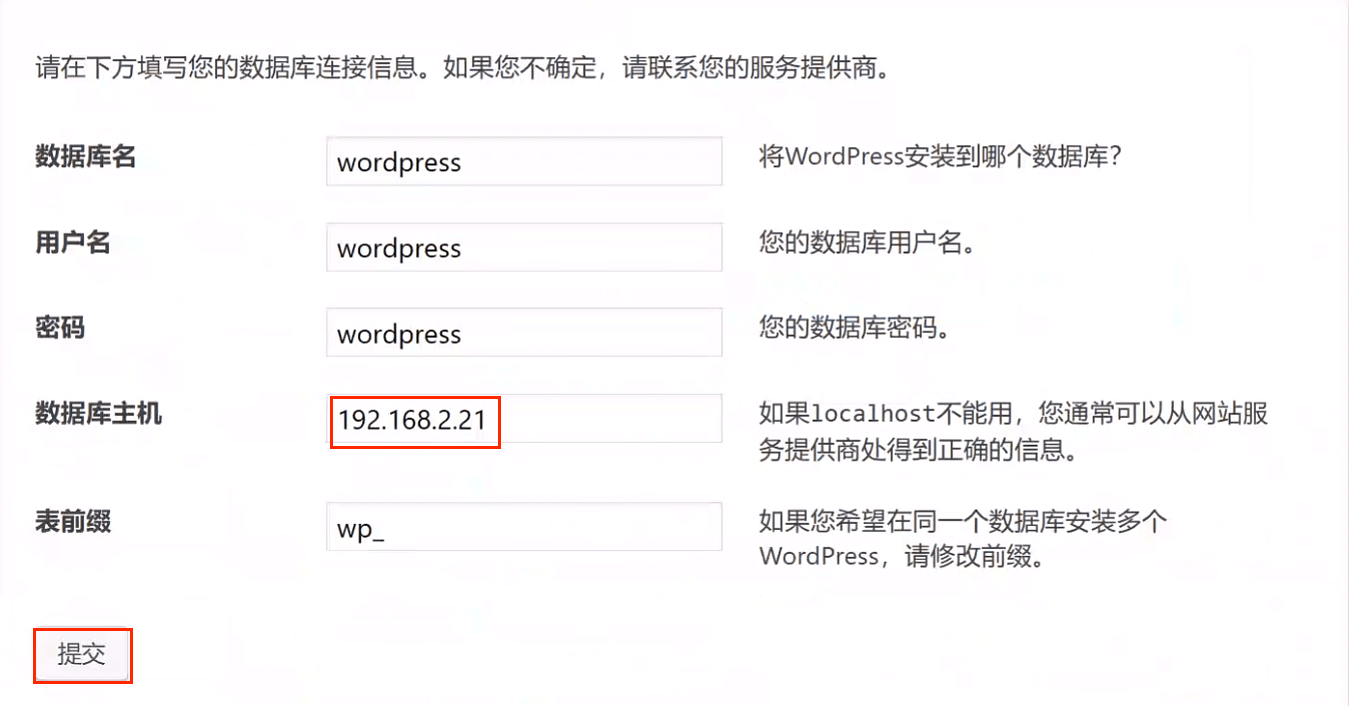
初始化wordpress
- 客户端访问http://192.168.2.11
项目二期
部署ceph存储集群
- 准备三台服务器(每台虚拟机台再加2块50磁盘)
- 一个缓存盘,一个数据盘
- 配置主机名、IP地址、yum源、修改hosts解析文件、防火墙和SELinux
- node1创建ssh密钥,远程其他主机无需密码
1 | [root@node1 ~]# cat /etc/hosts |
- node1做时间服务器、其他节点与node1同步时间
1 | [root@node1 ~]# vim /etc/chrony.conf |
部署MON集群
1 | [root@node1 ~]# yum install -y ceph-deploy |
初始化磁盘设备
1 | [root@node1 ~]# cd ceph-cluster |
部署OSD集群
1 | [root@node1 ceph-cluster]# ceph-deploy osd create node1:sdc:/dev/sdb |
启动MDS服务
1 | [root@node1 ~]# cd ceph-cluster/ |
创建存储池
1 | [root@node1 ceph-cluster]# ceph osd pool create cephfs_data 64 |
创建文件系统
1 | [root@node1 ceph-cluster]# ceph fs new myfs1 cephfs_metadata cephfs_data |
迁移网站数据
- 备份wordpress数据
1 | [root@web1 ~]# cd /usr/local/nginx/html/ |
- web服务器挂载ceph文件系统(软件在ceph10.iso)
1 | [root@web1 ~]# yum install -y libcephfs1 |
web服务器集群环境
- 部署服务器(web2与web3做相同操作)
1 | [root@web2 ~]# yum install -y gcc openssl-devel pcre-devel make |
- 修改配置
1 | [root@web2 ~]# vim /usr/local/nginx/conf/nginx.conf |
- 启动服务
1 | [root@web2 ~]# scp web1:/usr/lib/systemd/system/nginx.service /usr/lib/systemd/system/ |
- 关闭防火墙
1 | [root@web2 ~]# systemctl disable --now firewalld |
- web2服务器挂载ceph文件系统
1 | [root@web2 ~]# yum install -y libcephfs1 |
- 可以通过浏览器访问
- 192.168.2.12
- 192.168.2.13
项目三期

部署代理服务器一
- 部署代理服务
1 | [root@proxy1 ~]# yum install -y haproxy |
- 配置keepalived实现高可用(主服务器)
1 | [root@proxy1 ~]# yum install -y keepalived |
部署代理服务器二
- 部署代理服务
1 | [root@proxy2 ~]# yum install -y haproxy |
- 配置keepalived实现高可用(备用服务器)
1 | [root@proxy2 ~]# yum install keepalived -y |
客户端解析
正常情况下,我们应该部署一台DNS服务器完成域名解析
这里因为我们使用真实主机作为客户端,所以不再修改真机DNS
否则,可能导致真机无法上网
这里我们直接修改hosts解析即可(域名labx.tedu.cn–192.168.4.80)
Windows:C:\Windows\System32\drivers\etc\hosts
Linux:/etc/hosts
如果使用域名访问还需要修改wordpress配置文件
1 | [root@web1 ~]# vim /usr/local/nginx/html/wp-config.php |
- 通过labx.tedu.cn或192.168.4.80访问
本博客所有文章除特别声明外,均采用 CC BY-NC-SA 4.0 许可协议。转载请注明来自 ૮(˶ᵔ ᵕ ᵔ˶)ა!