git概述

git是一个版本控制系统

关于版本控制

  • 版本控制是一种记录若干文件内容变化,以便将来查阅特定版本修订情况的系统
  • 有了它你就可以将某个文件回溯到之前的状态,甚至将整个项目都会退到过去某个时间点
  • 可以比较文件的变化细节,查出是谁最后修改了什么地方从而造成某些怪异问题,又是谁在何时报告了某个功能缺陷
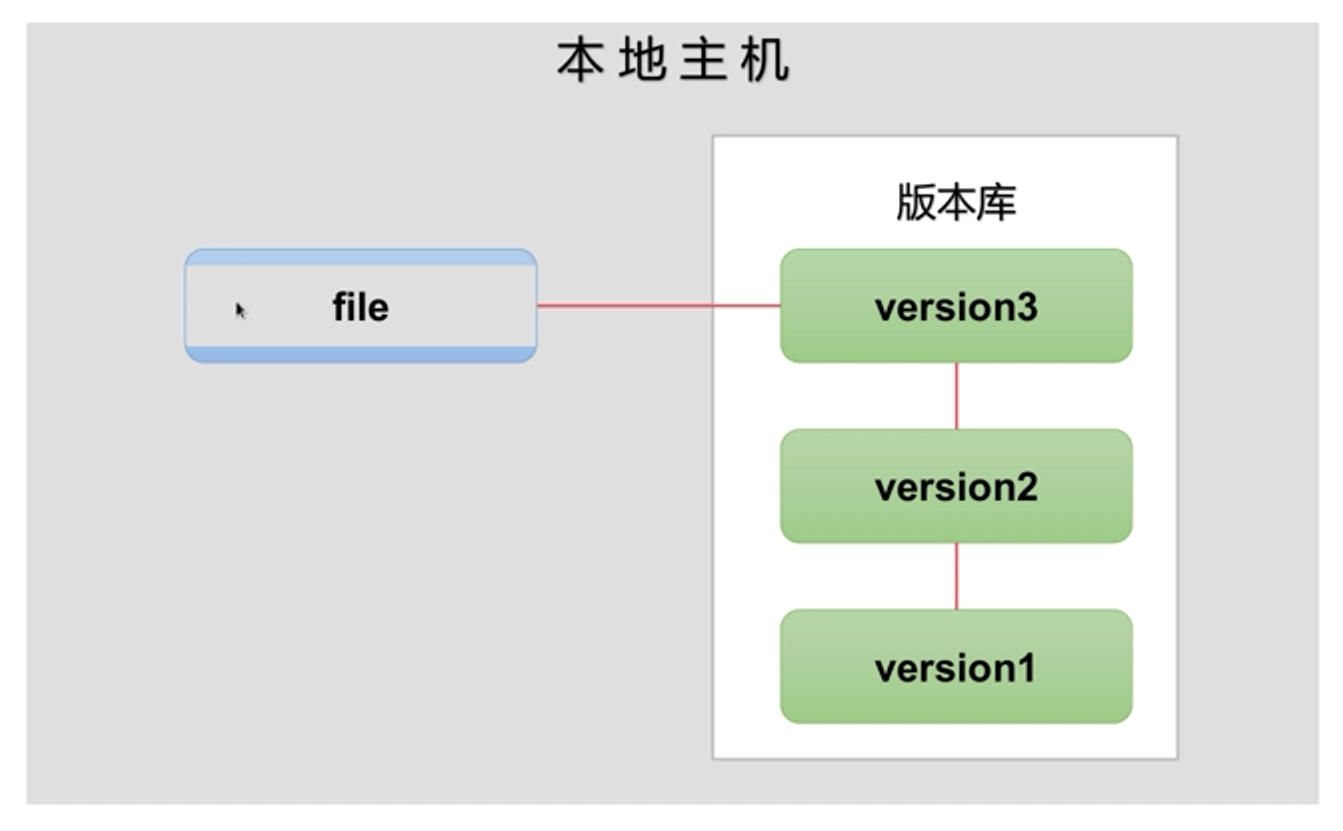
本地版本控制系统

  • 人们很久以前就开发了很多种本地版本控制系统
  • 大多都是采用某种简单的数据库来记录文件的历次更新差异
  • 其中最流行的一种叫做rcs
  • 它的工作原理就是保存并管理文件补丁(patch)
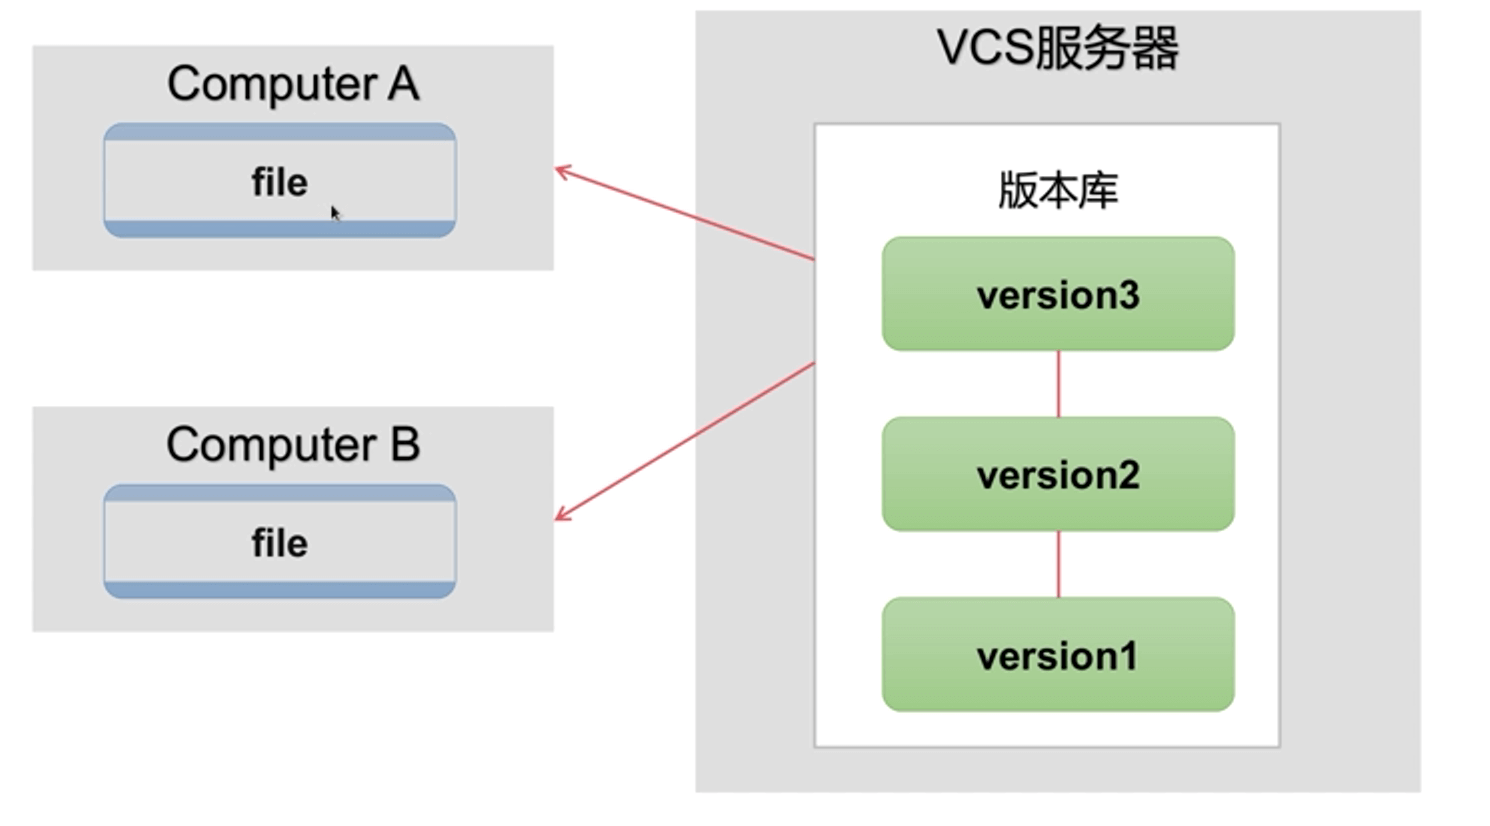
1.png

集中化的版本控制系统

  • 集中化的版本控制系统允许不同的开发者可以协同工作
  • 此类系统有CVS,Subversion以及Perforce等
  • 它们都单一拥有集中管理的服务器,保存所有文件的修订版本
  • 协同工作的人们都通过客户端连到这台服务器,去除最新的文件或者提交更新
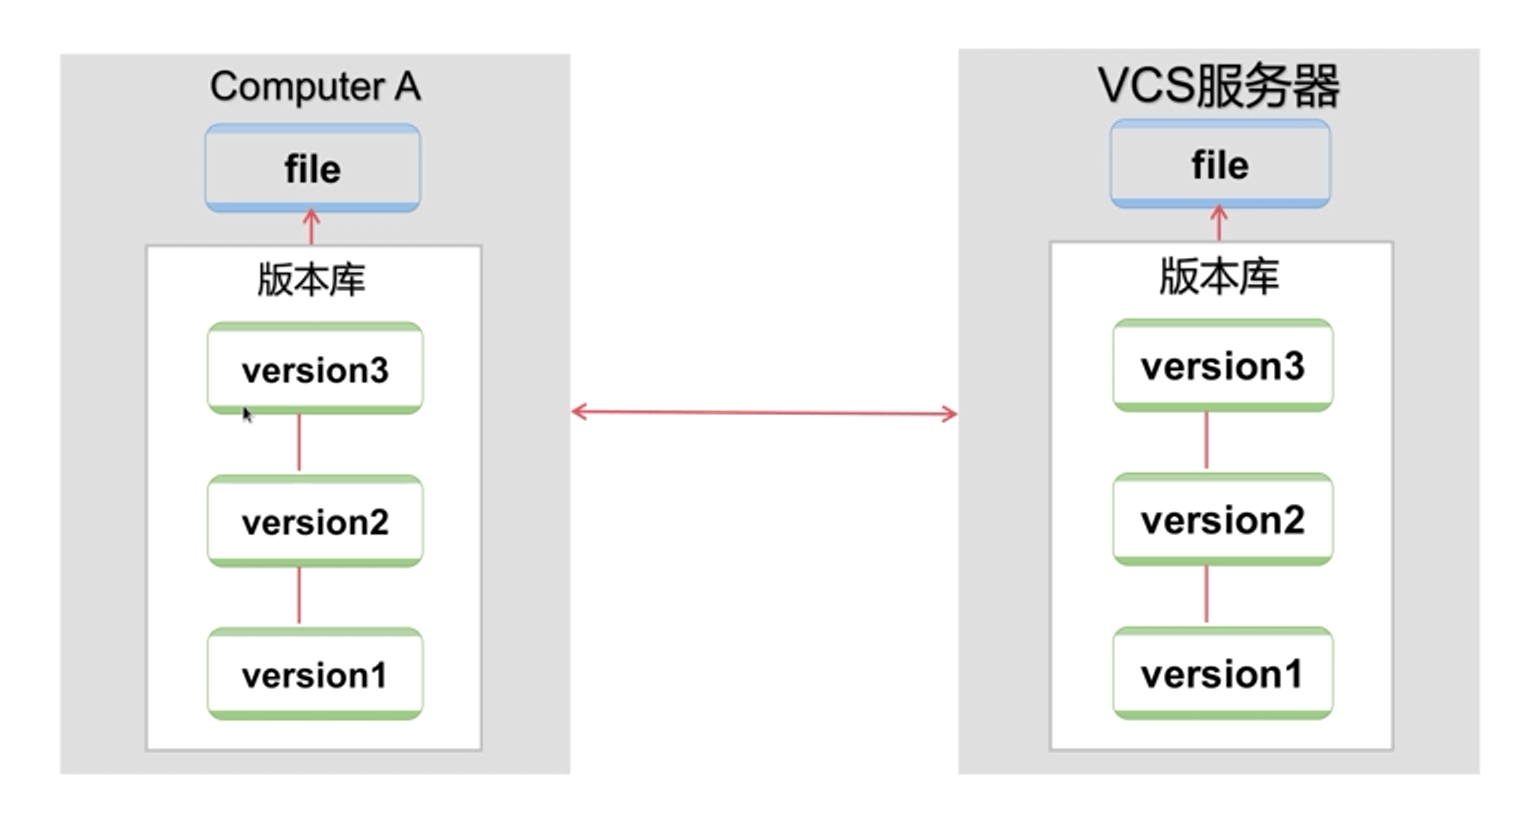
2.png

分布式版本控制系统

  • 客户端并不只提取最新版的文件快照
  • 而是把原始的代码仓库完整的镜像下来
  • 任何一处协同工作的服务器发生故障,事后都可以用任何一个镜像出来的本地仓库恢复
  • 每一次的提取操作,实际上都是一次对代码仓库的完整备份

3.png

Git的历史

  • Linux内核开源项目有着位数众多的参与者
  • 1991-2002年间,绝大多数的Linux内核维护工作都花在了提交补丁和保存归档的繁琐事务上
  • 2002年,整个项目组开始启用分布式版本控制系统BitKeeper来管理和维护代码
  • 到2005年的时候,开发BitKeeper的商业公司同Linux内核开源社区的合作关系结束,他们收回了免费使用的BitKeeper的权利

Git的特点

  • 直接快照,而非比较差异
  • 近乎所有操作都可本地执行
  • 时刻保持数据完整性。在保存Git之前,所有数据都要进行内容的校验和(checksum)计算,并将此结果作为数据的唯一标识和索引

Git状态

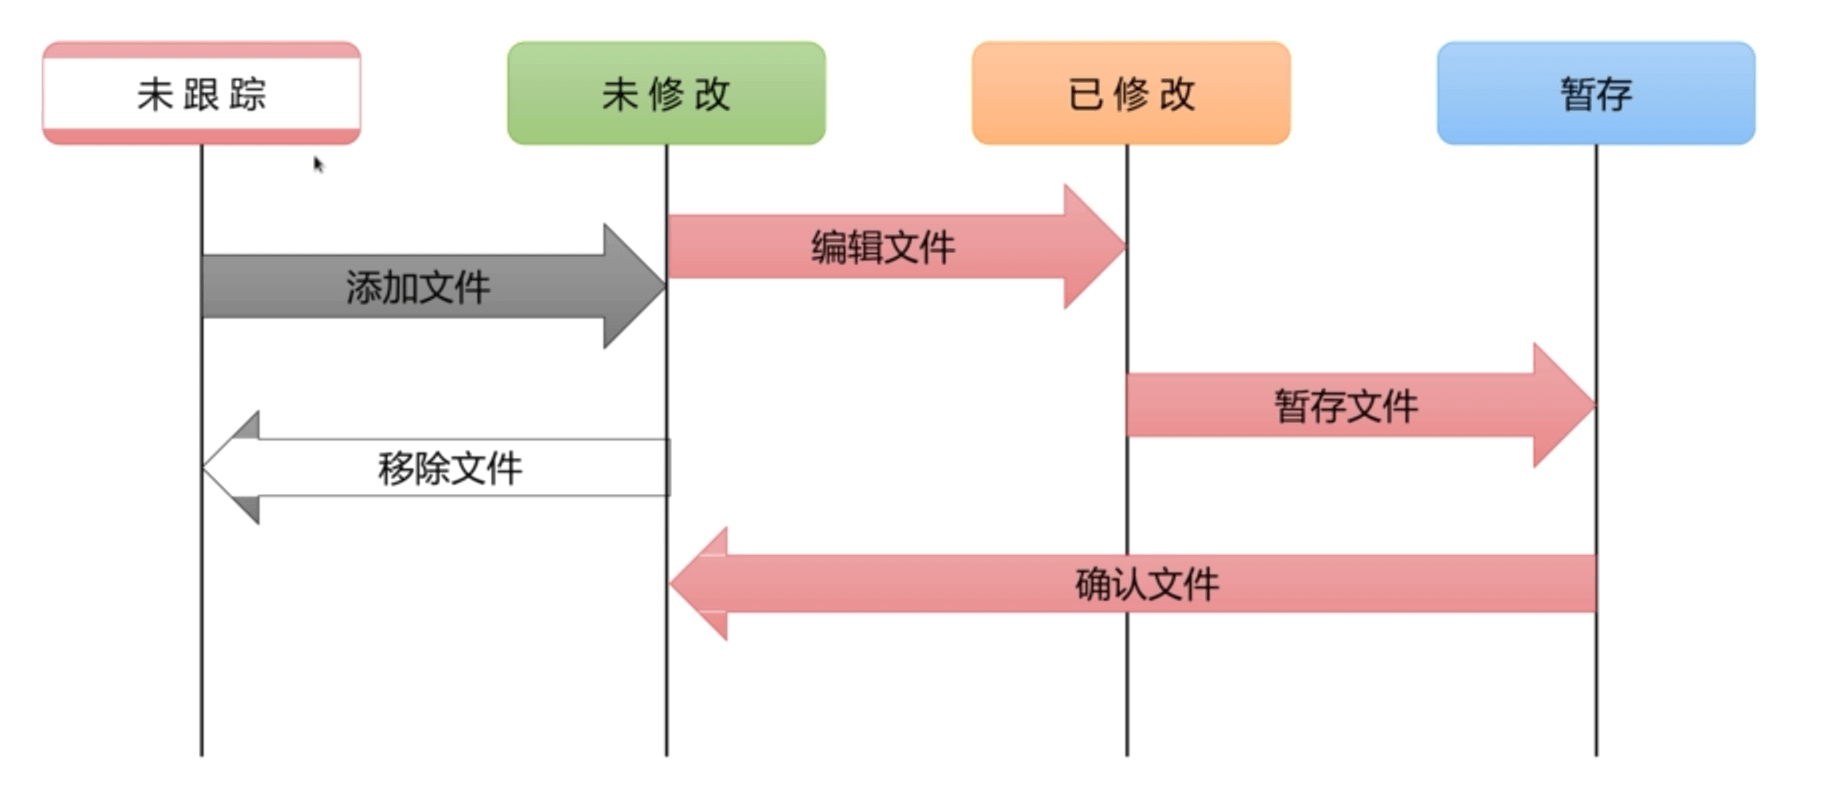
任何一个文件,在Git内都只有这三个状态

  • 已提交(committed):表示该文件已经被安全地保存在本地数据库中了
  • 已修改(modified):表示修改了某个文件,但还没有保存提交
  • 已暂存(staged):表示把已修改的文件放在下次提交时要保存到清单中
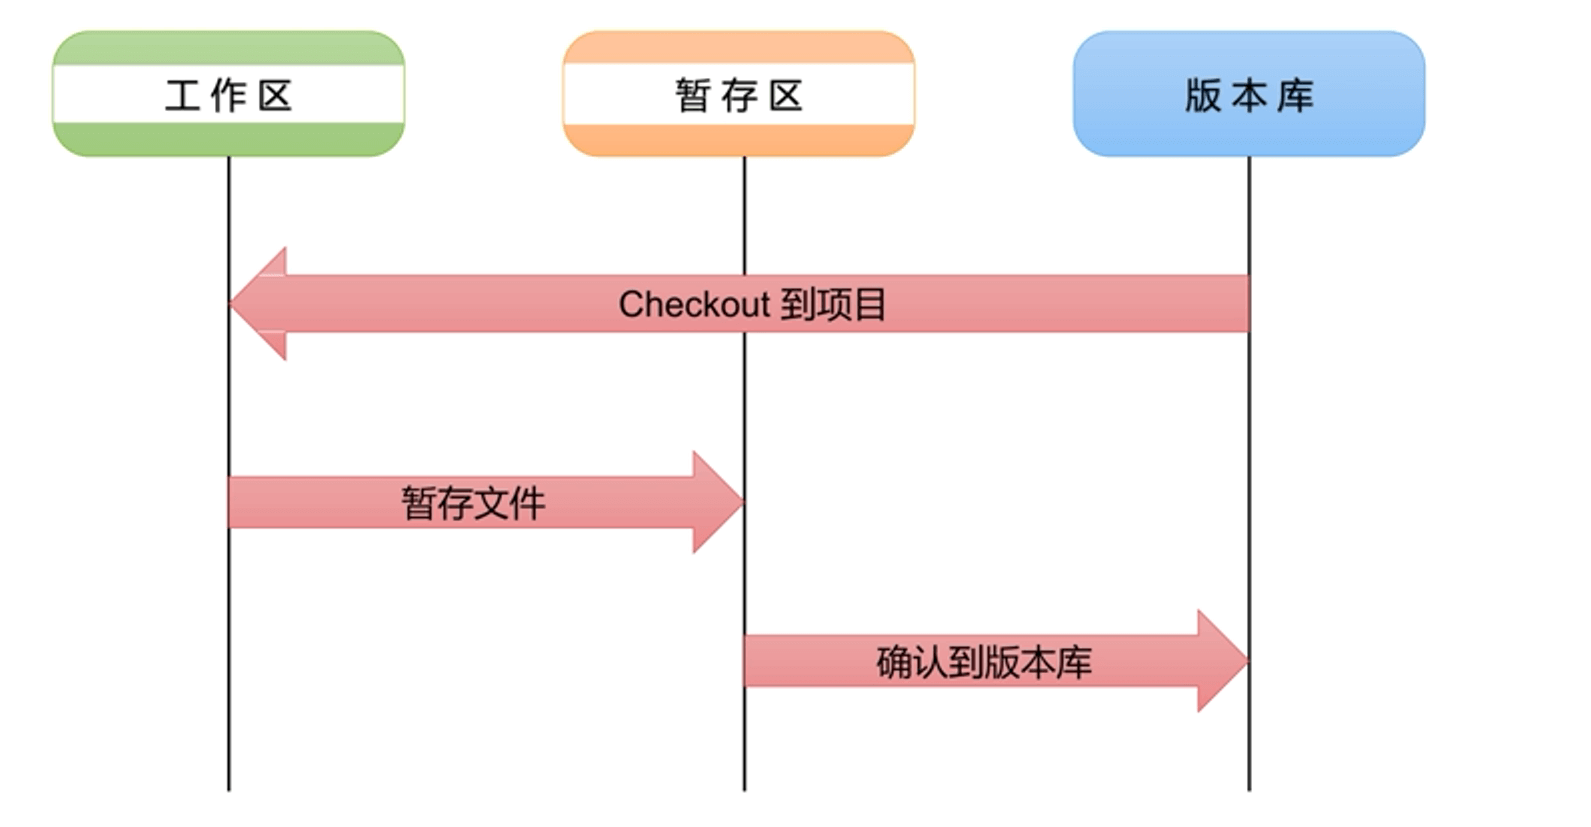
4.png

  • 工作区:git文件夹
  • 版本库:git文件夹/.git
  • 暂存区:git文件夹/.git/index
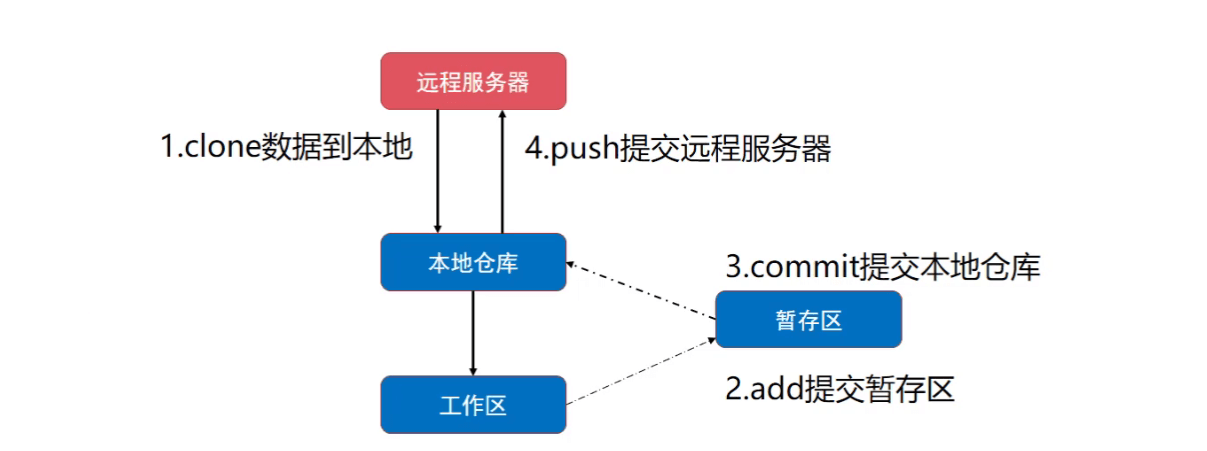
Git工作流程

1.png

Git基础配置

安装Git

  • Git安装后需要配置用户相关信息
1
2
3
4
5
6
7
8
9
10
11
12
13
14
15
16
17
18
19
20
21
22
[root@aliyun ~]$ yum install git -y
#实现命令自动补全
[root@aliyun ~]$ source /etc/bash_completion.d/git

[root@aliyun ~]$ git config --global user.name "wsq"
[root@aliyun ~]$ git config --global user.email "wsq@qq.com"
#使用git commit时打开的编辑器
[root@aliyun ~]$ git config --global core.editor vim


[root@aliyun ~]$ git config --list
user.email=wsq@qq.com
user.name=wsq
core.editor=vim

[root@aliyun ~]$ cat ./.gitconfig
[user]
email = wsq@qq.com
name = wsq
[core]
editor = vim

Git基础应用

仓库管理

创建仓库(版本库)

  • 尚不存在项目时,可以直接创建
1
2
[root@aliyun ~]$ git init devops
Initialized empty Git repository in /root/devops/.git/
  • 在已有项目的目录中创建仓库
1
2
[root@aliyun ~]$ cd myweb/
[root@aliyun myweb]$ git init

仓库说明

  • 初始化后,在当前目录下会出现一个名为.git的目录
  • 所有Git需要的数据和资源都存放在这个目录中
  • 目录仅仅按照既有的结构框架,初始化好了仓库中所有的文件和目录
  • 还没有开始跟踪管理项目中的任何一个文件

从现有仓库克隆

  • 还可以通过克隆现有仓库的方式获取版本库
  • 直接克隆
1
[root@aliyun ~]$ git clone https://github.com/schacon/grit
  • 克隆时,指定本地目录
1
[root@aliyun ~]$ git clone https://github.com/schacon/grit mygrit

记录更新到仓库

文件状态

  • 工作目录下的所有文件都不外乎这两种状态:以跟踪和未跟踪
  • 以跟踪的文件被纳入版本控制管理的文件,在上次快照中有它们的记录,工作一段时间后,它们的状态可能时未更新,已修改或者已放入暂存区
  • 所有其他文件都属于未跟踪文件

5.png

检查状态

  • 干净的工作区:当前没有任何跟踪着的文件,也没有任何文件在上次提交后更改过
  • 信息还表明,当前目录下没有任何处于未跟踪的新文件
  • 该命令还显示了当前所在的分支是master,这是默认的分支名称
1
2
3
4
5
6
7
8
9
10
11
12
13
14
15
16
[root@aliyun grit]$ git status
# On branch master
nothing to commit, working directory clean


[root@aliyun grit]$ cd ../myweb/
[root@aliyun myweb]$ git status
# On branch master
#
# Initial commit
#
# Untracked files:
# (use "git add <file>..." to include in what will be committed)
#
# index.html
nothing added to commit but untracked files present (use "git add" to track)

跟踪文件

  • 使用命令git add开始跟踪一个新文件
  • 运行git status命令,会看到文件已被跟踪,并处于暂存状态
1
2
3
4
5
6
7
8
9
10
11
12
13
[root@aliyun myweb]$ ls
index.html
[root@aliyun myweb]$ git add index.html
[root@aliyun myweb]$ git status
# On branch master
#
# Initial commit
#
# Changes to be committed:
# (use "git rm --cached <file>..." to unstage)
#
# new file: index.html
#

跟踪所有文件

  • 如果文件较少,可以指定跟踪的文件
  • 当文件很多时,可以使用git add .
1
2
3
4
5
6
7
8
9
10
11
12
13
14
[root@aliyun myweb]$ echo "git test" > README
[root@aliyun myweb]$ git add .
[root@aliyun myweb]$ git status
# On branch master
#
# Initial commit
#
# Changes to be committed:
# (use "git rm --cached <file>..." to unstage)
#
# new file: README
# new file: index.html
#

忽略文件

  • 可以创建一个名为.gitignore的文件
  • .gitignore的格式规范如下
  • 所有空行或者以注释符号#开头的行都会被Git忽略
  • 可以使用标准的glob模式匹配
  • 匹配模式最后跟反斜杠/说明要忽略的是目录
  • 要忽略指定模式以外的文件或目录,可以在模式前加上惊叹号!取反
1
2
3
4
5
6
7
8
9
10
11
12
13
14
15
16
17
18
19
20
21
22
23
24
25
26
27
28
29
30
31
32
33
34
35
36
37
38
39
40
41
42
43
44
45
46
47
48
49
50
51
52
53
54
55
56
57
58
59
60
61
62
63
64
[root@aliyun myweb]$ vim function.txt
用户注册
留言
支付

[root@aliyun myweb]$ git status
# On branch master
#
# Initial commit
#
# Changes to be committed:
# (use "git rm --cached <file>..." to unstage)
#
# new file: README
# new file: index.html
#
# Untracked files:
# (use "git add <file>..." to include in what will be committed)
#
# function.txt

[root@aliyun myweb]$ echo function.txt > .gitignore
[root@aliyun myweb]$ git status
# On branch master
#
# Initial commit
#
# Changes to be committed:
# (use "git rm --cached <file>..." to unstage)
#
# new file: README
# new file: index.html
#
# Untracked files:
# (use "git add <file>..." to include in what will be committed)
#
# .gitignore

[root@aliyun myweb]$ echo .gitignore >> .gitignore
[root@aliyun myweb]$ git status
# On branch master
#
# Initial commit
#
# Changes to be committed:
# (use "git rm --cached <file>..." to unstage)
#
# new file: README
# new file: index.html
#

[root@aliyun myweb]$ git add .
[root@aliyun myweb]$ git status
# On branch master
#
# Initial commit
#
# Changes to be committed:
# (use "git rm --cached <file>..." to unstage)
#
# new file: README
# new file: index.html
#

提交更新

  • 直接提交会启动文本编辑器以便输入本次提交的说明
1
[root@aliyun myweb]$ git commit
  • 也可以使用-m参数提交说明的方式,在一行命令中提交更新
1
[root@aliyun myweb]$ git commit -m "add README"

移除文件

  • 要从Git中移除某个文件,就必须要从以跟踪文件清单中移除(确切地说,是从暂存区域移除),然后提交
  • 使用git rm命令完成此项工作,并连带从工作目录中删除
1
2
3
4
5
6
7
8
9
10
[root@aliyun myweb]$ git rm index.html
rm 'index.html'
[root@aliyun myweb]$ git status
# On branch master
# Changes to be committed:
# (use "git reset HEAD <file>..." to unstage)
#
# deleted: index.html
#

移动文件

  • Git并不跟踪文件移动操作
  • 要在Git中对文件改名,可以这么做
1
2
3
4
5
6
7
8
9
10
11
[root@aliyun myweb]$ git mv README README.md

[root@aliyun myweb]$ git status
# On branch master
# Changes to be committed:
# (use "git reset HEAD <file>..." to unstage)
#
# renamed: README -> README.md
# deleted: index.html
#

  • 运行git mv就相当于运行了下面三个命令
1
2
3
[root@aliyun myweb]$ mv README README.md
[root@aliyun myweb]$ git rm README
[root@aliyun myweb]$ git add README.md

查看提交历史

  • 在提交了若干更新之后,又或者克隆了某个项目,想回顾下提交历史,可以使用git log命令
1
2
3
4
5
6
7
8
9
10
11
12
13
14
[root@aliyun myweb]$ git commit -m "rm index.html,mv README README.md"

[root@aliyun myweb]$ git log
commit 39ee7853699c9b17500298e30b0bb19b4cbe9ca5
Author: wsq <wsq@qq.com>
Date: Thu Apr 20 17:15:22 2023 +0800

rm index.html,mv README README.md

commit 806053a5289b2032adffdaa834a9636fddd02abc
Author: wsq <wsq@qq.com>
Date: Thu Apr 20 17:06:19 2023 +0800

README
  • 每次更新都会有一个SHA-1校验和、作者名字和电子邮件地址、提交时间,最后缩进一个段落显示提交说明

取消已暂存文件

  • 文件修改后,错误的提交到暂存区
  • 希望将文件撤出暂存区,但是保留其修改的内容
1
2
3
4
5
6
7
8
9
10
11
12
13
14
15
16
17
18
19
20
21
22
23
24
25
26
27
28
29
30
31
32
33
34
35
36
37
38
39
[root@aliyun myweb]$ vim README.md
git test
this a new post

[root@aliyun myweb]$ git status
# On branch master
# Changes not staged for commit:
# (use "git add <file>..." to update what will be committed)
# (use "git checkout -- <file>..." to discard changes in working directory)
#
# modified: README.md
#
no changes added to commit (use "git add" and/or "git commit -a")

[root@aliyun myweb]$ git add .
[root@aliyun myweb]$ git status
# On branch master
# Changes to be committed:
# (use "git reset HEAD <file>..." to unstage)
#
# modified: README.md
#

[root@aliyun myweb]$ git reset HEAD README.md
Unstaged changes after reset:
M README.md
[root@aliyun myweb]$ git status
# On branch master
# Changes not staged for commit:
# (use "git add <file>..." to update what will be committed)
# (use "git checkout -- <file>..." to discard changes in working directory)
#
# modified: README.md
#
no changes added to commit (use "git add" and/or "git commit -a")

[root@aliyun myweb]$ cat README.md
git test
this a new post

取消对文件的修改

  • 文件修改后,后悔所做出的修改
  • 希望文件恢复为修改前的内容
1
2
3
4
5
6
7
8
9
10
11
12
13
14
15
16
17
18
[root@aliyun myweb]$ git status 
# On branch master
# Changes not staged for commit:
# (use "git add <file>..." to update what will be committed)
# (use "git checkout -- <file>..." to discard changes in working directory)
#
# modified: README.md
#
no changes added to commit (use "git add" and/or "git commit -a")

[root@aliyun myweb]$ git checkout -- README.md
[root@aliyun myweb]$ cat README.md
git test

[root@aliyun myweb]$ git status
# On branch master
nothing to commit, working directory clean

Git版本控制

新建数据

  • 在客户端对仓库进行编辑,创建新资料
  • web2为客户端
1
2
3
4
5
6
7
8
9
10
11
12
13
14
15
16
[root@web2 project]# echo "init date" > init.txt
[root@web2 project]# mkdir demo
[root@web2 project]# cp /etc/hosts demo/

[root@web2 project]# git status
# On branch master
#
# Initial commit
#
# Untracked files:
# (use "git add <file>..." to include in what will be committed)
#
# demo/
# init.txt
nothing added to commit but untracked files present (use "git add" to track)

提交数据到本地仓库

1
2
3
4
5
6
7
8
9
10
11
#提交暂存区
[root@web2 project]# git add .
#将暂存区修改提交到本地仓库
[root@web2 project]# git config --global user.email "3311@123.com"
[root@web2 project]# git config --global user.name "wsq"
[root@web2 project]# git commit -m "注释,可以为任意字符"

[root@web2 project]# git status
# On branch master
nothing to commit, working directory clean

将数据推送至远程服务器

1
2
3
4
5
6
7
8
9
10
11
12
13
14
15
16
[root@web2 project]# git config --global push.default simple
[root@web2 project]# git push
or
[root@web2 project]# git remote -v
origin root@192.168.1.10:/var/git/project (fetch)
origin root@192.168.1.10:/var/git/project (push)
[root@web2 project]# git push -u origin --all

[root@web2 project]# git status
# On branch master
nothing to commit, working directory clean

[root@web2 project]# git pull
root@192.168.1.10's password: 000000
Already up-to-date.

生成更多版本

  • 多次修改,生成更多版本
1
2
3
4
5
6
7
8
9
10
11
12
13
14
15
16
17
18
[root@web2 project]# echo "new file" > new.txt
[root@web2 project]# git add .
[root@web2 project]# git commit -m "add new.txt"

[root@web2 project]# echo "frist" >> new.txt
[root@web2 project]# git add .
[root@web2 project]# git commit -m "new.txt:frist line"

[root@web2 project]# echo "second" >> new.txt
[root@web2 project]# git add .
[root@web2 project]# git commit -m "new.txt:second line"

[root@web2 project]# echo "third" >> new.txt
[root@web2 project]# git add .
[root@web2 project]# git commit -m "new.txt:third line"

[root@web2 project]# git push

查看日志

1
2
3
4
5
6
7
8
9
10
11
12
13
14
15
16
17
18
19
20
21
22
23
24
25
26
27
28
29
30
31
32
33
34
35
36
37
38
39
40
41
42
[root@web2 project]# git log
commit db8b5647f0f2b1a8852b765e16d0e95d347f7b33
Author: wsq <3311@123.com>
Date: Sun Apr 2 15:51:31 2023 +0800

new.txt:third line

commit f763f019376d816e28f0cb58ed0f26679ec7300a
Author: wsq <3311@123.com>
Date: Sun Apr 2 15:51:01 2023 +0800

new.txt:second line

commit 5361b1eb3f739023c322ae0d5b8755c215e53fc5
Author: wsq <3311@123.com>
Date: Sun Apr 2 15:50:33 2023 +0800

new.txt:frist line

commit 83bdb1143b5424288292cc7f3e4d63fce6b68527
Author: wsq <3311@123.com>

[root@web2 project]# git log --pretty=oneline
db8b5647f0f2b1a8852b765e16d0e95d347f7b33 new.txt:third line
f763f019376d816e28f0cb58ed0f26679ec7300a new.txt:second line
5361b1eb3f739023c322ae0d5b8755c215e53fc5 new.txt:frist line
83bdb1143b5424288292cc7f3e4d63fce6b68527 add new.txt
11c03130f7a3e1730a16d9fc0e1776fee6528906 注释,可以为任意字符

[root@web2 project]# git log --oneline
db8b564 new.txt:third line
f763f01 new.txt:second line
5361b1e new.txt:frist line
83bdb11 add new.txt
11c0313 注释,可以为任意字符

[root@web2 project]# git reflog
db8b564 HEAD@{0}: commit: new.txt:third line
f763f01 HEAD@{1}: commit: new.txt:second line
5361b1e HEAD@{2}: commit: new.txt:frist line
83bdb11 HEAD@{3}: commit: add new.txt
11c0313 HEAD@{4}: commit (initial): 注释,可以为任意字符

数据恢复

HEAD指针

  • HEAD指针是一个可以在任何分支和任何版本移动的指针

  • 通过移动指针我们可以将数据还原至任何版本

  • 当前HEAD指针为HEAD@{0}

    通过git relog查看当前指针

1
2
3
4
5
6
[root@web2 project]# git reflog
db8b564 HEAD@{0}: commit: new.txt:third line
f763f01 HEAD@{1}: commit: new.txt:second line
5361b1e HEAD@{2}: commit: new.txt:frist line
83bdb11 HEAD@{3}: commit: add new.txt
11c0313 HEAD@{4}: commit (initial): 注释,可以为任意字符

移动HEAD指针

  • 通过移动指针就可以获取任何版本的数据
1
2
3
[root@web2 project]# git reset --hard db8b564

[root@web2 project]# git reset --hard 11c0313

Git分支管理

标签管理

标签概述

  • 同大多数VCS一样,Git也可以对某一时间点上的版本打上标签
  • Git可以给历史中的某一个提交打上标签,以示重要
  • 在发布某个软件版本(比如V1.0等等)的时候,经常这么做
  • 发布一个版本时,通常先在版本库中打一个标题(tag),这样就确定了打标签时刻的版本。将来无论什么时候,取某个标记的版本,就是把那个打标签的时刻的历史版本取出来

列出标签

  • 在Git中列出已有标签是非常简单直观的
1
2
[root@aliyun myweb]$ git tag

  • 这个命令以字母顺序列出标签;但是它们出现的顺序并不重要

查找标签

  • 可以使用特定的模式查找标签
  • 例如,Git自身的源代码仓库包含标签的数量超过500个。如果只对1.8.5感兴趣,可以运行:
1
2
[root@aliyun myweb]$ git tag -l 'v1.8.5*'

标签分类

  • Git使用两种主要类型的标签
  • 轻量标签(lightweight):它只是一个特定提交的应用
  • 附注标签(annotated):是存储在Git数据库中的一个完整对象。其中包含打标签作者的名字、电子邮件地址、日期时间;还有一个标签信息、并且可以使用GNU Privacy Guard(GPG)签名和验证

附注标签

  • 简单的方式是当你在运行tag命令时指定-a选项
1
2
3
4
5
6
7
8
9
10
11
12
[root@aliyun myweb]$ git tag -a v1.4 -m "my version 1.4"
[root@aliyun myweb]$ git tag
v1.4

[root@aliyun myweb]$ git show v1.4
tag v1.4
Tagger: wsq <wsq@qq.com>
Date: Thu Apr 20 17:56:19 2023 +0800
my version 1.4
commit 39ee7853699c9b17500298e30b0bb19b4cbe9ca5
Author: wsq <wsq@qq.com>

轻量标签

  • 创建轻量标签,不需要使用选项,只需要提供标签名字
1
2
3
4
5
6
7
8
9
[root@aliyun myweb]$ git tag v1.4-lw
[root@aliyun myweb]$ git tag
v1.4
v1.4-lw

[root@aliyun myweb]$ git show v1.4-lw
Author: wsq <wsq@qq.com>
Date: Thu Apr 20 17:15:22 2023 +0800

删除标签

  • 删除本地仓库的标签,使用命令git tag -d <tagname>
1
2
3
4
[root@aliyun myweb]$ git tag -d v1.4-lw 
Deleted tag 'v1.4-lw' (was 39ee785)
[root@aliyun myweb]$ git tag
v1.4

Git分支

分支概述

  • 几乎所有的版本控制系统都以某种形式支持分支

  • 使用分支意味着你可以把你的工作从开发主线上分离开来,以免影响开发主线

  • 在很多版本控制系统中,这是一个略微低效的过程

  • Git处理分支的方式可谓是难以置信的轻量,创建新分支这一操作几乎能瞬间完成

  • 在不同分支之间的切换操作也是一样便捷

  • 分支可以让开发分多条主线同时进行,每条主线互不影响

    按功能模块分支、按版本分支

    分支也可合并

  • 常见的分支规范

    MASTER是主分支,是代码的核心

    DEVELOP最新开发成果的分支

    RELEASE分支,为发布新产品设置的分支

    HOTFIX分支,为修复软件BUG缺陷的分支

    FEATURE分支,为开发新功能设置的分支
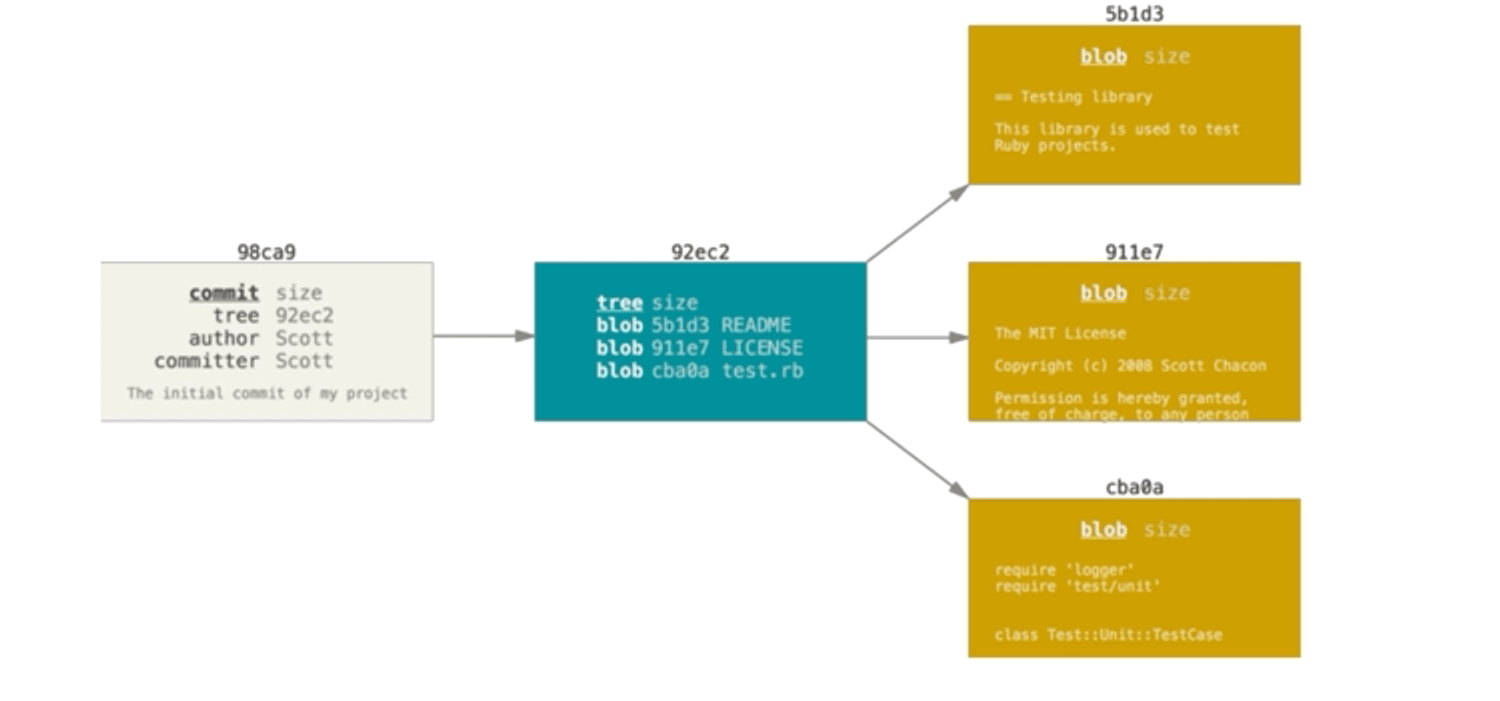
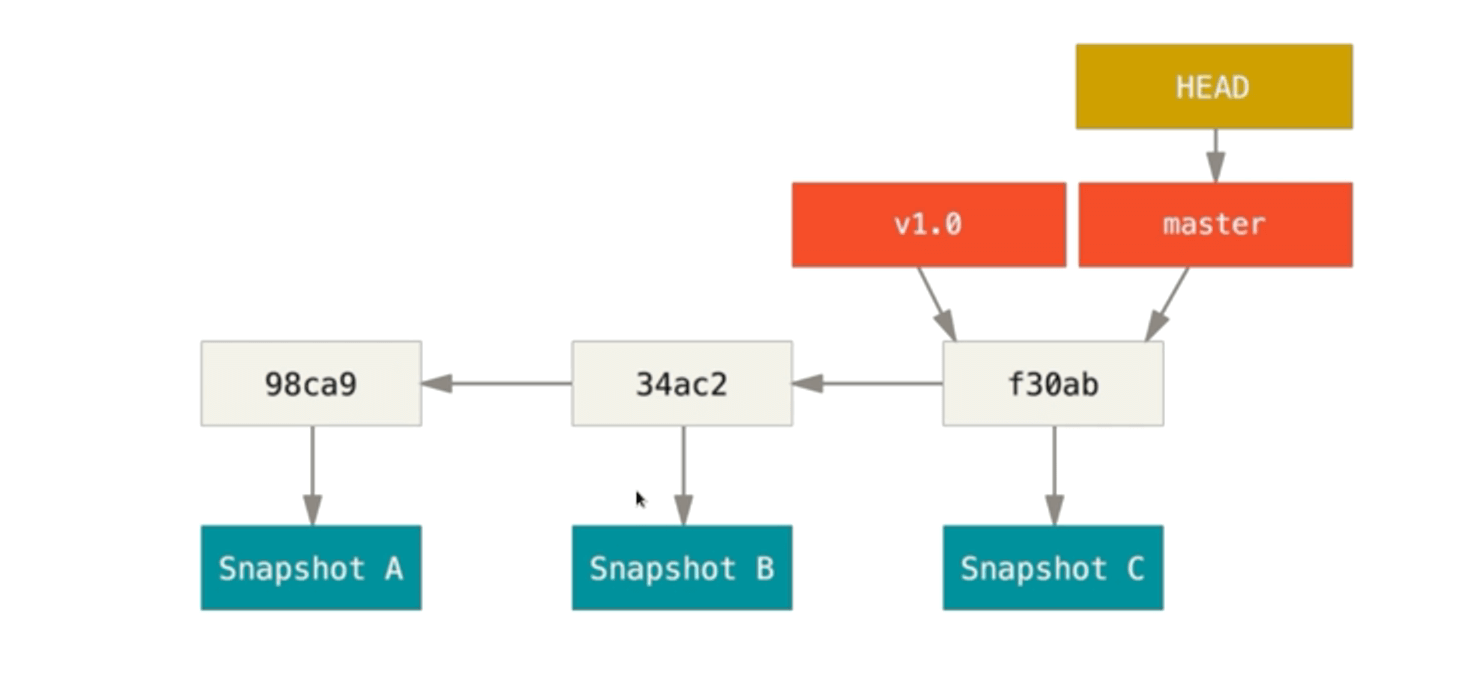
核心原理

  • 当使用git commit进行提交操作时,Git先计算每一个子目录的校验和
  • 然后在Git仓库中这些校验和保存为树对象
  • 随后,Git便会创建一个提交对象,它除了包含上面提到的哪些信息外,还包含指向这个树对象(项目根目录)的指针
  • 如此一来,Git就可以在需要的时候重现此次保存的快照
1
2
3
[root@aliyun myweb]$ git add README test.rb LICENSE

[root@aliyun myweb]$ git commit -m "The initial commit of my preject"

6.png

  • 做些修改后再次提交,那么这次产生的提交对象会包含一个指向上次提交对象(父对象)的指针

7.png

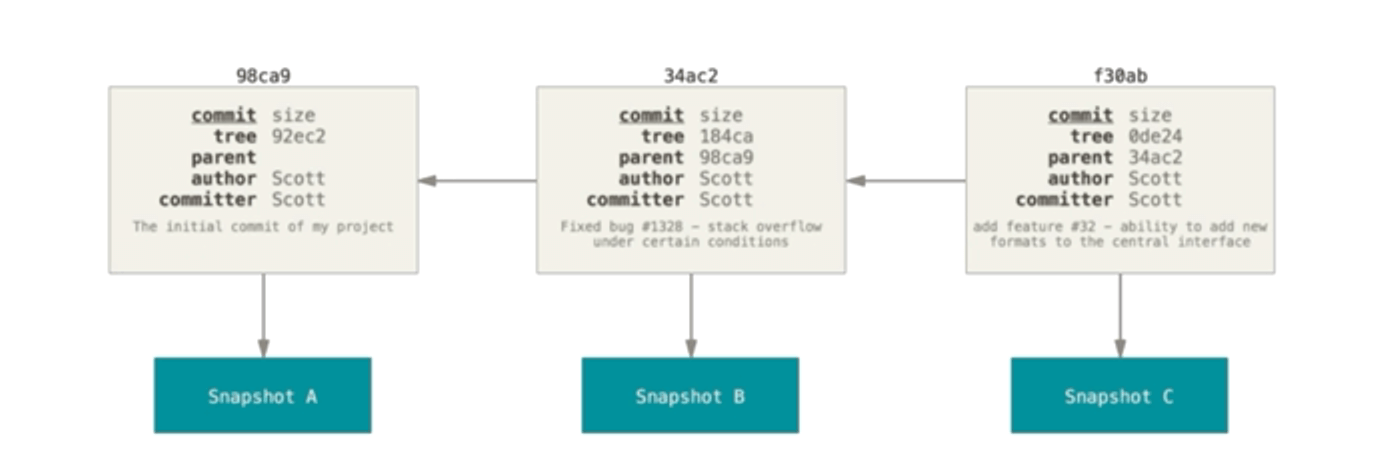
  • Git的分支,其实本质上仅仅是指向提交对象的可变指针
  • Git的默认分支名字是master
  • 在多次提交操作之后,你其实已经有一个指向最后那个提交对象的master分支
  • 它会在每次的操作中自动详情移动
  • master并不是一个特殊分支,与其他分支没有区别
1
2
3
4
5
6
7
8
9
10
11
12
13
14
15
[root@aliyun myweb]$ git branch	# 查看当前分支
* master

[root@aliyun myweb]$ git log
commit 39ee7853699c9b17500298e30b0bb19b4cbe9ca5
Author: wsq <wsq@qq.com>
Date: Thu Apr 20 17:15:22 2023 +0800

rm index.html,mv README README.md

commit 806053a5289b2032adffdaa834a9636fddd02abc
Author: wsq <wsq@qq.com>
Date: Thu Apr 20 17:06:19 2023 +0800

README
  • Git有一个名为HEAD的特殊分支,指向当前所在分支
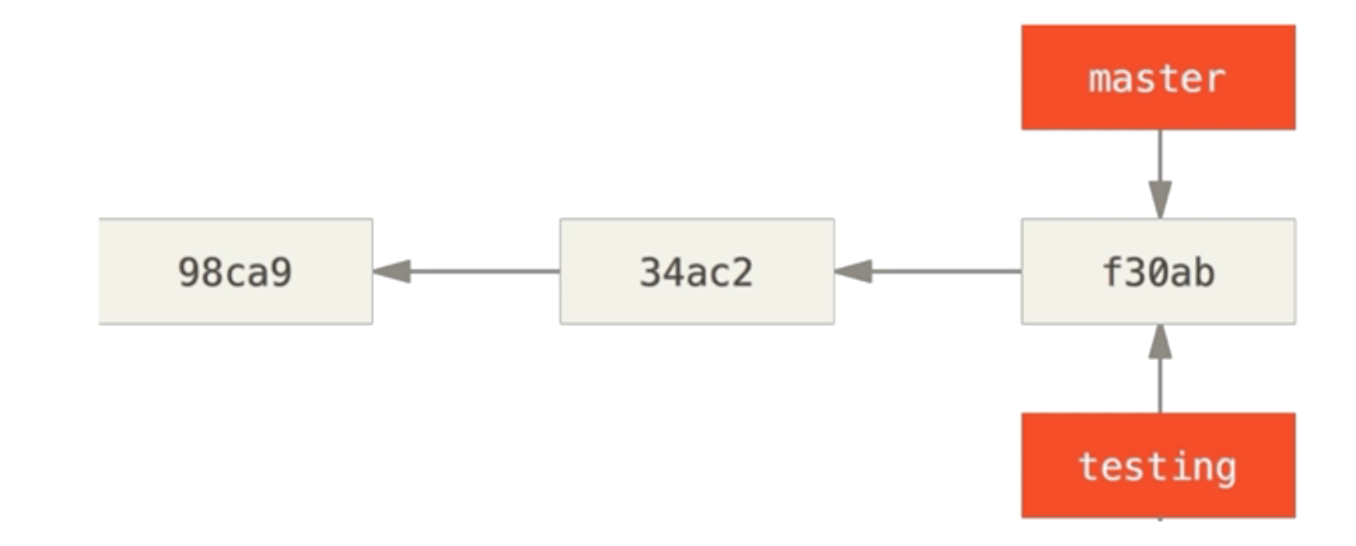
8.png

创建分支

  • 创建分支只是为你创建了一个可以移动的新的指针
1
2
3
4
5
[root@aliyun myweb]$ git branch testing
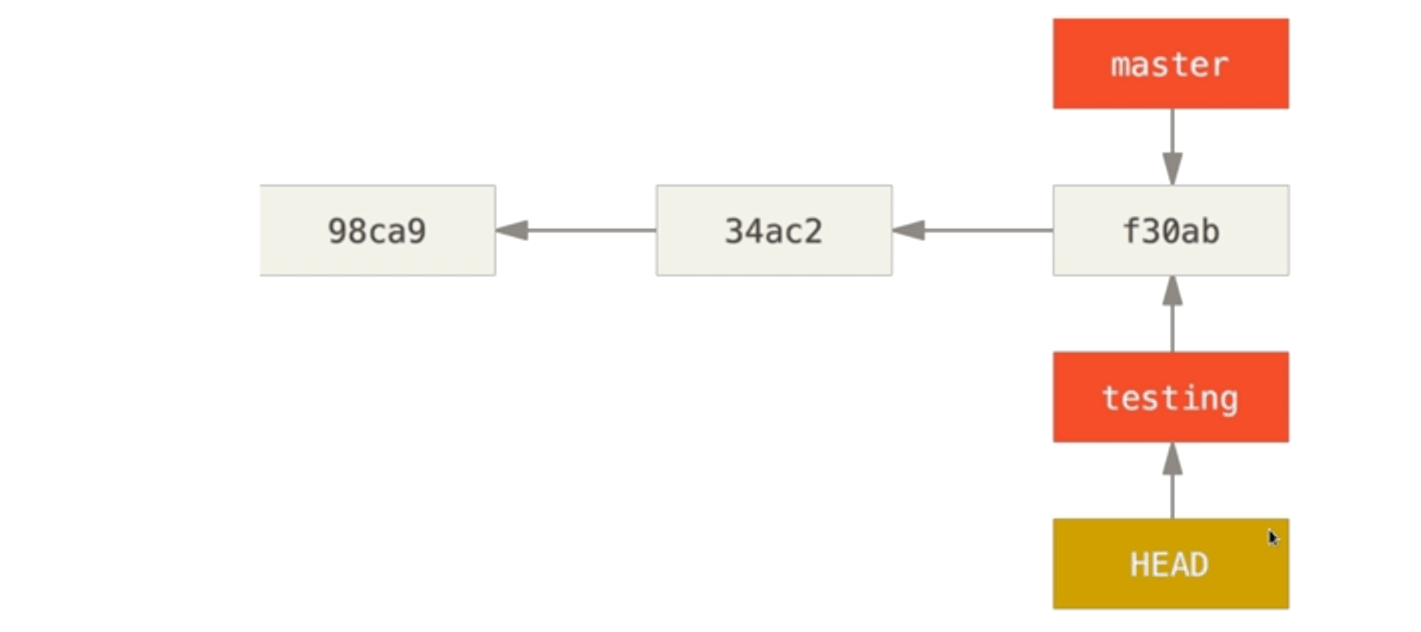
[root@aliyun myweb]$ git branch
* master
testing

9.png

切换分支

  • 创建分支并不会切换分支
  • 要切换一个已存在的分支,你需要使用git checkout
1
2
3
4
5
6
[root@aliyun myweb]$ git checkout testing 

[root@aliyun myweb]$ git branch
master
* testing

10.png

合并分支

  • 每个分支都可以继续进行提交
  • 分支功能完成后,可以汇入主干分支
1
2
3
4
5
6
7
8
9
10
11
12
13
14
15
16
17
18
19
20
21
22
[root@aliyun myweb]$ git branch 
master
* testing

[root@aliyun myweb]$ cp /etc/hosts .
[root@aliyun myweb]$ git add .
[root@aliyun myweb]$ git commit -m "add hosts"

#master分支下不存在hosts文件
[root@aliyun myweb]$ git checkout master
[root@aliyun myweb]$ ls
function.txt README.md

[root@aliyun myweb]$ cp /etc/passwd .
[root@aliyun myweb]$ git add .
[root@aliyun myweb]$ git commit -m "add passwd"

#testing分支下不存在passwd文件
[root@aliyun myweb]$ git checkout testing
[root@aliyun myweb]$ ls
function.txt hosts README.md

  • 合并分支
1
2
3
4
5
6
7
8
9
10
[root@aliyun myweb]$ git branch 
master
* testing
[root@aliyun myweb]$ git checkout master

[root@aliyun myweb]$ git merge testing

[root@aliyun myweb]$ ls
function.txt hosts passwd README.md

  • 分支版本冲突问题
  • 在不同分支中修改相同的文件相同行数据,模拟数据冲突
1
2
3
4
5
6
7
8
9
10
11
12
13
14
15
16
17
18
[root@web2 project]# git checkout hotfix
[root@web2 project]# echo "AAA" > a.txt
[root@web2 project]# git add .
[root@web2 project]# git commit -m "add a.txt by hotfix"

[root@web2 project]# git checkout master
[root@web2 project]# echo "BBB" > a.txt
[root@web2 project]# git add .
[root@web2 project]# git commit -m "add a.txt by master"
[root@web2 project]# git merge hotfix

[root@web2 project]# cat a.txt
<<<<<<< HEAD
BBB
=======
AAA
>>>>>>> hotfix
#自动合并失败,修正冲突然后提交修正的结果

删除分支

  • 删除分支git branch -d name
1
2
3
4
5
6
7
8
9
[root@aliyun myweb]$ git branch 
* master
testing

[root@aliyun myweb]$ git branch -d testing

[root@aliyun myweb]$ git branch
* master